If you create an application or API that is secured with Microsoft Entra ID, you are likely going to require a consumer of your application to provide an OAuth access token in order to access your application or API. The caller would have to obtain this token from Entra ID by first authenticating with Entra ID and then request a token for your application.
For the rest of this post, I’m going to assume you are working with a REST API, but everything applies to an application as well.
But anyone can create an OAuth access token. It’s just a JSON object that has a set schema and then base64 encoded. There’s nothing secure about it.
What legitimizes its use as a security token is that the creator of the token digitally signs the token with a public-private key pair. The creator of the token uses their private key and includes the result in the OAuth access token in the JWT (JavaScript Web Token) format.
If you’ve elected to use Entra ID to secure your REST API, you have established a trust with Entra ID. Therefore, when you receive the OAuth access token from the caller, you should first validate two things:
- This token was generated by Entra ID & its contents have not been altered
- This token is intended to be used only by “me”
Validating the intended audience
The second part of this validation process is very simple. You need to check the audience part of the JWT token. This is listed as the aud property and it contains the URI of the audience the token is intended for.
Confused? Think of this like the street address of your home. A key used to unlock your front door has this address on it. A key with a different address should not be “validated” and allowed to open your front door because it is intended to be used with someone else’s front door (aka: a different audience).
You can ensure the audience property in the token was set by Entra ID because you previously validated that the token was generated by Entra ID and it’s contents have not been altered.
Wait… we skipped that part… let’s jump back…
Validating JWT tokens were created by Microsoft Entra ID
So… how you do validate an Entra ID JWT token, or more specifically - how do you validate a JWT token was created by Microsoft Entra ID?
A JWT token contains three sections:
- header: specifies the algorithm used to digitally sign the token & type of the token
- payload: the data in the JWT token… what we want to work with
- verification signature: this part contains the digital signature of the token that was generated by Entra ID’s private key.
The way you validate the authenticity of the JWT token’s data is by using Entra ID’s public key to verify the signature. If it works, you know the contents were signed with the private key. If not, you can’t be sure of it so you should treat the JWT token as an invalid token.
So… back to the question: how you do validate an Entra ID JWT token?
Option 1 - Manually obtain the Entra ID public key
Let’s start by looking at the manual process of obtaining the public key
You first need to obtain the Entra ID public key. To do this, start by calling the public Entra ID OpenID configuration endpoint: https://login.microsoftonline.com/common/.well-known/openid-configuration:
curl --location 'https://login.microsoftonline.com/common/.well-known/openid-configuration'
{
  "token_endpoint": "https://login.microsoftonline.com/common/oauth2/token",
  "token_endpoint_auth_methods_supported": [
    "client_secret_post",
    "private_key_jwt",
    "client_secret_basic"
  ],
  "jwks_uri": "https://login.microsoftonline.com/common/discovery/keys",
  "response_modes_supported": [ "query", "fragment", "form_post" ],
  "subject_types_supported": [ "pairwise" ],
  "id_token_signing_alg_values_supported": [ "RS256" ],
  "response_types_supported": [
    "code", "id_token", "code id_token", "token id_token", "token"
  ],
  "scopes_supported": [ "openid" ],
  "issuer": "https://sts.windows.net/{tenantid}/",
  "microsoft_multi_refresh_token": true,
  "authorization_endpoint": "https://login.microsoftonline.com/common/oauth2/authorize",
  "device_authorization_endpoint": "https://login.microsoftonline.com/common/oauth2/devicecode",
  "http_logout_supported": true,
  "frontchannel_logout_supported": true,
  "end_session_endpoint": "https://login.microsoftonline.com/common/oauth2/logout",
  "claims_supported": [
    "sub", "iss", "cloud_instance_name", "cloud_instance_host_name",
    "cloud_graph_host_name", "msgraph_host", "aud", "exp", "iat", "auth_time",
    "acr", "amr", "nonce", "email", "given_name", "family_name", "nickname"
  ],
  "check_session_iframe": "https://login.microsoftonline.com/common/oauth2/checksession",
  "userinfo_endpoint": "https://login.microsoftonline.com/common/openid/userinfo",
  "kerberos_endpoint": "https://login.microsoftonline.com/common/kerberos",
  "tenant_region_scope": null,
  "cloud_instance_name": "microsoftonline.com",
  "cloud_graph_host_name": "graph.windows.net",
  "msgraph_host": "graph.microsoft.com",
  "rbac_url": "https://pas.windows.net"
}
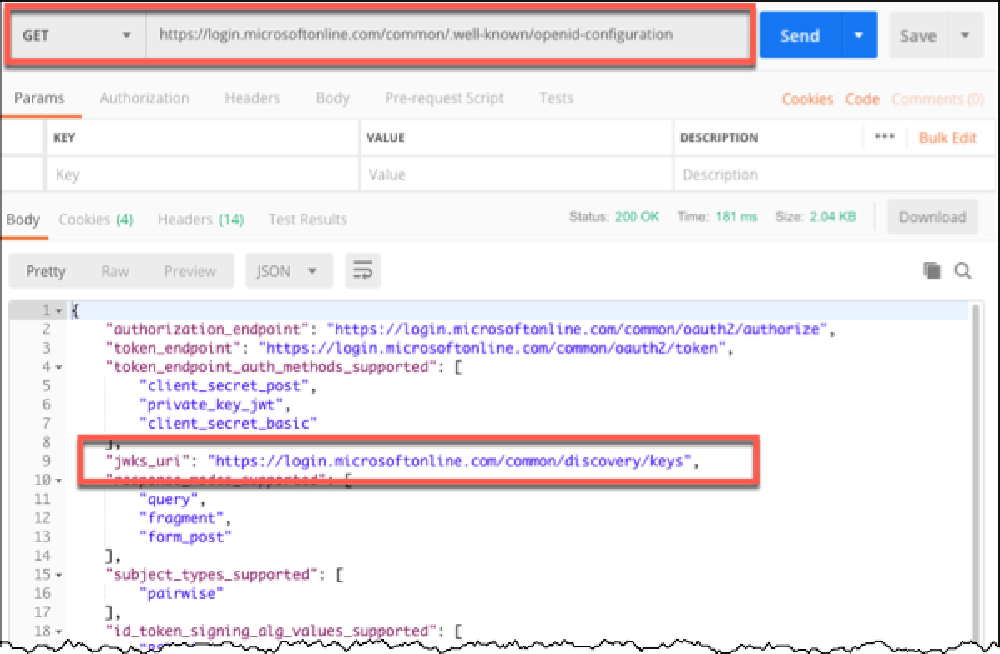
Results of a request for the OpenID configuration with Postman
Within the JSON response, you’ll see a property jwks_uri which is the URI that contains the JSON Web Key Set for Entra ID. For Entra ID, that URI is https://login.microsoftonline.com/common/discovery/keys. This endpoint returns a collection of the public keys that Entra ID used to sign the token.
Entra ID actually uses the private key that’s part of the public-private key pair. The private key is natually kept secret and not shared, but the public key is shared so anyone can validate the content was digitally signed with the matching private key.
When you go there, you’ll see an array of keys. Each key has a set of properties. I’m only interested in a few of these, but you can learn about all properties here if you’re interested.
Submit an HTTP GET request to get a list of all the keys:
curl --location 'https://login.microsoftonline.com/common/discovery/keys'
{
  "keys": [
    {
      "kty": "RSA",
      "use": "sig",
      "kid": "-sxMJMLCIDWMTPvZyJ6tx-CFxw0",
      "x5t": "-sxMJMLCIDWMTPvZyJ6tx-CFxw0",
      "n": "hu2SJrLlDOUtU2s9T6_OMITTED_FOR_BREVITY",
      "e": "AQAB",
      "x5c": [ "MIIC/jCCAeagAwIBAgIJA_OMITTED_FOR_BREVITY" ]
    },
    {
      "kty": "RSA",
      "use": "sig",
      "kid": "MGLqj98VNLoXaFfpJCBpgB4JaKs",
      "x5t": "MGLqj98VNLoXaFfpJCBpgB4JaKs",
      "n": "yfNcG8Ka_b4R7niLqd_OMITTED_FOR_BREVITY",
      "e": "AQAB",
      "x5c": [ "MIIC/jCCAeagAwIBAgIJAJtuCSy_OMITTED_FOR_BREVITY" ]
    },
    // more keys omitted for brevity...
  ]
}
What you’re looking for is a key that has the same thumbprint of the x.509 certificate (SHA-1 thumbprint) that’s listed in the header of the JWT token you got from Entra ID. How do you get that?
I’m going to use https://jwt.io (my favorite tool) to easily decode a real JWT token I got from calling the Microsoft Graph. Look at the header value:
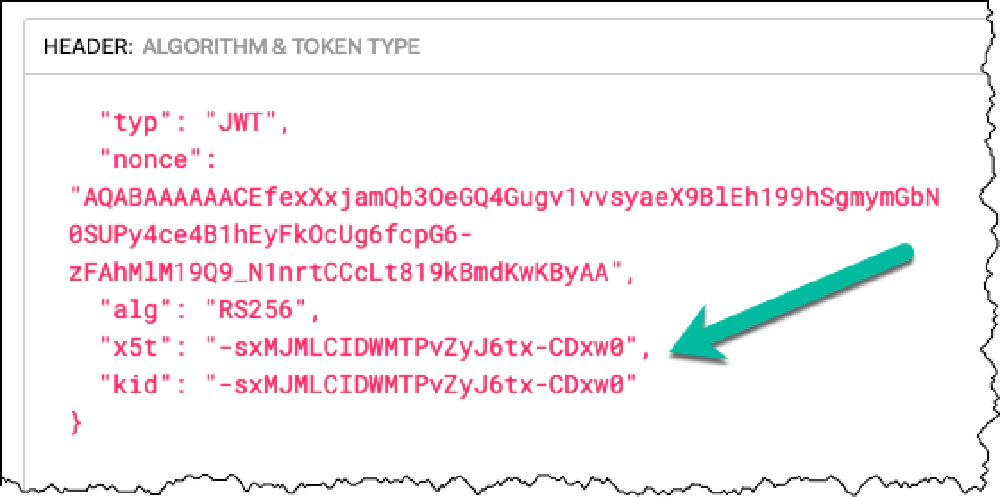
Locate the key ID (`kid`) property
Using the key ID (kid) property, I can tell which key used to digitally sign the token. So going back to the JSON Web Key Set URL for Entra ID, I’ll find the matching key.
{
  "keys": [
    {
      "kty": "RSA",
      "use": "sig",
      "kid": "-sxMJMLCIDWMTPvZyJ6tx-CFxw0",
      "x5t": "-sxMJMLCIDWMTPvZyJ6tx-CFxw0",
      "n": "hu2SJrLlDOUtU2s9T6_OMITTED_FOR_BREVITY",
      "e": "AQAB",
      "x5c": [ "MIIC/jCCAeagAwIBAgIJA_OMITTED_FOR_BREVITY" ]
    },
    {
      "kty": "RSA",
      "use": "sig",
      "kid": "MGLqj98VNLoXaFfpJCBpgB4JaKs",
      "x5t": "MGLqj98VNLoXaFfpJCBpgB4JaKs",
      "n": "yfNcG8Ka_b4R7niLqd_OMITTED_FOR_BREVITY",
      "e": "AQAB",
      "x5c": [ "MIIC/jCCAeagAwIBAgIJAJtuCSy_OMITTED_FOR_BREVITY" ]
    },
    // more keys omitted for brevity...
  ]
}
Once you find the key, take the value in in the x5c property and wrap it in the begin and end certificate markers: -----BEGIN CERTIFICATE-----<newline><key><newline>-----END CERTIFICATE-----.
This new string is what you can use as the public key to validate a JWT token. For instance, using the npm package jsonwebtoken, you can do it like this:
import jwt = require('jsonwebtoken');

const decodedValidToken = (accessToken: string) => {
  const key: string = '-----BEGIN CERTIFICATE-----\nMIIC/jCCAeagAwIBAgIJA_OMITTED_FOR_BREVITY\n-----END CERTIFICATE-----';

  // decode & verify token
  return jwt.verify(accessToken, key);
}

const authorizationHeader: string = req.headers.authorization;
const decodedToken = (decodedValidToken(authorizationHeader.replace('Bearer ','')) as any);
If no errors were thrown and you got a token back, you have yourself a validated JWT token that you can trust was created by Entra ID and has not been tampered since Entra ID generated it!
If errors were thrown, you can check for specific issues with the validation process, as documented in the jsonwebtoken npm package: Errors & Codes
Option 2 - Obtain the Entra ID public key with jwks-rsa
In addition to the manual process I walked through above, you can use the jwks-rsa NPM package to get the key from the JWKS endpoint.
To do this, install and import the package in your JavaScript/TypeScript project, then configure it:
const jwksClient = require('jwks-rsa');

const client = jwksClient({
  jwksUri: 'https://login.microsoftonline.com/common/discovery/keys',
  requestHeaders: {},
  timeout: 30000 // 30s (default)
});
Next, retrieve the public key by passing the key ID property in. Using our previous example, you can do that using the following:
const kid = '-sxMJMLCIDWMTPvZyJ6tx-CFxw0';
const key = await client.getSigningKey(kid);
const signingKey = key.getPublicKey();
Finally, you can validate the token using the same jsonwebtoken library:
import jwt = require('jsonwebtoken');

const decodedValidToken = (accessToken: string) => {
  const key: string = `-----BEGIN CERTIFICATE-----\n${signingKey}\n-----END CERTIFICATE-----`;

  // decode & verify token
  return jwt.verify(accessToken, key);
}

const authorizationHeader: string = req.headers.authorization;
const decodedToken = (decodedValidToken(authorizationHeader.replace('Bearer ','')) as any);
Continue Validating the Token’s Claims
At this point, we’ve validated the token was created by Microsoft Entra ID who we trust. But you shouldn’t stop there… you should then validate the contents of the token are what you expect them to be.
Think of it like this: say you have a house with a single door on it. In order to gain access to the door, you need to use a key to unlock the door. All we’ve done so far is to validate it’s a real key. But, we shouldn’t accept just any key… we should ensure the key is valid for this house.
To do this, you look at the payload of the JWT token and validate the different properties, known as claims.
Remember the aud, or audience claim, I mentioned at the beginning of this article? That claim is in the payload. There are a lot of claims you can validate again. For example:
- audience (
aud): The intended recipient of the token. For example, if you get a token for Microsoft Graph, Microsoft Graph will validate the token’saudclaim contains the Microsoft Graph. - issuer (
iss): The issuer, or authorization server, of the token. In our case, this will be the Microsoft Entra ID tenant that the user was authenticated with. You can use this to only support tokens from a specific list of tenants. - subject (
sub): The subject, or user, of the token. - Time-related claims:
- issued at time (
iat): When was this token issued. - not before time (
nbf): Time before the JWT must not be accepted. - expiration time (
exp): Time when this token expires.
- issued at time (
- Identity-related claims:
- tenant ID (
tid): The tenant the user is signed in to. This won’t change. - object ID (
oid): The ID of the user object in the tenant. This won’t change. - name (
name): The human-readable name of the user (aka:sub) of the token. - preferred username (
preferred_username): This could be the user’s email address, but it could also be a phone humber or generic name. This can change over time.
- tenant ID (
- Security and permission claims:
- roles (
roles): Set of roles assigned to the user of the claim. - scopes (
scp): List of the permissions, or scopes, the user has granted consent to the app that specifies what the token has rights to do. - token type (
idtyp): Thi sis used to indicate the token is anapptoken, ausertoken, ordevicetoken.
- roles (
Access Token Claims Reference
Learn more about all the optional claims in JWT tokens from the Microsoft Entra documentation: Access token claims reference.
Depending on the needs and requirements for your application, you should validate the JWT token your app receives is valid. You can do this validation manually, or you could use a library. For example the jwt-validate is one such example from a Microsoft 365 Cloud Developer Advocate, Waldek Mastykarz.
Be Careful Trusting Libraries
As with any library you take a dependency on, make sure you verify the library & trust the publisher.
Download Article Resources
Want the resources for this article? Enter your email and we'll send you the download link.
Microsoft MVP, Full-Stack Developer & Chief Course Artisan - Voitanos LLC.
Andrew Connell is a full stack developer who focuses on Microsoft Azure & Microsoft 365. He’s a 21-year recipient of Microsoft’s MVP award and has helped thousands of developers through the various courses he’s authored & taught. Whether it’s an introduction to the entire ecosystem, or a deep dive into a specific software, his resources, tools, and support help web developers become experts in the Microsoft 365 ecosystem, so they can become irreplaceable in their organization.
