The Problem
When you had custom code to deploy in WSS v2, primarily Web Parts, you packaged them up in a Web Part Package using WPPackager for deployment on your servers. Unfortunately it wasn’t the easiest tool to use, nor was it error-free. Thankfully Microsoft has abandoned the WPPackager utility in WSS v3 in favor solution files. A solution file is a Windows SharePoint Services solution package that is really just a CAB with a WSP extension. You can use solutions to deploy Web Parts & associated files (such as resource files, images, CSS, etc), add safe control entries, deploy the CAS policy changes, features, and so on… (read the documentation in the WSS SDK linked at the end of this post for more info).
The only downside is that building CAB files isn’t the easiest or most straightforward thing to do. Visual Studio 2005 includes a set up project template that you can use to include another project’s output, but it has two limitations… one very big one:
- It will only generate
*.CABfiles, even if you try to rename the settings, it will always generate a*.CABfile, but more importantly… - It doesn’t allow you to create subfolders in your
*.WSPwhich localized deployments require.
Your other option is to get the Microsoft Cabinet SDK that includes the MakeCAB.EXE utility, craft a diamond directive file (*.DDF), and build the *.WSP that way. Yuck… there must be an easier way!
Overview
There is! With just a little work, you can configure your Visual Studio 2005 project, using MSBuild and MakeCAB.exe, to create the *.WSP file for you. Tony’s post on how he did it to deploy a WSS v3 Feature shows one way to do this… I implemented a similar set up.
The process is actually quite simple. You’ll create a new MSBuild targets file (basically an instruction file) that will execute the MakeCab.exe, passing in a DDF. You’ll also need to create the DDF file that tells MakeCab.exe what it needs to build a CAB. Then you tell MSBuild that after it compiles the project, it needs to kick off the new targets file you created.
Prerequisite
You need to download and extract the Microsoft Cabinet SDK to your dev machine where you’ll build this project. I extracted the contents of the SDK to c:\Program Files\Microsoft Cabinet SDK, but you can put yours anywhere you like (just make sure to make the appropriate changes to the custom targets file in step 5 below.
Modifying Visual Studio 2005 Projects to generate WSS v3 Solution Packages (*.WSP’s)
In this article I’ll walk through creating a simple feature that provisions a master page and preview image into the Master Page Gallery in a Publishing site. Steps 1-3 are nothing special… steps 4-6 utilizes the MakeCab.exe utility by leveraging MSBuild. It’s these latter steps (4-6) that I consider customization steps… but it’s only three steps!
Step 1 - Create a Visual Studio 2005 C# empty project
I’m not going to detail this step, here… all I’ve done is create a new Visual Studio 2005 project using the Empty Project template as shown in Figure 1.
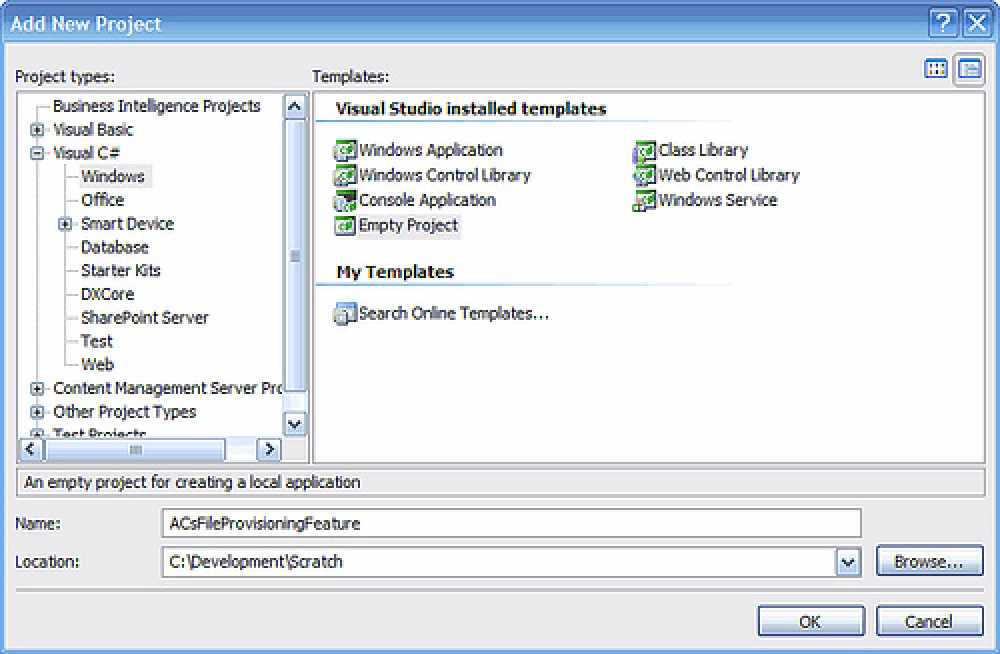
Figure 1: Visual Studio 2005 Add Project Dialog
Step 2 - Add all files necessary for the feature
Nothing special here, just everything that you’ll need for your feature. I just copy everything within the feature directory into the root of the project, then add them one by one to the project as existing items. You should how have a feature that looks like Figure 2.
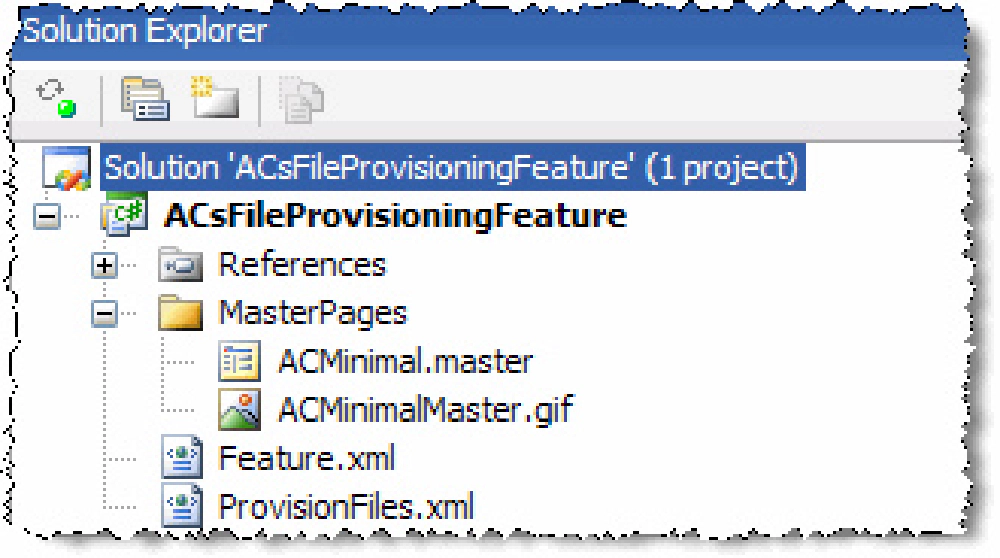
Figure 2: Project containing feature files
Step 3 - Add a Manifest.XML file to the project
When you deploy your solution it must contain a manifest.xml file detailing everything that’s in the WSP file. Since my feature is quite simple, my manifest file is quite simple as well as shown:
<?xml version="1.0" encoding="utf-8" ?>
<Solution xmlns="http://schemas.microsoft.com/sharepoint/"
          SolutionId="F4D7E21A-6227-41ac-881A-E08A3356230B"
          DeploymentServerType="WebFrontEnd">

  <FeatureManifests>
    <FeatureManifest Location="ACsFileProvisioningFeature\feature.xml" />
  </FeatureManifests>

</Solution>
Step 4 - Create a diamond directive file (*.DDF)
These are similar to *.INF files. DDF files are broken down into two parts: setting some variables and specifying the payload of the generated cabinet file. For all my DDF’s, I use the same top part, up to the line of asterisks (a comment line). Next comes the payload.
Two things to note here: (1) files are relative to the current directory (the way I’ve set this up, it will always be the root of the project) and (2) when you want to create a subdirectory within the generated cabinet file, you need to set the DestinationDir variable. All files following that statement will be added to that subdirectory:
.OPTION Explicit
.Set DiskDirectoryTemplate=CDROM
.Set CompressionType=MSZIP
.Set UniqueFiles=Off
.Set Cabinet=On
;***********************************************
Manifest.xml

.Set DestinationDir=ACsFileProvisioningFeature
Feature.xml
ProvisionFiles.xml

.Set DestinationDir=ACsFileProvisioningFeature\MasterPages
MasterPages\ACMinimal.master
MasterPages\ACMinimalMaster.gif
Step 5 - Add custom MSBuild targets file
Now we need to create the instructions that we’ll feed MSBuild to execute MakeCab.exe to generate our cabinet file. The first piece to this is in the opening <project> node. It tells MSBuild the default target to run (which we’ll define in a moment). Next, it creates a custom property called MakeCabPath which contains the path to the MakeCab.exe utility.
Now for the meat & potatoes: the custom MSBuild targets instructions. You’ll see two <exec> nodes which will execute one command each when we build our project. The first one calls MakeCab.exe passing in three parameters:
- DDF file: This is the instruction set for MakeCab.exe we created in the previous step. MakeCab.exe uses this to create the payload of the cabinet file.
- CabinetNameTemplate: This tells MakeCab.exe what to name the output cabinet file. This isn’t something you can do with Visual Studio’s CAB Project template!
- DiskDirectory1: This tells MakeCab.exe where to put the generated cabinet file.
Refer to the next code sample for the custom targets file. A few things to note here:
- I’m running MakeCab.exe a second time if you build using the Debug configuration (note the
Conditionattribute on line 13). This time, I build the cabinet but as a*.CABfile, not as a*.WSPfile. Why? Because you can double-click into a*.CABfile in Windows Explorer to see its contents (good for debugging). - All output is saved to the
$(OutputPath)SpPackagedirectory. This will result in aSpPackagefolder being created in thebin\debugorbin\releasefolder depending on which Configuration you build under.
<?xml version="1.0" encoding="utf-8" ?>
<Project xmlns="http://schemas.microsoft.com/developer/msbuild/2003"
         DefaultTargets="SharePointFeaturePackage">

  <PropertyGroup>
    <MakeCabPath>"C:\Program Files\Microsoft Cabinet SDK\BIN\MAKECAB.EXE"</MakeCabPath>
  </PropertyGroup>

  <Target Name="SharePointFeaturePackage">
    <!-- create Windows SharePoint Services solution package (WSP) file -->
    <Exec Command="$(MakeCabPath) /F SharePointFeaturePackage.ddf
                      /D CabinetNameTemplate=$(MSBuildProjectName).wsp
                      /D DiskDirectory1=$(OutputPath)SpPackage\" />
    <!-- create exact same file as above, but name it *.CAB to make
        it easier to open an view it's contents -->
    <Exec Condition=" '$(Configuration)|$(Platform)' == 'Debug|AnyCPU'"
          Command="$(MakeCabPath) /F SharePointFeaturePackage.ddf
                      /D CabinetNameTemplate=$(MSBuildProjectName).cab
                      /D DiskDirectory1=$(OutputPath)SpPackage\" />
  </Target>
</Project>
Step 6 - Modify project file to import & call custom targets file after building the project
Finally, the last step is to configure your project file so that MSBuild will run our instructions in our custom targets file instead of the default instructions. To do this, you need to unload the project by right-clicking it in the Solution Explorer tool window and selecting Unload Project (refer to Figure 3). Now, right-click the project again in Solution Explorer and select Edit [project name].csproj. Make the following changes:
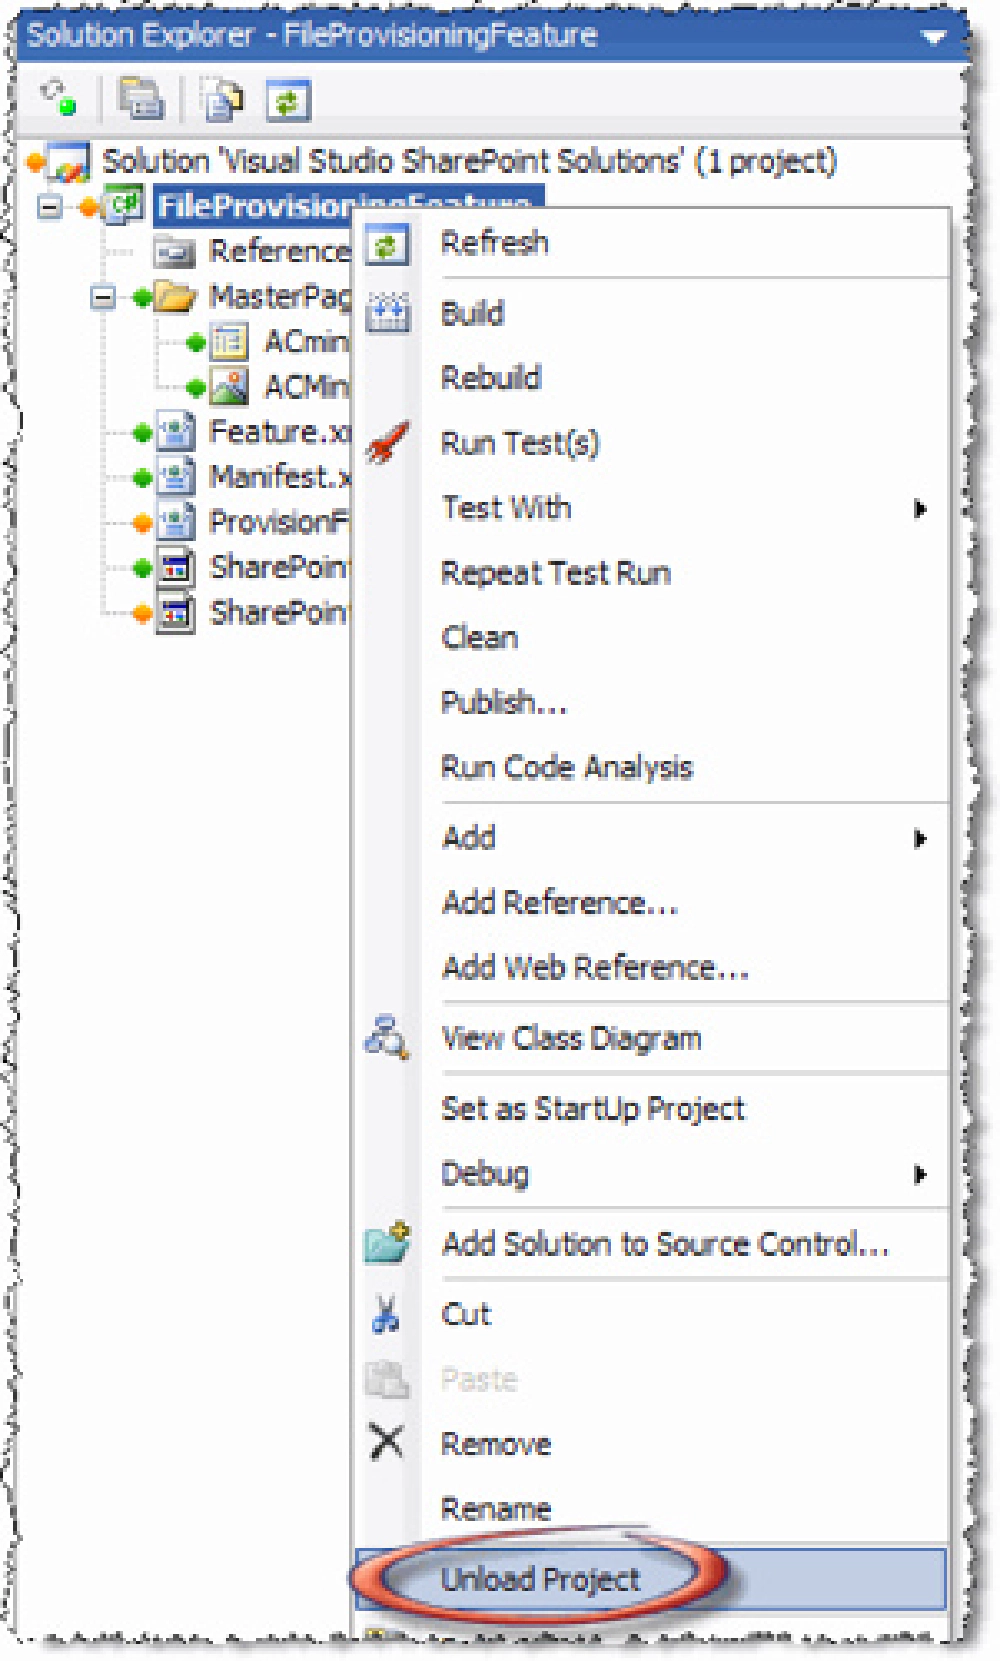
Figure 3: Unloading a project
- Change the DefaultTargets attribute in the opening
<project></project>node from Build to SharePointFeaturePackage. - On (or about) line 31, change the node’s
Projectattribute toSharePointFeaturePackage.Targets. This tells MSBuild to use our targets file, not the Csharp targets file (usually used for compiling).
Refer to Figure 4 for what your project file should look like. Save your changes, then right-click the project in the Solution Explorer window and select Reload Project (if prompted with a security warning, select Load project normally).
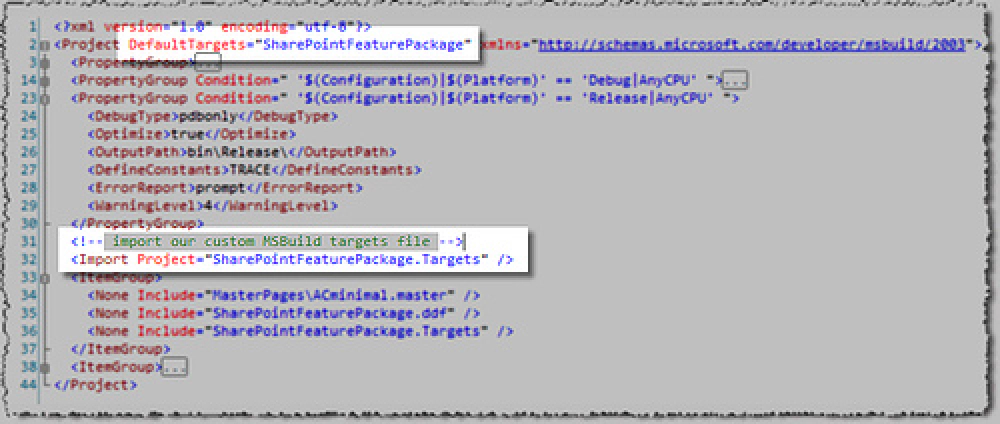
Figure 4: Customized project file (*.csproj)
That’s it! Now build your solution. When you look in your \bin\debug\SpPackage directory, you’ll see two files, a *.CAB and a *.WSP. Use STSADM.EXE to add the solution to the solution store using the following command at a prompt:
STSADM -o addsolution -filename ACsFileProvisioningFeature.wsp
With your solution added to the solution store, you now need to deploy it. You can do that from the command line, or by going to Central Administration, selecting the Operations tab, then Solution Management under the Global Configuration section. Select your solution then click Deploy Solution. Once it’s deployed, you should see your feature in the [..]\12\TEMPLATE\FEATURES directory.
Finally, browse to a Publishing site, select Site Actions > Site Settings > Modify All Site Settings, then select Site Collection Features under the Site Collection Administration and click Activate for your feature (in my case, it’s called File Provisioning Feature Sample 1) to provision the files. Check the Master Page Gallery (Site Actions > Manage Content and Structure, then select Master Page Gallery) and you should see your custom master page in the list as shown in Figure 5. Very cool!
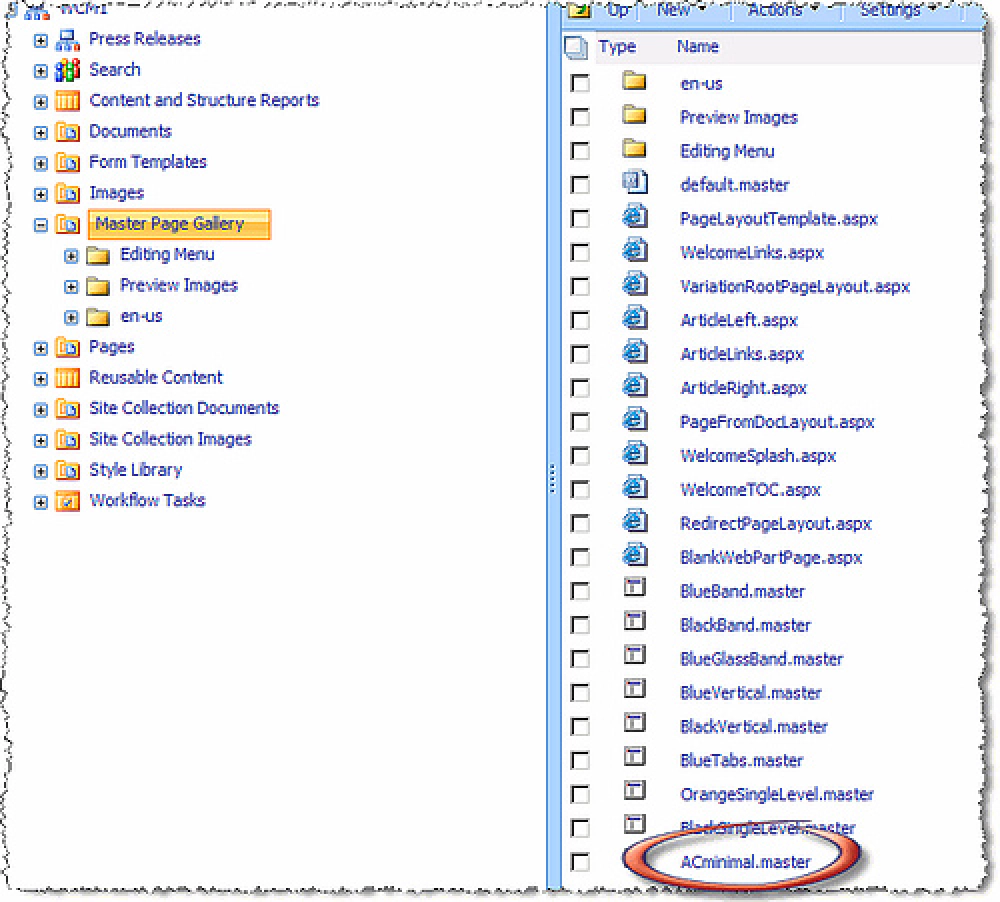
Figure 5: Provisioned File!
You can download the project I used in writing this article here: ACsFileProvisioningFeature.
Extras
- Visual Studio 2005 external tools & customizing the toolbar: Make your life easier as a SharePoint developer and add the STSADM commands AddSolution, UpgradeSolution, DepolySolution, and RetractSolution to your External Tools in Visual Studio and then create a custom toolbar like I have in Figure 6. Tony has another post on how he did it (note: his commands won’t work exactly with the steps outlined in this article… but you should be able to figure them out; basically one or two of the macros he uses in the arguments aren’t defined in our project because we didn’t use the C# targets file). Refer to a previous post on how to add items to the toolbars in Visual Studio 2005.

Figure 6: Custom toolbar commands
- Gocha: If you make changes to your custom MSBuild targets file, note you’ll have to unload & reload your project to have those changes picked up. Visual Studio will cache the targets files when it loads a project so your changes won’t be taken into consideration when MSBuild runs unless the project is refreshed. Thanks again to Tony Bierman for helping me out on this one.
- Reference links:
- Microsoft Cabinet SDK: http://support.microsoft.com/default.aspx/kb/310618
- WSS v3 SDK - Solution Overview: https://msdn2.microsoft.com/library/aa543214.aspx
- WSS v3 SDK - Creating a Solution: https://msdn2.microsoft.com/library/aa543741.aspx
- Tony Bierman’s VS 2005 Feature Project post: http://sharepointsolutions.blogspot.com/2006/10/anatomy-of-sharepoint-wss-v3-feature.html
- Tony Bierman’s VS 2005 External Tools post: http://sharepointsolutions.blogspot.com/2006/10/automation-in-visual-studio-2005-for.html
- Sample VS 2005 File Provisioning Feature project: ACsFileProvisioningFeature.zip

Microsoft MVP, Full-Stack Developer & Chief Course Artisan - Voitanos LLC.
Andrew Connell is a full stack developer who focuses on Microsoft Azure & Microsoft 365. He’s a 20+ year recipient of Microsoft’s MVP award and has helped thousands of developers through the various courses he’s authored & taught. Whether it’s an introduction to the entire ecosystem, or a deep dive into a specific software, his resources, tools, and support help web developers become experts in the Microsoft 365 ecosystem, so they can become irreplaceable in their organization.


