In this article I am going to show you how to take a custom Publishing site you’ve created using Office SharePoint Server 2007 (MOSS 2007) Web Content Management and upgrade it to a SharePoint Server 2010 (SPS2010) Web Content Management (WCM). For my case I’m going to use a sample that’s fairly close to a real world scenario, but I want to use one that will be easy for you to replicate in your own environment.
You may be familiar with the Adventure Works Travel sample SharePoint 2007 Publishing site Microsoft released in 2009. That sample included a lots of content in a content database along with a slew of code in various solutions (*.wsp’s). First I simplified things by stripping down as much of the code dependencies and moved to making it as close to a content database only upgrade.
Step 1 - Prepare the Environment Restore the Content DB & Create the Web Application
I’ve made the Adventure Works Travel (AWT) content database that I customized available on the Critical Path Training Members downloads. Check the Code Samples section for the download after logging (note there are two parts to this as it is a spanned self-extracting ZIP). You’ll need to sign in to the site but if you don’t have a sign in don’t worry, they are free to create.
After extracting the single BAK file from the ZIP, you need to restore it to your database server. For me, I’ll call this database WSS_Content_AdventureWorksTravel.
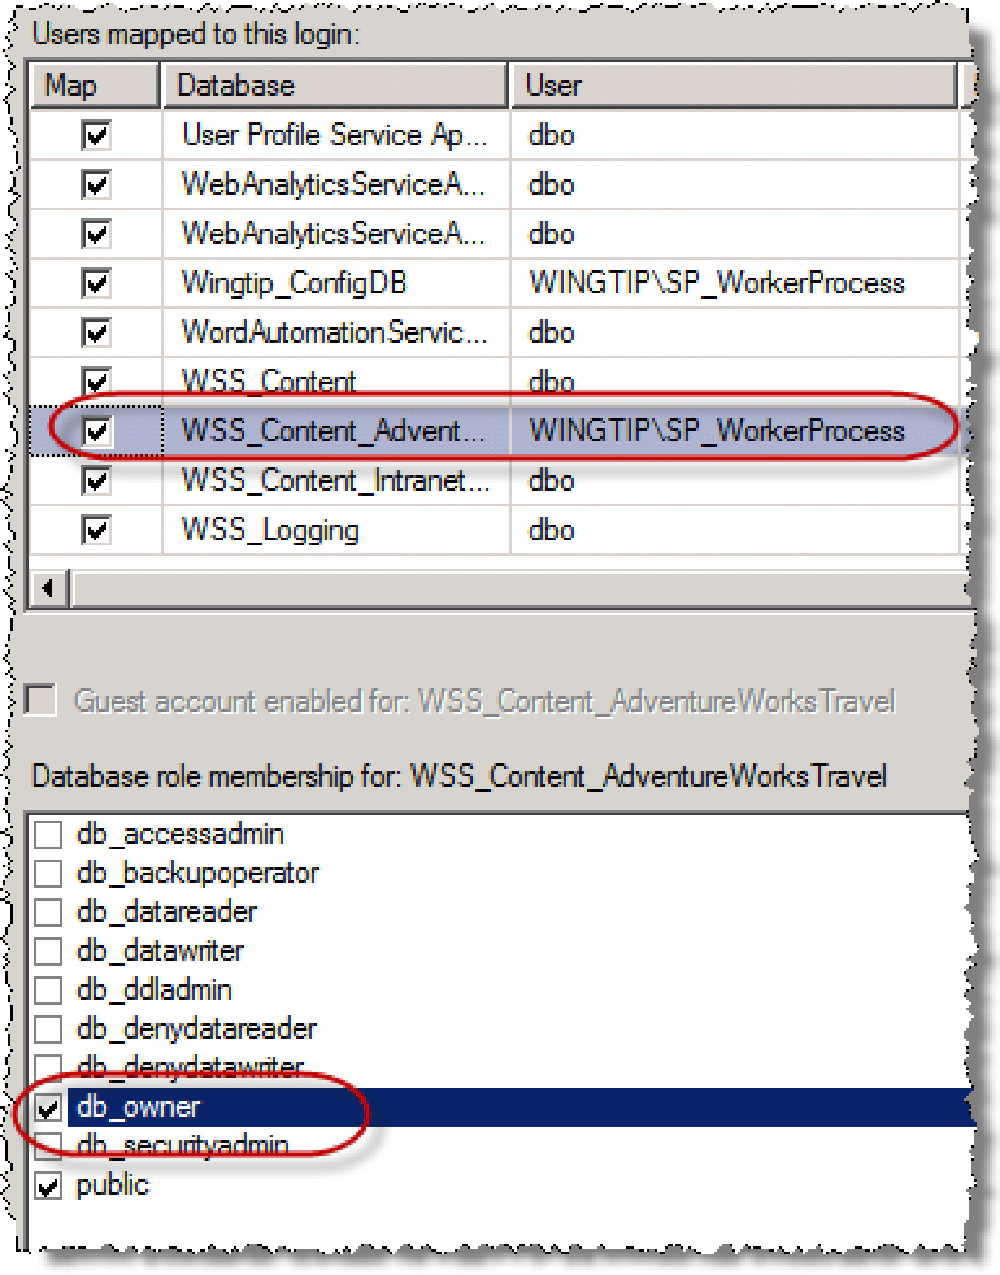
Once the DB has been restored you now need to set up the proper security settings on it. To do this grab the SharePoint farm account as well as the identity of the application pool that will access it (for me SP_WorkerProcess) and grant them DBO rights to that database.
Upgrade Site Collection
With the database restored and configured, now you need to create the Web application that will host the AWT site. This is straightforward… simply create a new Web application using Central Administration. For my sample I’ll use the URL http://www.adventureworkstravel.com and I’ll also set the name of the content DB to WSS_Content_Disposable_AWT. I like to use a name that indicates that this thing is disposable because we won’t use it as you’ll see in a minute. We just have to create one in this step. This way when I look at my list of DB’s in SQL, it’s easy to spot which one is disposable and can be deleted. Oh, when prompted to create a site collection just skip that step. We won’t be keeping this content DB around anyway.
Step 2 – Restore the Adventure Works Travel site in SharePoint 2010
In this step we’ll get the SharePoint 2007 AWT site working in our SharePoint 2010 environment. This won’t do anything that the customer will notice… it simply gets the site working on the SharePoint 2010 software.
There are plenty of options for upgrading a site from MOSS 2007 to SharePoint 2010. In my case I’m going ot use the super simple option known as “DB Attach”. In this model you simply associate the content DB with the new Web application. This process upgrades the MOSS 2007 schema to SharePoint 2010.
Before doing this you need to remove the content DB from the Web application you created in step 1:
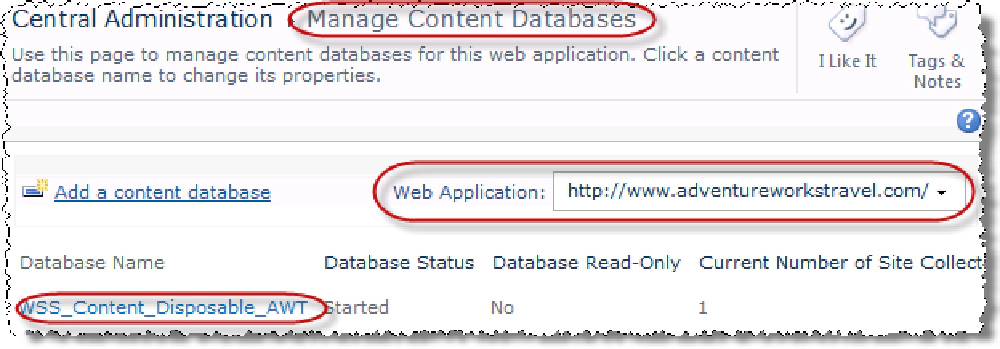
- Open Central Administration and select Application Management > Manage content databases (from the Databases group).
- Verify the www.adventureworks.com Web application is selected (as indicated by the selector in the upper-right corner of the Central Administration > Manage Content Databases page).
- Select the only content database shown, WSS_Content_Disposable_AWT.
- On the next page, check the Remove content database option and click OK.
Upgrade Site Collection
Now that the Web application doesn’t have a content DB associated with it we can add the restored DB to the Web application. To do this use the Windows PowerShell cmdlet Mount-SPContentDatabase:
PS c:\Mount-SPContentDatabase
    -Name WSS_Content_AdventureWorksTravel
    -WebApplication "http://www.adventureworkstravel.com"

Upgrade Site Collection
After running this cmdlet, which will run for a few minutes, you’ll see a bunch of errors reported. In the real world this should raise a red flag that you need to address some issues as they are reported. In my case here I can ignore them. What they are reporting is that some files that are referenced in the content DB aren’t found on the file system. Frankly, I couldn’t strip out all the customizations in prepping this database, but these won’t affect us that much so you can ignore them.
With the DB attached to the Web application you likely need to change the site collection administrator as I doubt you have the exact same Active Directory configuration that I had in my MOSS 2007 environment where my AWT site was running:
- From Central Administration select Application Management > Change site collection administrators (from the Site Collections group).
- Verify the
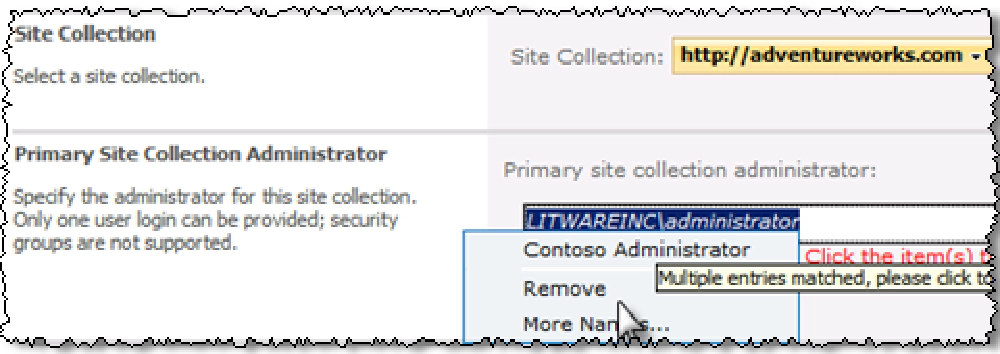
http://www.adventureworks.comsite collection is selected. Select the Primary Site Collection Administrator by left-clicking it and select Remove:
Upgrade Site Collection
- Click the address book to the right of the Primary Site Collection Administrator input box to bring up the people picker. Select a valid user in your environment to be the site collection administrator.
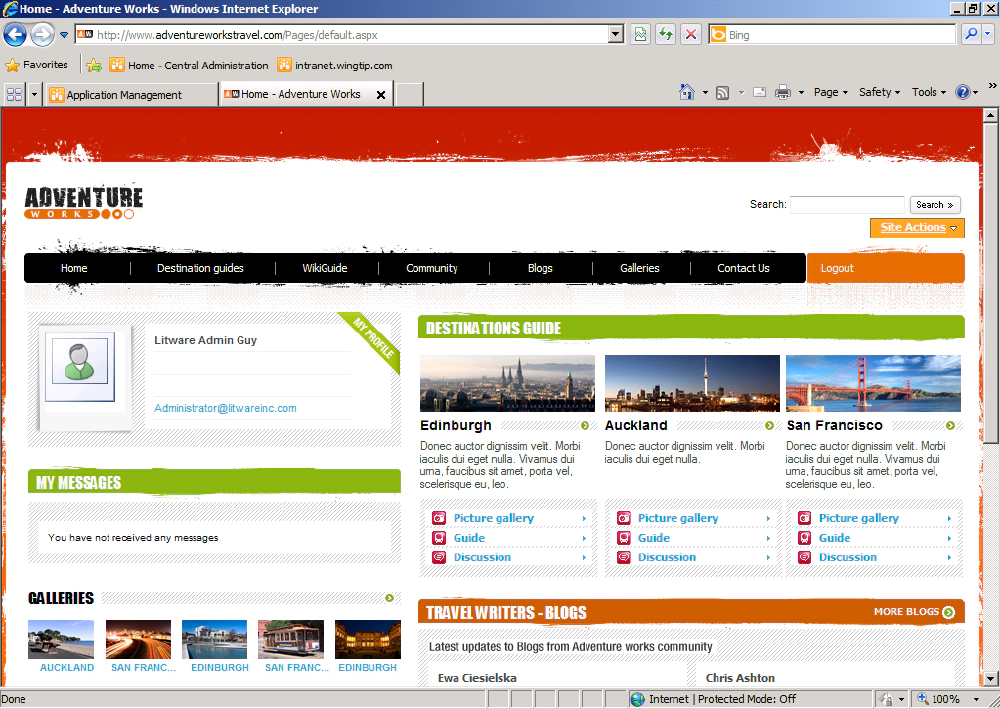
Now, test the site to make sure everything is working. By navigating to http://www.adventureworkstravel.com, you should see the AWT site looking exactly as it was in MOSS 2007 (proof when you see the Site Actions bar on the far right):
Upgrade Site Collection
Step 3 – Upgrade the AWT Site to use the SharePoint Server 2010 User Interface
The first step in upgrading the site is to switch from the SharePoint 2007 UI (aka: v3) to the SharePoint 2010 UI (v4). This will change the settings for the site as well as change the site to use the v4 based master page (v4.master). This won’t magically make the site get the ribbon and it will likely surface a few errors, but we’ll see.
First update the visuals. Once logged in and looking at the http://www.adventureworkstravel.com site, go to Site Actions - Site Settings > Modify All Site Settings. Under the Site Collection Administration group select the Visual Upgrade link. Next, click the button Update All Sites, in the Apply the User Interface to All Sites section. What you’ll notice is the Site Settings page will now look like SharePoint 2010.
However if you go back to the homepage of the site, you’ll see it is most certainly not what you want (nice error page). The reason there’s an error is because the AWT page layouts reference a custom ASP.NET ContentPlaceholder that isn’t in the OOTB v4.master master page (what the site is currently set to).
Let’s start customizing the UI by modifying the master page. The best way to do this is to get a copy of the customized master page that AWT was using and create a new SP 2010 version of it:
- Launch SharePoint Designer 2010.
- In SharePoint Designer 2010, click the Open Site button.
- Enter
http://www.adventureworks.comin the Site name input box and click Open. - Create a new master page by clicking the Master Pages item in the Site Objects Navigation panel & then select Blank Master Page button in the ribbon.
- When prompted for a name, use AW2010Default.
- Select the entire markup and delete it.
- Copy the source of the original Adventure Works Travel master page into the new master page. The trick is that it won’t show up in the list of master pages because it isn’t a v4 master page. Therefore an alternate method is needed:
- Click All Files in the left-hand navigation.
- Click the _catalogs folder.
- Click the masterpage folder
- Click the AWDefault.master master page.
- Under the Page tab in the ribbon, click Edit File in the Edit group.
- Copy the entire contents of this page, switch back to the AW2010Default.master page and paste the contents in it.
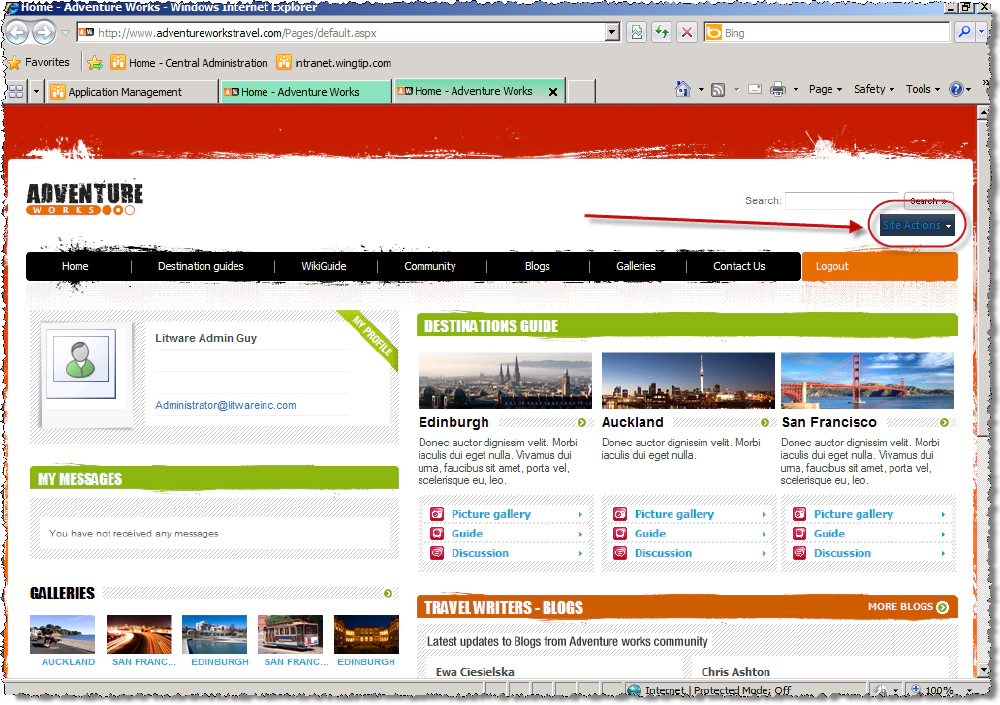
Let’s configure the site to use this new master page and see where we are at this point. Save your changes to the master page. Go back to the browser and from the Site Settings page, select Master page under the Look and Feel group. For the Site Master Page select the AW2010Default.master and then scroll to the bottom of the page and click OK. So, how does it look? Go to the homepage of the site:
Upgrade Site Collection
Hmm… not exactly what we’re hoping for (notice the odd styling of the Site Actions menu), but it is to be expected as there’s got to be some extra work involved. In the last step you’ll update the master page to work in SharePoint 2010.
Step 4 – Update the AWT Master Page to Work in SharePoint Server 2010 WCM
I did the super quick and dirty copy-paste of my UI from 2007 in 2010. All I really want is to make the site look and feel in SharePoint 2010 WCM just like it worked in SharePoint 2007 WCM, but I also want the 2010 embellishments such as the server ribbon. Go back to the master page in SharePoint Designer 2010 and open it up to make some changes.
Cleanup the AWT Master Page
First, update any assembly references there were pointing to SharePoint 2007 WCM (v12) to SharePoint 2010 (v14). Look at all the <%@ Register %> declarations and replace any 12.0.0.0 references with 14.0.0.0.
Next, let’s clean up a lot of some unnecessary things in the source of the markup that just aren’t needed in the 2010 version of our master page:
- Search for the string
PlaceHolderWCMActions(found around line 73). Delete its contents (everything within the tag, including that tag itself). Why? This is simply not needed. - Search for the string
PublishingConsole:Console(found around line 149). Delete the tag. This isn’t needed anymore because the server ribbon will serve the purpose here.
Add the Server Ribbon
Next you want to add the server ribbon of course! First, in the <head> section of the page immediately before the <SharePoint:CssLink /> tag, add the following tag:
<SharePoint:ScriptLink language="javascript" name="core.js" Defer="true" runat="server" />
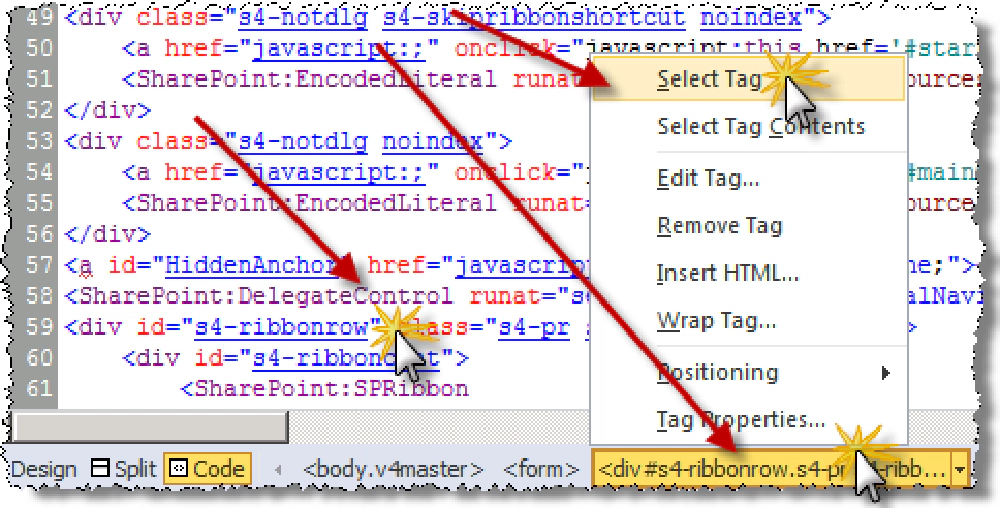
Now we need to get the ribbon. The easiest way to do this is to copy it from the out of the box (OOTB) v4.master master page that ships with SharePoint 2010. Open the v4.master master page in SharePoint Designer 2010. Search for the opening tag for the ribbon that looks like this and put the cursor somewhere in it (should be around line 59):
<div id="s4-ribbonrow" class="s4-pr s4-ribbonrowhidetitle">
Now, use the SharePoint Designer 2010 tag selector to grab this tag and all of its contents:
Upgrade Site Collection
Copy all the ribbon and paste into the AW2010Default.master page between the <asp:ScriptManager /> tag (on line 36) and the <div id="container"> tag (around line 39).
Go back to the v4.master file and copy the <%@ Register %> directive for the MUISelector (on line 6) and add it to the AW2010Default.master’s <%@ Register %> directives at the top of the page:
The old Adventure Works Travel site included a specific reference to the breadcrumb placeholder which is now included in the ribbon markup. Having both instances of these will cause an error so you need to remove one.
Search for the phrase PlaceHolderTitleBreadcrumb that isn’t in the ribbon. This should be around line 388. Remove the entire <asp:ContentPlaceholder id="PlacehodlerTitleBreadcrumb" ...>...</asp:ContentPlaceholder> from the master page. Save your changes to the master page.
Verify the ribbon is working by navigating to the http://www.adventureworks.com site:

Upgrade Site Collection
The above screenshot only shows a new black bar with the new Site Actions menu. This is because the page is not in edit mode. Select Site Actions > Show Ribbon, then select the Page tab **to see the ribbon appear:

Upgrade Site Collection
Test the ribbon by selecting the Edit button in the Page tab. Just below the dark horizontal navigation bar (not the server ribbon but the actual Adventure Works Travel navigation) notice a field control called Page Content. Notice how a new contextual tab group Editing Tools containing two tabs Format Text and Insert appears in the ribbon.
Adjusting the AWT User Interface to Play Nicely with the Ribbon
As it stands now, the ribbon is working just fine in our updated SharePoint 2007 AWT site in SharePoint 2010. However you’ll notice something that’s not working the way we’d like it. For instance activate the ribbon and scroll down the page. Now look at the top of the browser. Oh no… ribbon is gone!
In the OOTB SharePoint 2010 experience, the ribbon is always pinned to the top of the page and the rest of the page is scrollable. Unfortunately that isn’t happening right now. So how does Microsoft do this? What they do in the OOTB CSS is disable scrolling in the page.
Um… this whole vertical scrolling thing isn’t exactly going away! Yeah ,they get that. So what they did is put stuff that should be scrollable inside of some specific DIV’s. Basically you wrap your entire UI in the following DIV’s and it should start scrolling:
<div id="s4-workspace">
  <div id="s4-bodyContainer">
    <!-- your custom UI here -->
  </div>
</div>
For more information on the ribbon positioning system check out this post on the SharePoint Team Blog: Customizing Ribbon Positioning in SharePoint 2010 Master Pages.
Conclusion
And there you have it… a SharePoint 2007 WCM site and upgrading the user interface to SharePoint 2010 WCM isn’t so bad. Now, there will certainly be a ton, and I mean a serious ton of one off issues you’ll have to address. Why? You built a custom UI most likely and you we’re doing it for use in a SharePoint 2010 site! This is huge… sure you’ll have other things to address. Best of luck!

Microsoft MVP, Full-Stack Developer & Chief Course Artisan - Voitanos LLC.
Andrew Connell is a full stack developer who focuses on Microsoft Azure & Microsoft 365. He’s a 21-year recipient of Microsoft’s MVP award and has helped thousands of developers through the various courses he’s authored & taught. Whether it’s an introduction to the entire ecosystem, or a deep dive into a specific software, his resources, tools, and support help web developers become experts in the Microsoft 365 ecosystem, so they can become irreplaceable in their organization.
