You know what I don’t like about automated tests? Most of the time, we don’t automate them, we just instrument them. We write our tests and then open a console window to run them periodically. Maybe we set up a watcher to automatically rerun them when either a test or the code file changes, and maybe we use an integrated console window in our editor to monitor when things change.
While there is nothing wrong with this approach, I find it to be frustratingly inefficient and distracting. I want to keep working and just be notified with a subtle visual indicator that’s akin to someone who is watching me work and subtly taps me on the shoulder when something is wrong. Thankfully in the testing world, a solution exists!
In this post I am going to show you what I use and how I configure my SharePoint Framework projects to continuously run my unit tests efficiently and minimize distractions so I can focus on the task at hand.
A few years ago I blogged about a tool that I use in VSCode that I started using in JavaScript / TypeScript projects… both client-side and server-side: Better JS Testing Experience with VSCode and Wallaby.js. Wallaby.js is a test runner engine that has plugins & extensions for various editors… including VSCode. Once configured it runs your tests in the background. Like all test runners, it collects the results of the tests, how long they ran, and code coverage.
Wallaby.js isn’t a free product; it requires a personal or company license. There is a trial period you can take advantage of to see if it works for you. From my POV, it’s cheap for what I get in return, but that’s up to you.
I’m not getting anything for this post, the guys at Wallaby.js are getting some free marketing out of this as I have my own license that I purchased… in fact, I’ve purchased it twice: the initial one and a renewal after the first year of free updates.
What’s so special about Wallaby.js?
Instead of having to open a console window to see the results of your tests, it decorates your editor with the information it collects so you can keep your eyes on the task at hand.
What it does is add a little colored badge on the line that was run and if the test passed (green) or failed (red):
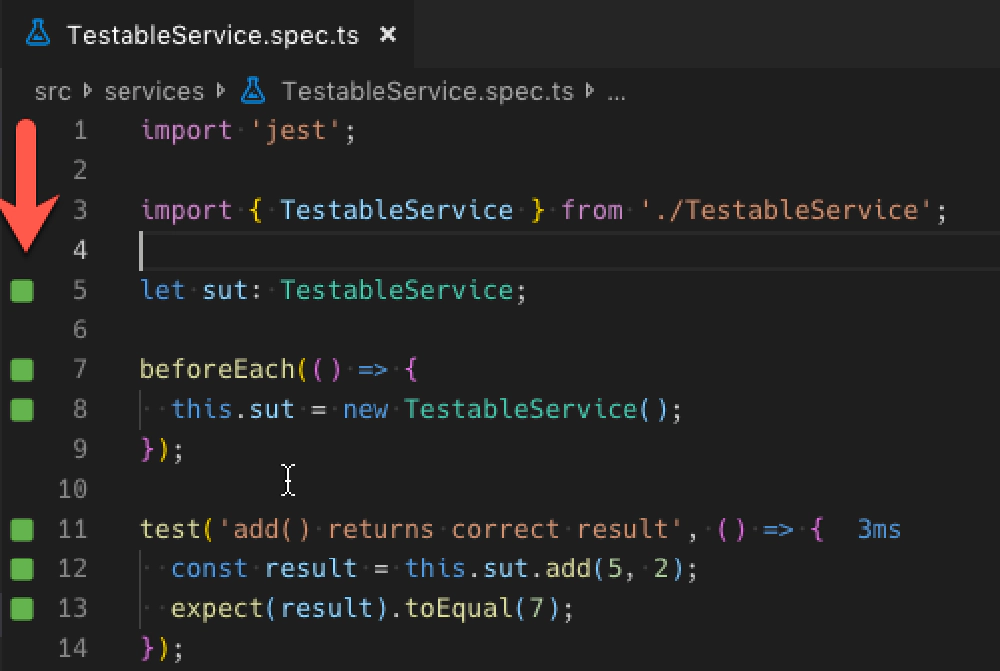
Wallaby.js test result icons in the gutter
From the above image, you can not only see the tests are passing but if you look at the end of line #11, you’ll see this test took only 3ms to run.
In the case where a test a line is not touched by the test, either within the test or in the code being tested, a light gray box is shown. In the following figure, notice line #39 is not tested. This test is intentionally triggering an error so the catch part of the promise is what’s actually running, not the then part:
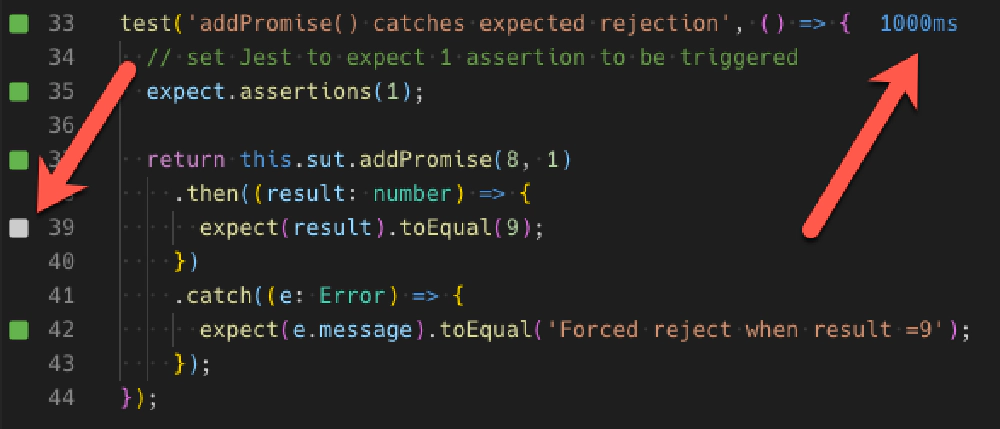
Wallaby.js displaying test duration & results
Of course, things don’t always go as planned. When tests fail, a solid red indicator is used in the gutter of the line that caused the error. In the following figure that’s line #13:

Wallaby.js displaying test error text
Notice how the actual error message that you would see in the console is added to the right of the failing test.
The lighter red or pink indicator is showing a line that is failing, but only because it’s in the test that’s failing.
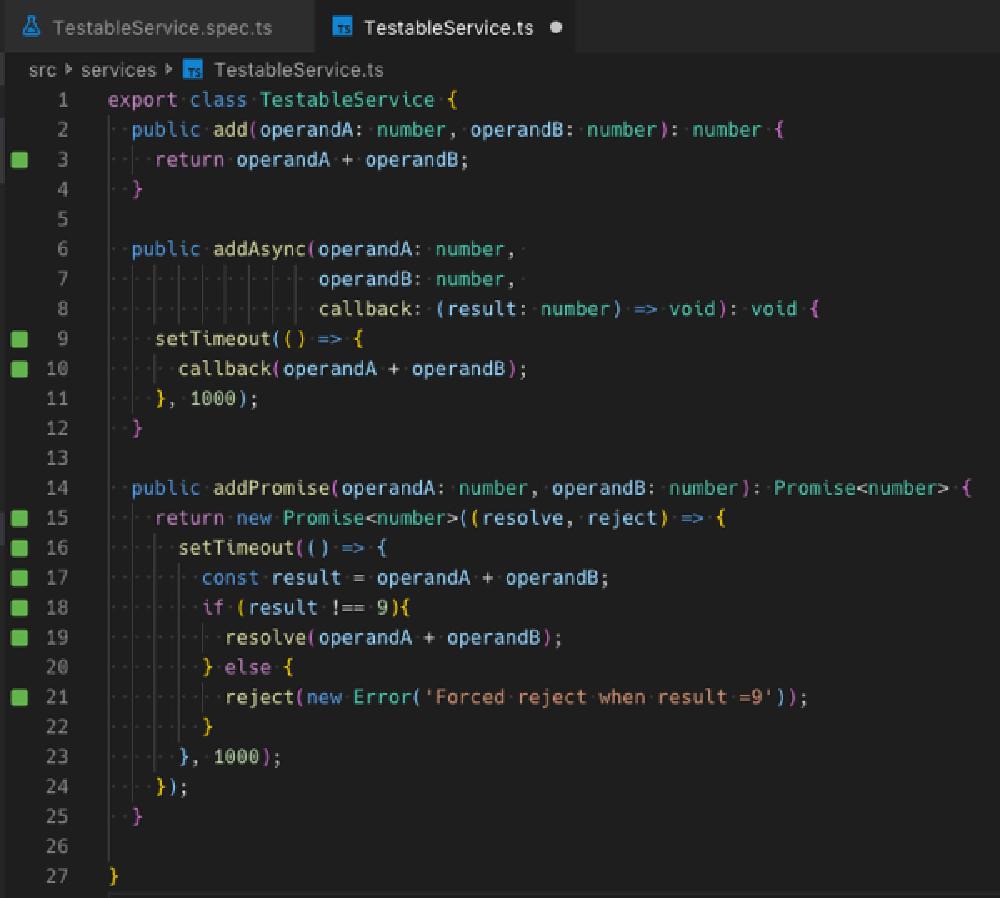
Wallaby.js doesn’t just decorate the test files as I’ve shown above. It also will show you the line of code that triggered the failing test:
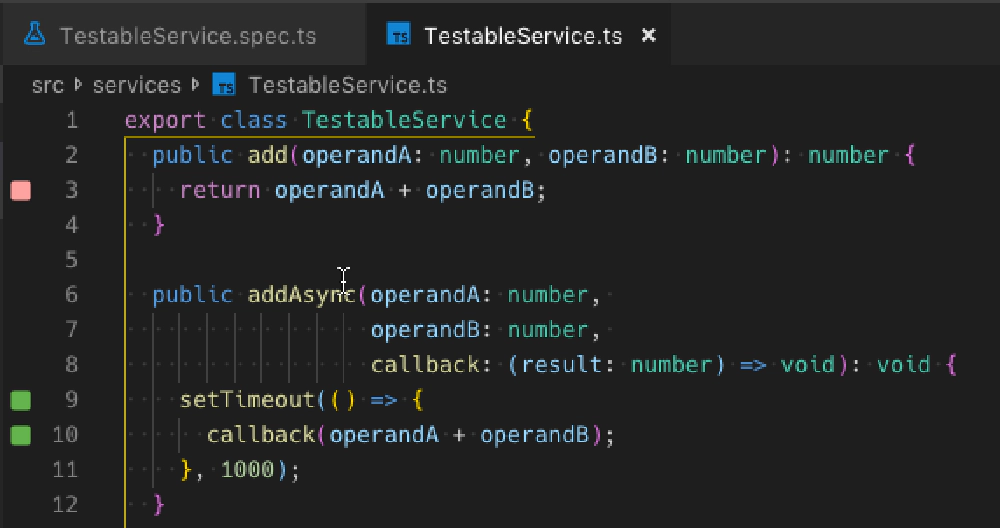
Wallaby.js showing a failing test
In the previous figure, you can see line #3 in the add() method is triggering a failing test.
All these subtle indicators will change (if necessary) each time the tests are executed. No more switching focus to some console window watching for the results of your tests!
If you want to see the console, you can open the integrated console up in VSCode, change to the Wallaby.js Tests window and you can see the raw results.
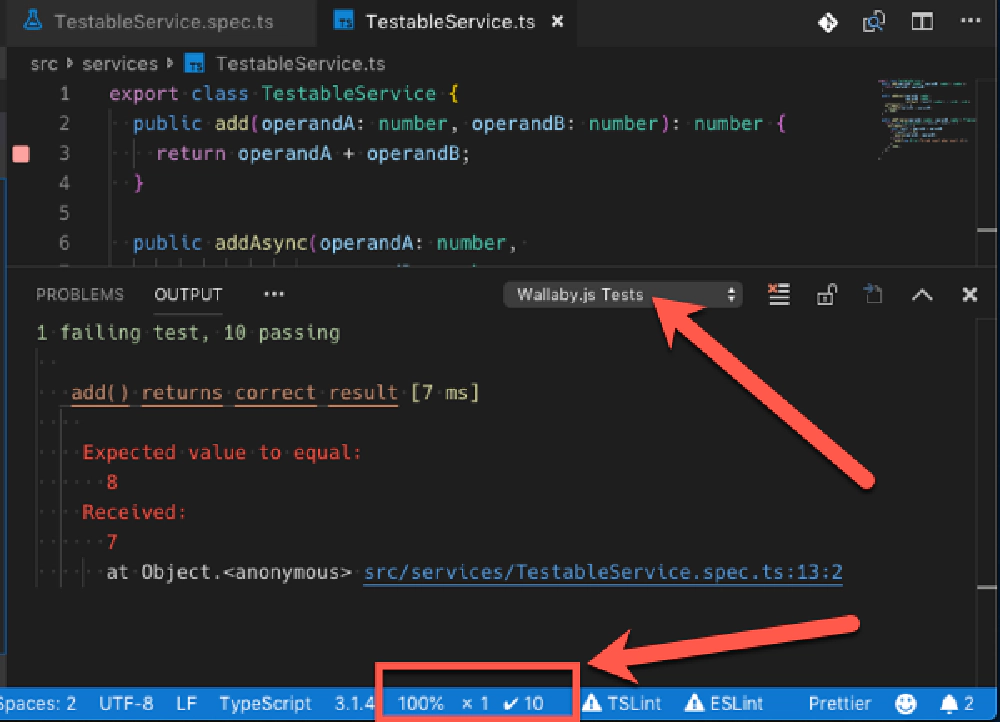
Wallaby.js test console
You can even see the status of your entire application’s test suites in the status bar of VSCode at the bottom. In the image above notice, the highlighted area that shows 100% code coverage and 10 of the 11 tests across my entire application are passing while 1 is failing.
If I click the test in the console window above, VSCode will jump to the failing test within my app.
Wallaby.js App
Maybe you’re not the type who likes that dedicated window or an all-up view of your application, tests, and coverage? When Wallaby.js is running, it runs a local web server hosting a dynamic web app providing you with more information than a typical console window:
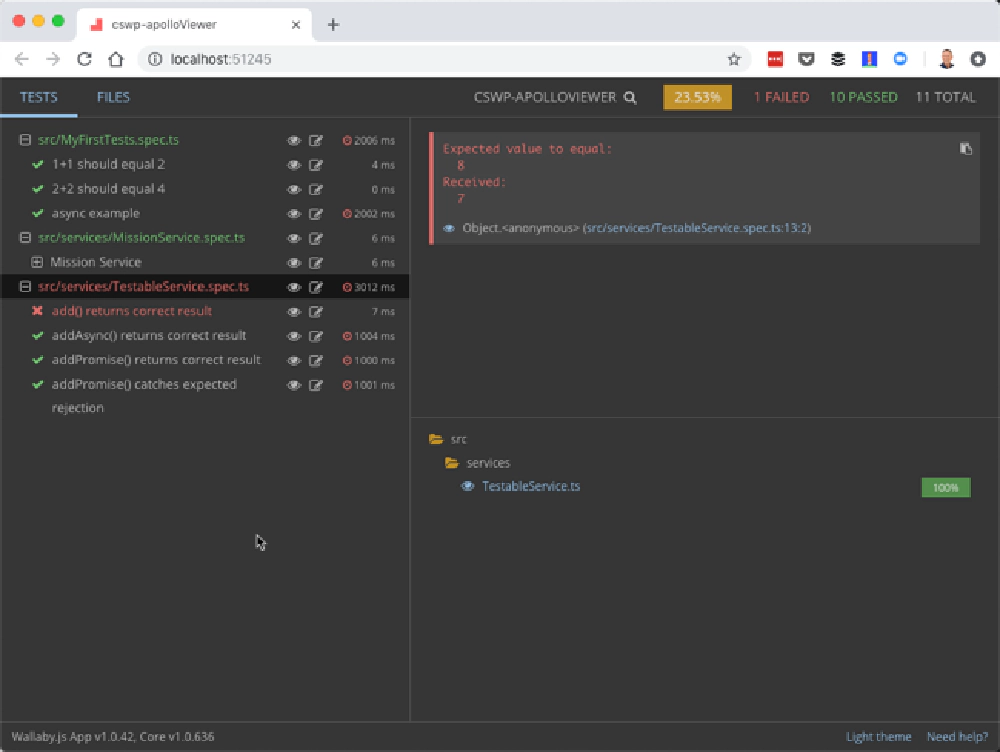
Wallaby.js test browser app
Here I can see all my tests, their status and click on them to see the results in the right panel or click one of the icons in the tree view to have the app open the file in VSCode.
Another view, the Files tab (selected at the top-right), will show more of a code coverage view:
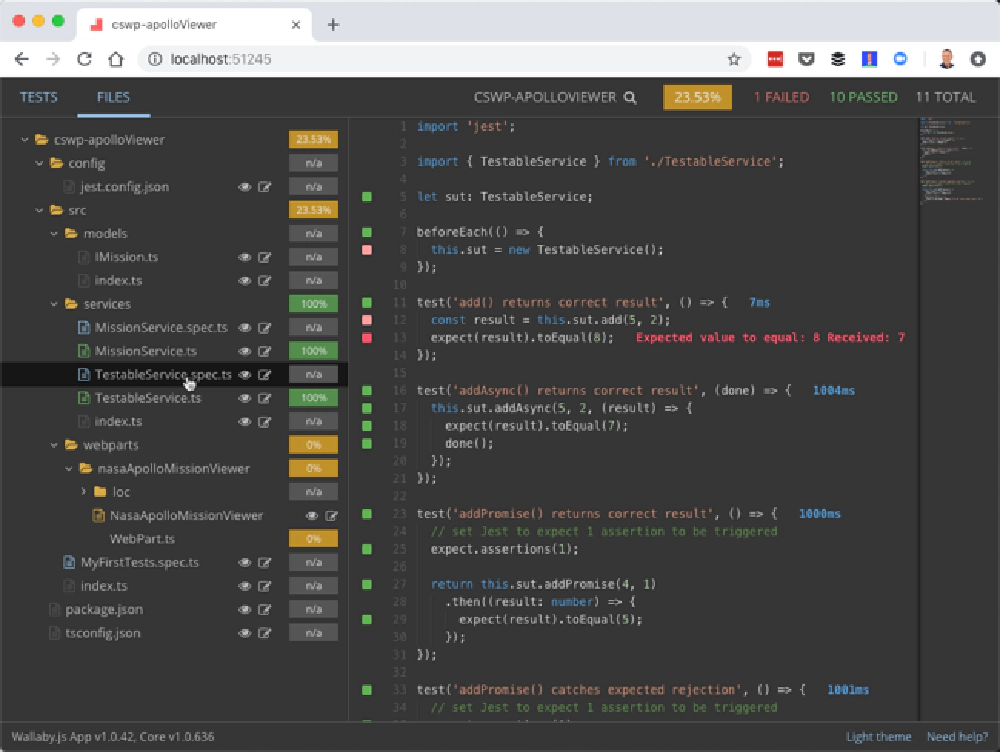
Wallaby.js test browser app
I don’t use the web app much, but it is helpful with getting an all up view of my project’s overall health.
Configuring Wallaby.js for SharePoint Framework Projects
You can check out the Wallaby.js site to learn more and how to configure it. What follows is what you need to do for a SharePoint Framework (SPFx) project.
After installing the VSCode extension, the next step is to create a configuration file for Wallaby.js. This tells Wallaby.js what files it needs for the tests to run, the test files and a bunch of other stuff. Some of these are needed, such as the set up function, because I’m using Jest as my test runner & because I put its configuration file in the config folder. Check the Wallaby.js documentation for details on all the options I’m using.
module.exports = function (wallaby) {

  return {
    files: [
      { pattern: './tsconfig.json', instrument: false},
      { pattern: './config/jest.config.json', instrument: false},

      'src/**/*.ts',

      '!src/**/*.spec.ts',
      '!src/**/*.scss.ts'
    ],
    tests: [
      'src/**/*.spec.ts'
    ],
    hints: {
      ignoreCoverageForFile: /istanbul ignore next/
    },
    env: {
      type: 'node'
    },
    testFramework: 'jest',
    compilers: {
      '**/*.ts?(x)': wallaby.compilers.typeScript({ module: 'commonjs' })
    },
    setup: function (wallaby) {
      const jestConfig = require('./config/jest.config.json');
      wallaby.testFramework.configure(jestConfig);
    }
  };
};
A few things to note in the config above:
files: An array of all files that Wallaby.js will need to run my tests including the TypeScript project filetsconfig.jsonand the Jest configuration file. Note that I’m specifically excluding tests and a*.scss.tsfile, generated by the SPFx build engine, from the collection as they will just hurt my code coverage percentage. *Notice how some are just strings while others are objects? The object approach enables me to tell Wallaby.js I don’t want this file included in code coverage calculations (ie:instrumentation: false).hints: Includes a regular expression for strings that should tell the Wallaby.js code coverage analysis what strings indicate the following line should be ignored. I’m usually using Istanbul as that’s what Jest uses so I’m just telling Wallaby.js to use the same string.compilers: Because SPFx projects already have atsconfig.jsonfile that configures the TypeScript compiler to use esnext as it’s module resolution. Live is simpler if you configure Jest for commonjs as it’s just a Node.js app. That’s what I’m doing in thecompilerssection.
Tell Wallaby.js where the configuration file is using the Wallabyb.js: Select configuration file command from the VSCode Command Pallet:

Generating a Wallaby.js configuration file
That’s it… just run it by either selecting the Wallaby.js: Start command from the VSCode Command Pallet.
Here’s what it looks like testing a SharePoint Framework project with Jest & Wallaby.js:
Configuring Wallaby.js for SPFx + React Projects that use Enzyme
Enzyme is a renderer for Jest by Airbnb that replaces what we get out-of-the-box from Jest. If you are using it in your React tests, you have a bit more configuration.
module.exports = function (wallaby) {

  return {
    files: [
      { pattern: './tsconfig.json', instrument: false},
      { pattern: './config/jest.config.json', instrument: false},
      { pattern: './config/jest.enzyme.js', instrument: false},

      'src/**/*.ts',
      'src/**/*.tsx',

      '!src/**/*.spec.ts',
      '!src/**/*.spec.tsx',
      '!src/**/*.scss.ts'
    ],
    tests: [
      'src/**/*.spec.ts',
      'src/**/*.spec.tsx'
    ],
    hints: {
      ignoreCoverageForFile: /istanbul ignore next/
    },
    env: {
      type: 'node'
    },
    testFramework: 'jest',
    compilers: {
      '**/*.ts?(x)': wallaby.compilers.typeScript({ module: 'commonjs' })
    },
    setup: function (wallaby) {
      const jestConfig = require('./config/jest.config.json');
      jestConfig.setupFiles = [
        "raf/polyfill",
        wallaby.projectCacheDir + '/config/jest.enzyme.js'
      ];
      wallaby.testFramework.configure(jestConfig);
    }
  };
};
In addition, your Wallaby.js config needs a bit more work as well. After adding the Enzyme set up file to configure the React version specific render to the files collection, I updated the set up function. Because files are moved around, the value of <rootDir> in the Jest config file gets a little wonky. Therefore, I just change the properties in the Jest configuration file to work with Wallaby.js.
Here’s what it looks like testing a SharePoint Framework project with Jest & Wallaby.js:

Microsoft MVP, Full-Stack Developer & Chief Course Artisan - Voitanos LLC.
Andrew Connell is a full stack developer who focuses on Microsoft Azure & Microsoft 365. He’s a 20+ year recipient of Microsoft’s MVP award and has helped thousands of developers through the various courses he’s authored & taught. Whether it’s an introduction to the entire ecosystem, or a deep dive into a specific software, his resources, tools, and support help web developers become experts in the Microsoft 365 ecosystem, so they can become irreplaceable in their organization.


