Most SharePoint Framework (SPFx) developers have been there.
You’ve got a web part or SPFx extension that expects a list to exist on the site for it to work. So, how do you get that list created?
It’s a common question, one that a student of my Mastering the SharePoint Framework course recently asked in our student community. His question included a good list of his options:
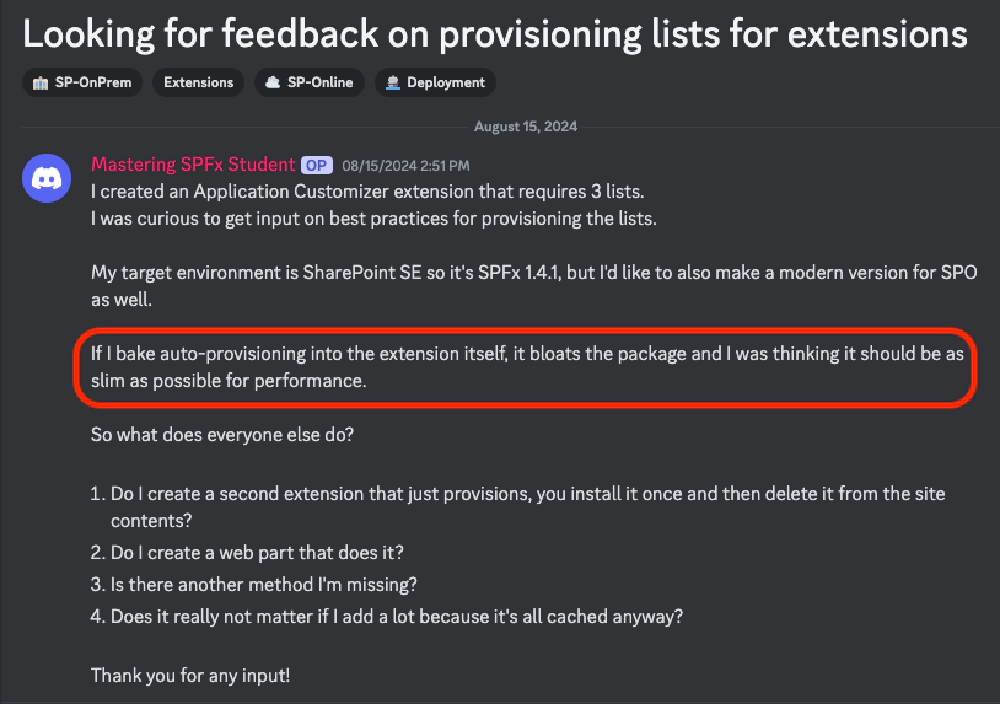
SharePoint Framework dependency dilemma
how to create artifacts like lists your SPFx component needs?
This course gets you up-to-speed on the SharePoint Framework (SPFx), the recommended way to extend SharePoint Online & SharePoint Server.
https://www.voitanos.io/course-master-sharepoint-framework/

I prefer to include the code within the component. When the component loads on the page, it does a very quick check to see if the dependency is present. If not, it can either automatically provision the list (if the user has permission to create it) or get someone else to create it by triggering the process.
But the student brings up a good point: if that code is only run one time, do we need to include it in the bundle? Usually, I’d say it’s not going to have enough of an impact to be concerned about, but if there’s a lot of code involved in the provisioning, maybe you don’t want that.
Thankfully, there’s an easy solution using webpack code splitting!
Introducing webpack code splitting
Webpack has supported code splitting going back to the first version, but it wasn’t easy to implement. Thankfully it’s easy today.
The way it works is a special code comment can be used to instruct webpack to put a module with our code in a separate chunk from the main bundle. This keeps the main bundle for our component as small as possible.
But, when the execution of the code reaches that module, webpack will dynamically load the module on the fly. This way, your provisioning code will only load when you run it, but it’s all still in the same project.
It’s the best of both worlds!
See code splitting in action
Before we look at the code, let’s see this in action.
In my course, I have a sample web part I use to demonstrate how to use the SPFx SpHttpClient API to call the SharePoint REST API to read and write to SharePoint lists.
But for that to run, I need a list with a specific schema.
Before I add the web part to the page, notice how I’ve cleared the browser’s dev tools Network tab and set the filter to only show JavaScript files…
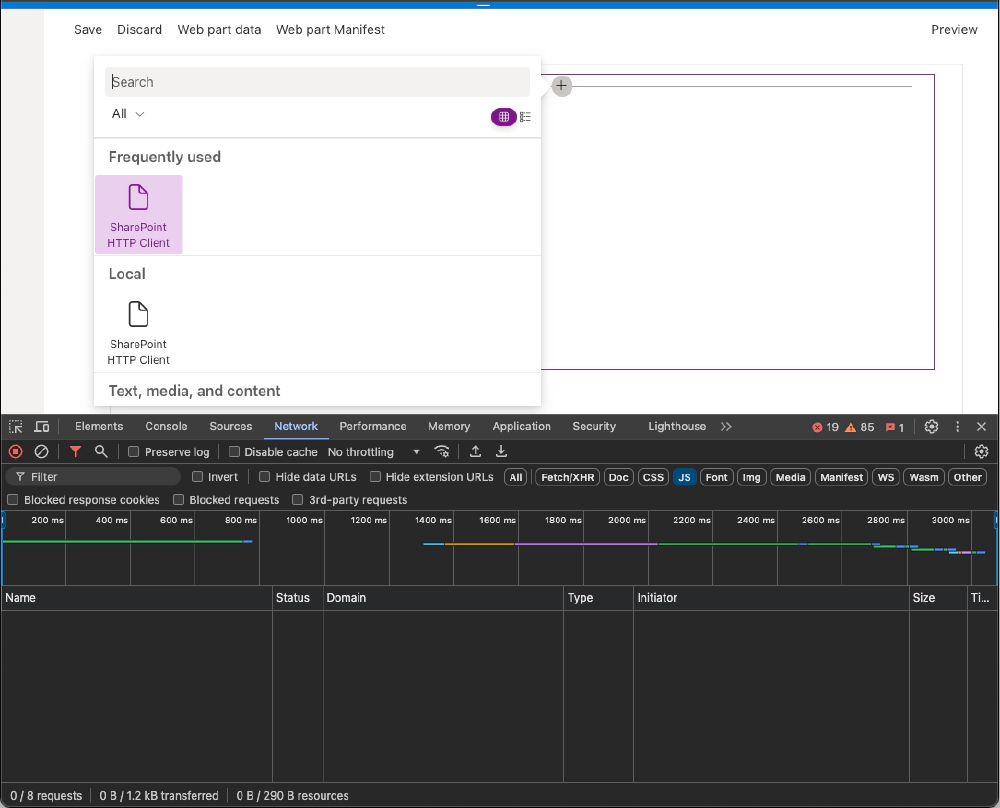
Before loading the SPFx web part in the SharePoint Online hosted dashboard
After selecting the web part, notice two JavaScript files have been loaded on the page:
- the SPFx web part bundle share-point-http-client-web-part.js
- the string localization file
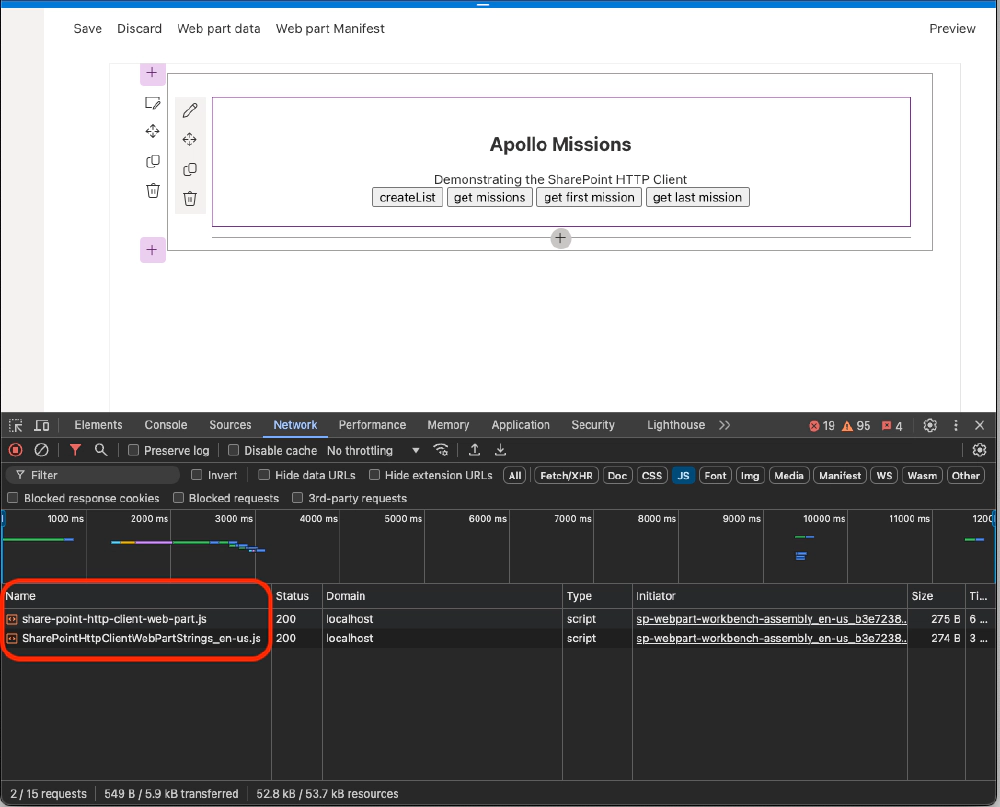
After loading the SPFx web part in the SharePoint Online hosted dashboard
But, when I click the createList button, notice how that triggers the chunk file (chunk.list-manager-service.js) to load:
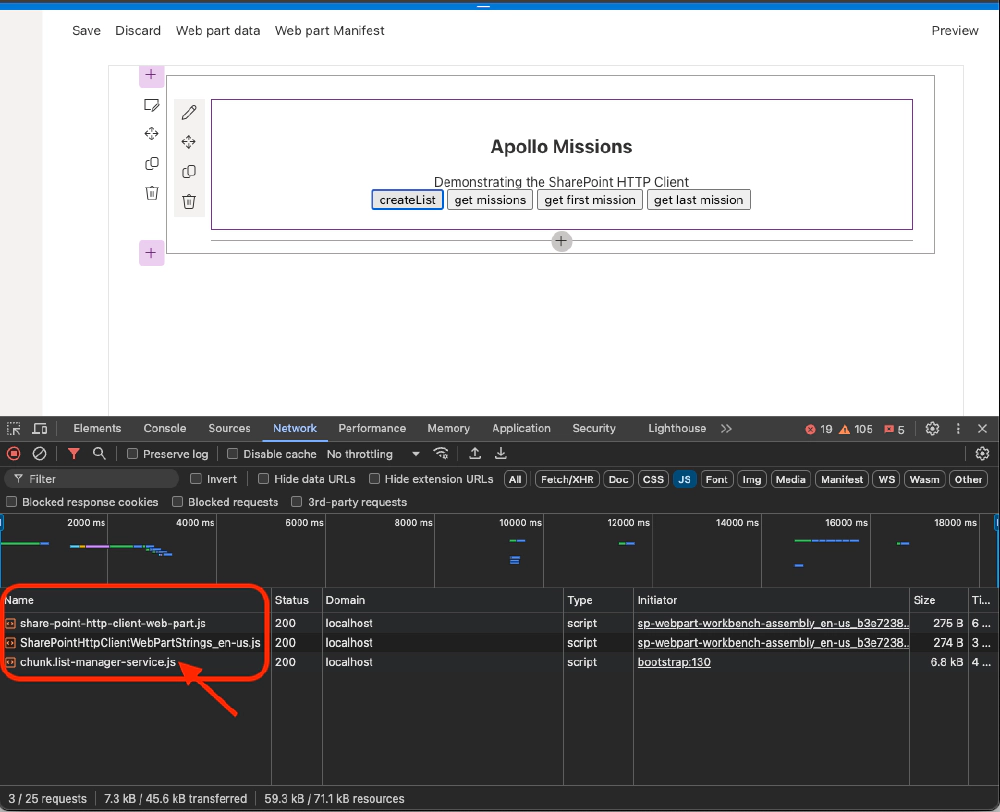
Dynamically loading the chunk file when the button is clicked
In a real SPFx web part, I’d probably do this within the web part’s property pane or using a popup to give the user more details how it works and what permissions are required, but for this simple solution, it works.
Now let’s see how to implement this.
How to implement code splitting in SPFx components
There are two ways you can implement code splitting in your SPFx project. The first is to modify the webpack configuration object the SPFx build toolchain creates when you run the gulp bundle command.
The webpack configuration object includes an entry object that specifies where webpack should start creating the bundle. Normally, it looks like this:
const path = require('path');

module.exports = {
  entry: './lib/webparts/sharePointHttpClient/SharePointHttpClientWebPart.js'
  output: {
    filename: 'share-point-http-client-web-part.js',
    path: path.resolve(__dirname,'dist'),
}
To use code splitting, use the webpack SplitChunksPlugin that’s been moved to the optimization.splitChunks property within our configuration like so:
const path = require('path');

module.exports = {
  entry: {
    'share-point-http-client-web-part': './lib/webparts/sharePointHttpClient/SharePointHttpClientWebPart.js',
    'chunk.list-manager-service': './lib/services/ListManagerService.js',
  },
  output: {
    filename: '[name].js',
    path: path.resolve(__dirname,'dist')
  },
  optimization: {
    splitChunks: {
      chunks: 'all'
    }
  }
}
You don’t normally see this as the webpack configuration object is created dynamically by the gulp bundle process.
The downside to this approach with SPFx projects is that you have to hook into the webpack configuration object creation process, take the configuration the SPFx toolchain creates, make your edits to it within your gulpfile.js, and return the modified configuration back to the toolchain. While possible, it’s cumbersome.
But there’s an easier way that works in this scenario without having to modify the webpack configuration object: use magic comments.
Implement webpack code splitting with magic comments
Webpack’s magic methods enable developers to do some webpack configuration within your code instead of using the configuration object.
In the case of SPFx projects, this is a bit easier to implement because modifying the webpack configuration object is a more involved process. Let’s see how to use a magic comment to create and dynamically load a chunk.
First, put all the code you want to keep separate from the main bundle in it’s own module (or file). In my case, I created a ListManagerService.ts file and added it to the project with the following code:
import { SPHttpClient } from '@microsoft/sp-http';

export class ListManagerService {

  private _siteAbsoluteUrl: string;
  private _client: SPHttpClient;

  public constructor(siteAbsoluteUrl: string, client: SPHttpClient) {
    this._siteAbsoluteUrl = siteAbsoluteUrl;
    this._client = client;
  }

  public async createList(): Promise<void> {

    // create the list...
    await this._client.post(`${this._siteAbsoluteUrl}/_api/web/lists`,
      SPHttpClient.configurations.v1,
      {
        body: JSON.stringify({
          "AllowContentTypes": false,
          "BaseTemplate": 100,
          "ContentTypesEnabled": false,
          "Title": "Apollo Missions"
        })
      }
    );

    // create columns in the list...
    const columns: string[][] = [
      ["Commander", "Text"],
      ["SrPilotCmPilot", "Text"],
      ["PilotLmPilot", "Text"],
      ["LaunchDate", "DateTime"],
      ["ReturnDate", "DateTime"]
    ];
    for (let i: number = 0; i < columns.length; i++) {
      await this._client.post(
        `${this._siteAbsoluteUrl}/_api/web/lists/getbytitle('Apollo Missions')/fields`,
        SPHttpClient.configurations.v1,
        {
          body: JSON.stringify({
            "FieldTypeKind": (columns[i][1] === "Text") ? 2 : 4, // 2=Text, 4=DateTime
            "Title": columns[i][0]
          })
        }
      );
    }

    return Promise.resolve();
  }

}
There’s nothing special about this file (other than it’s quick & dirty with no error handling)… just a regular class with a single method.
The second step is to use this file, but only load it on demand.
My SPFx’s web part render() method includes a button that when clicked, runs the _createList() method within the web part.
public render(): void {
  if (!this.renderedOnce) {
    this.domElement.innerHTML = `
  <section class="${styles.sharePointHttpClient} ${!!this.context.sdks.microsoftTeams ? styles.teams : ''}">
    <div class="${styles.welcome}">
      <h2>Apollo Missions</h2>
      <div>Demonstrating the SharePoint HTTP Client</div>
      <button class="createList">create list</button>
      <button class="getMissions">get missions</button>
      <button class="getFirstMission">get first mission</button>
      <button class="getLastMission">get last mission</button>
      <div class="apolloMissions"></div>
    </section>`;

    // get reference to the HTML element where we will show mission details
    this._missionDetailElement = this.domElement.getElementsByClassName('apolloMissions')[0] as HTMLElement;

    // attach handlers
    this.domElement.getElementsByClassName('createList')[0]
                   .addEventListener('click', () => {
      this._createList();
    });
    this.domElement.getElementsByClassName('getMissions')[0]
                   .addEventListener('click', () => {
      this._getMissions();
    });
    this.domElement.getElementsByClassName('getFirstMission')[0]
                   .addEventListener('click', () => {
      this._getFirstMission();
    });
    this.domElement.getElementsByClassName('getLastMission')[0]
                   .addEventListener('click', () => {
      this._getLastMission();
    });
  }
}
The _createList() method is where the code splitting and dynamic loading happens.
Usually, to use the ListManagerService, I’d import it in the web part like this:
import { ListManagerService } from '../../services/ListManagerService';
But in this case, I want to configure webpack to not only keep it in it’s own bundle, or chunk, but I want to import it under specific conditions.
Here you can see that immediately before I import it, I’m including a comment with the webpackChunkName magic comment and specify what I want to call the chunk (list-manager-service):
private _createList(): void {
  //eslint-disable-next-line @typescript-eslint/no-floating-promises
  ( async () => {
    const module = await import (
      /* webpackChunkName: 'list-manager-service' */
      '../../services/ListManagerService'
    );
    const listManager = new module.ListManagerService(
      this.context.pageContext.web.absoluteUrl,
      this.context.spHttpClient);
    await listManager.createList();
  })();
}
After I load the module, I then use it like I normally would by new up an instance of the service before I call it. That’s all there is to it!
How code splitting works
When you bundle the project, web pack will create a separate chunk file, chunk.list-manager-service.js, and reference it within the main bundle. In fact, you can see this in the project’s ./dist folder:
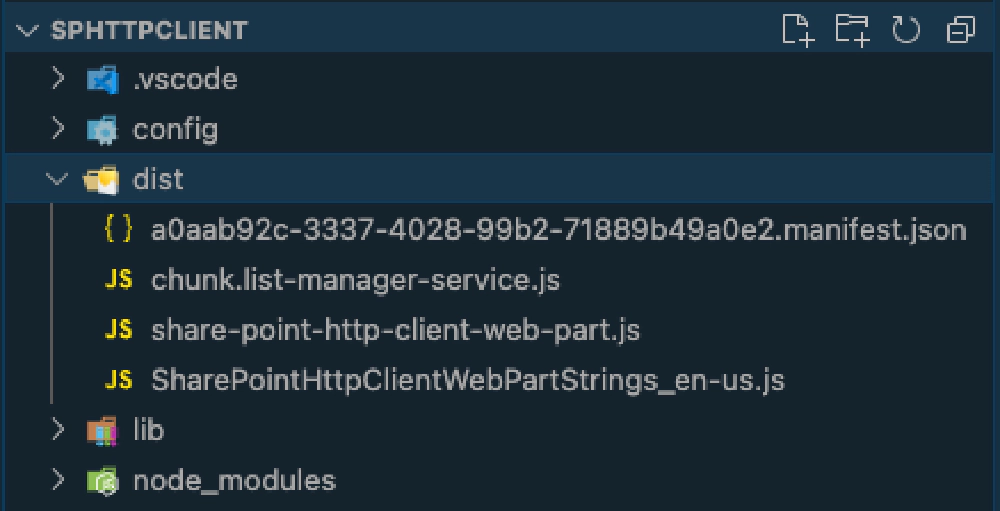
Results of webpack code splitting
You can inspect how webpack loads this by opening the main bundle & searching for list-manager-service.
To prove this is just a webpack feature that has nothing to do with the SharePoint Framework, take a look at the generated manifest file for the component. Notice the loaderConfig property that’s used to configure the module loader in the SPFx runtime in the browser has no reference to this chunk file:
{
  "id": "a0aab92c-3337-4028-99b2-71889b49a0e2",
  "alias": "SharePointHttpClientWebPart",
  "componentType": "WebPart",
  // ... omitted for brevity
  "loaderConfig": {
    "internalModuleBaseUrls": [
      "https://localhost:4321/dist/"
    ],
    "entryModuleId": "share-point-http-client-web-part",
    "scriptResources": {
      "share-point-http-client-web-part": {
        "type": "path",
        "path": "share-point-http-client-web-part.js"
      },
      // ... spfx libraries omitted for brevity
      "SharePointHttpClientWebPartStrings": {
        "type": "path",
        "path": "SharePointHttpClientWebPartStrings_en-us.js"
      }
    }
  }
}
Keep in mind this technique of code splitting isn’t unique to just this one scenario. I’ve used this for large single page apps (SPA) that have lots of React components and use loads of UI components or third party libraries.
It’s a great solution when you have a portion of your app that only needs to load under certain conditions.
Want the resources for this article? Enter your email and we'll send you the download link.
Microsoft MVP, Full-Stack Developer & Chief Course Artisan - Voitanos LLC.
Andrew Connell is a full stack developer who focuses on Microsoft Azure & Microsoft 365. He’s a 20+ year recipient of Microsoft’s MVP award and has helped thousands of developers through the various courses he’s authored & taught. Whether it’s an introduction to the entire ecosystem, or a deep dive into a specific software, his resources, tools, and support help web developers become experts in the Microsoft 365 ecosystem, so they can become irreplaceable in their organization.
