In my recent SharePoint Framework accelerator cohort, a question came up about implementing continuous integration & continuous deployment (CI/CD) in SharePoint Framework (SPFx) projects. I had planned to improve upon the process I showed in my Mastering the SPFx Ultimate bundle course by using managed identities with Microsoft Entra ID. Unfortunately, I discovered this wasn’t supported by the CLI for Microsoft 365, which is the preferred tool for implementing CI/CD in automated workflows.
This limitation meant we had to stick with client certificates to authenticate our Entra ID app for deployment. This works, but it’s no ideal as I’d like to use the latest features in Azure to go credential-less.
But today, I’m thrilled to share a major improvement to this process!
How We Got Here (Or Skip Ahead)
In this article, I want to start by looking back at how we got here, but if you only want to see what’s new, feel free to skip it using the table of contents in the left margin.
Looking Back
Let me walk you through how we got here.
Initially, CI/CD wasn’t possible for SPFx solutions or any projects using SharePoint app catalogs (including SharePoint Add-ins). We simply didn’t have the APIs needed to manage the package lifecycle: installing, deploying, uninstalling, or upgrading.
That changed in late 2017 when Microsoft introduced the application lifecycle management (ALM) endpoints in the SharePoint REST API. This gave us the ability to automate lifecycle operations for SPFx packages.
Back then, these automations required user authentication. Organizations typically created service accounts for automated deployments, storing credentials in GitHub or Azure DevOps’s secure stores. The downside? Passwords needed regular maintenance and had to be updated when they expired.
These service accounts came with another limitation in that they couldn’t use multi-factor authentication (MFA). Adding MFA would have required manual intervention, which defeats the purpose of automation.
Microsoft later enhanced the ALM APIs with Entra ID app support. A significant improvement came in early 2021 with the Sites.Selected application permission, letting customers grant permissions to specific site collections instead of the entire tenant. But there was still a catch—these apps only worked with client certificates for authentication. Like client secrets, these certificates expire and require ongoing maintenance.
But today, things are a LOT better!
Credential-Less Authentication with Federated Identity
In 2023, Microsoft added support for identity federation with Microsoft Entra ID apps. This feature lets you access Microsoft Entra ID-protected resources without managing secrets for specific scenarios.
Previously, apps needed an identity to authenticate and access resources with other services. With the SharePoint ALM endpoints in the SharePoint REST API, we used client IDs and secrets or certificates to authenticate with an Entra ID app to obtain an identity (access token) for our API calls.
For workloads running in Azure, we could use managed identities where the resource had its own identity. For instance, if you had an Azure Function that needed to write to an Azure Storage Blob, you could simply grant the Azure Function’s managed identity the necessary RBAC role on the Storage account.
This improvement eliminated the need for credentials in our app! We just granted permissions to the Azure resource where our app ran.
But what about resources that didn’t exist in Azure?
That’s where user-assigned managed identities or app registrations come in!
In 2023, Microsoft enabled Microsoft Entra ID to trust tokens from external identity providers (IdP) like GitHub and Google. Once you create a trust relationship, your external process, like a GitHub Action workflow, can exchange trust tokens between the external IdP and the Microsoft identity platform.
The result? Your CI/CD process running in GitHub Actions can now obtain an Entra ID application identity with zero credentials!
Scenario: Deploy Files Directly to Azure Storage Blob from CI/CD Processes
I use this model across many of my projects. For instance, I have an automated process that builds and redeploys this website several times daily. During these workflow runs, I deploy all client-side source map files to an Azure Storage Blob, which enables better debugging when Azure Application Insights logs client-side exceptions.
#########################################################
# login to Azure CLI via federated credential
#########################################################
- name: 🔑 Login to Azure
  uses: azure/login@v2
  with:
    client-id: ${{ vars.VTNSIO_ENTRAAPP_CLIENTID }}
    tenant-id: ${{ vars.VTNSIO_ENTRAAPP_TENANTID }}
    subscription-id: ${{ vars.VTNSIO_ENTRAAPP_SUBID }}
#########################################################
# deploy scripts to azure storage
#########################################################
- name: 🚀  Deploy JS Source Maps Azure Storage container
  run: |
    az storage blob upload-batch \
        --overwrite \
        --auth-mode login \
        --account-name $STORAGE_ACCOUNT \
        --source $LOCAL_SOURCE_DIR \
        --destination $AZURE_STORAGE_CONTAINER_NAME
  env:
    STORAGE_ACCOUNT: ${{ vars.VTNSIO_AZCDNSTORAGE }}
    LOCAL_SOURCE_DIR: assets/js
    AZURE_STORAGE_CONTAINER_NAME: sourcemaps
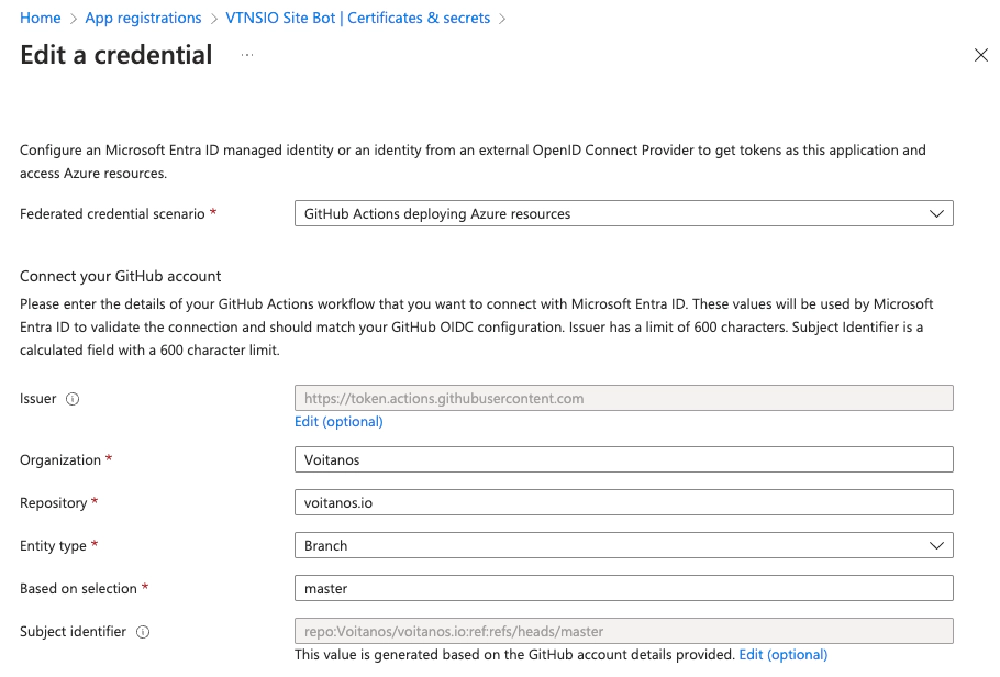
This setup has been running smoothly for years without requiring any maintenance of passwords, client secrets, or client certificates. I’ve configured an Entra ID application to trust workflows that run from the main branch of my site’s GitHub repository.

Entra ID app used for Azure resource deployment
Federated credentials from trust link with GitHub IdP
This approach is not only easier to manage—since there’s no need to worry about expiring or rotating secrets and certificates—but it’s also more secure because files can only enter the Azure Storage Blob through the automated deployment process!
I apply this same approach with SPFx projects to generate and deploy source maps too!
Want to Learn How to Auto Package & Deploy SPFx Source Maps?
Interested to learn more about how I automate the creation & deployment of source maps? Leave a comment below & I’ll add another article showing how to do that!
Pretty exciting stuff, right?
Previously, implementing federated identities for SPFx CI/CD required significant effort because the CLI for Microsoft 365 lacked native support.
That changed a few weeks ago when I spotted the issue pnp/cli-microsoft365#6610 in the CLI for Microsoft 365’s repository. Within two weeks, it was implemented through pull request pnp/cli-microsoft365/#6611!
Starting with CLI for Microsoft 365 v10.5, you can now set up credential-less CI/CD with GitHub Actions!
Let me show you how to set this up.
Step 1 - Create an Admin Management App
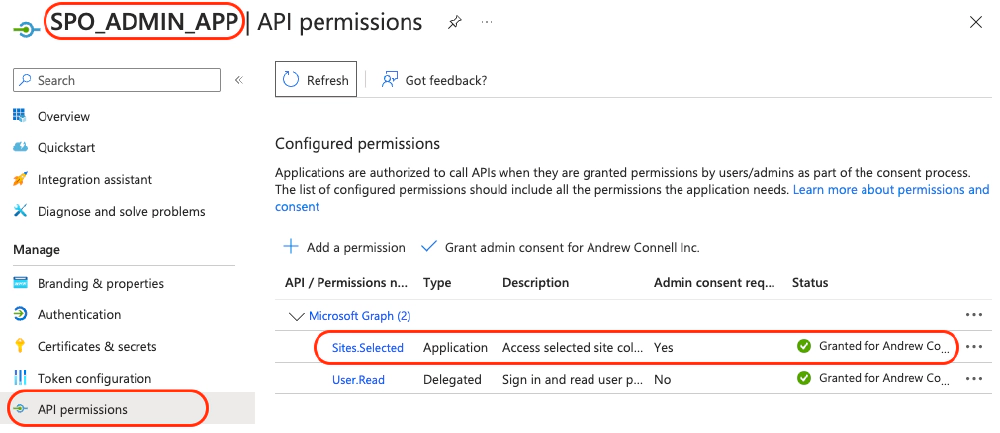
First, create an Entra ID application that SharePoint Admins can use to grant permissions to specific sites for other Entra ID applications. This application needs the Sites.Selected application permission. Let’s call it the SPO_ADMIN_APP.

SPO_ADMIN_APP with Sites.Selected app only Permission
This app is used by a SPO tenant admin to grant other apps permission to specific sites rather than the entire tenant.
You’ll use this Entra ID app to grant specific permissions to other Entra ID apps, like the one used in CI/CD scenarios.
This app should be configured with a client certificate. The SharePoint Online tenant admin will use the certificate to connect to your Microsoft 365 tenant.
Step 2 - Create M365 CI/CD App
Next, create another Entra ID application that you’ll use for your CI/CD workflows (you can create one application per workflow or use a single app for multiple workflows). Let’s call this one M365_CICD_APP.
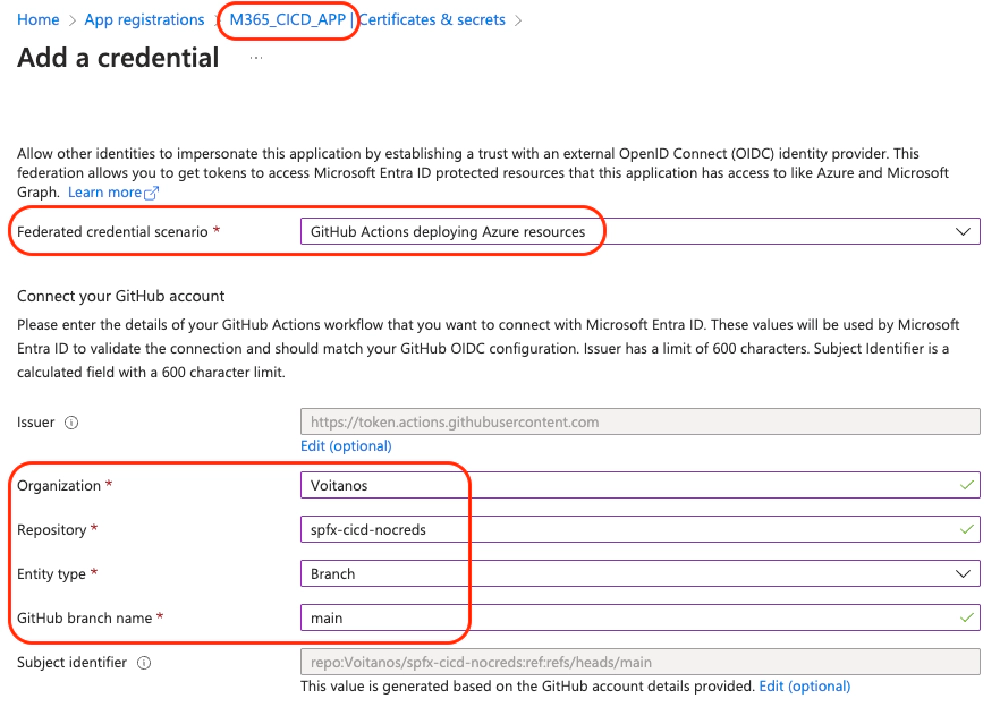
On that app, I’ll configure federated identity by setting it up with my organization (Voitanos), my repository where the project lives, and specifying the entity type as the main branch of my repository. This means Entra ID will return a credential that allows my workflow to authenticate and act as the M365_CICD_APP.
To do this, select Certificates & secrets > Federated credentials and add a new credential:

M365_CICD_APP - Add Federated credential
This app is used by the CI/CD process to deploy the SPPKG to app catalog
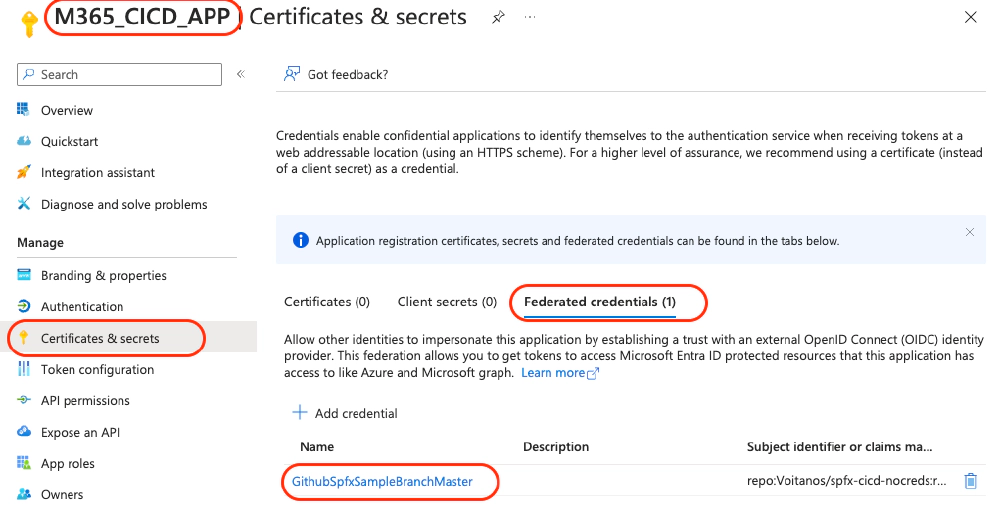
Once it’s created, you’ll see it listed on the Certificates & secrets page for the app in the Entra ID portal. Notice the other two tabs, Certificates & Client secrets… nothing is set!

M365_CICD_APP with a single credential, federated with the GitHub IdP
This app is used by the CI/CD process to deploy the SPPKG to app catalog.
With this setup, my workflow will operate under the identity of the Entra ID app M365_CICD_APP.
I want to call out one more thing when you’re setting up the federated identity. Notice the options available to you - one of the entity types you can associate the trust relationship with is a GitHub environment. This means you could use different Entra ID apps to deploy to different environments, like development, test, or production. I use branches for this, but it’s nice having different options.
Step 3 - Grant Permissions to M365 CI/CD App
After creating both apps, you’ll use the SPO_ADMIN_APP to grant permissions to the M365_CICD_APP, which will handle uploading and managing packages in the SharePoint Online app catalog.
# sign in to your M365 tenant using the SPO_ADMIN_APP
m365 login --authType certificate
           --certificateFile ./myCert.pem

# grant the M365_CICD_APP write permission
#  on the specified site collection
m365 spo site apppermission add
                --appId $M365_CICD_APP_CLIENTID
                --siteUrl $SITE_URL
                --roles write
With everything set up, I now have my Microsoft Entra ID app, M365_CICD_APP, that I can use to authenticate and write to the tenant app catalog.
Step 4 - Implement the GitHub Workflow
Next, I need to set up my GitHub workflow to obtain the access token by authenticating using federated identity. Thanks to the latest version of the CLI for Microsoft 365, I can now upload packages and deploy them directly to the tenant app catalog.
To implement this, first, grant your GitHub Actions workflow permissions by specifying the ID token and contents.
permissions:
  # req: Azure login for user-defined managed identity
  id-token: write
  # req: Azure login for user-defined managed identity
  contents: read
Then, once you’ve installed the CLI for Microsoft 365, you can then use the new support for federated identity by setting the authtype argument on the login command. Make sure to also set the Entra ID client ID and tenant ID for the M365_CICD_APP to use its identity when you log in.
- name: Sign in to M365 tenant with federated identity
  run: |
    m365 login \
        --authType ${AUTH_TYPE} \
        --clientId ${APP_ID} \
        --tenantId ${TENANT_ID}
  env:
    AUTH_TYPE: federated
    APP_ID: ${{ env.M365_CICD_APP_CLIENTID }}
    TENANT_ID: ${{ env.M365_CICD_APP_TENANTID }}
All that’s left is to handle the deployment! The following workflow job will build the SPFx package, upload it to the specified SharePoint Online tenant app catalog, and deploy it for use, all without storing or having to maintain ANY credentials!
name: Production build and deploy

defaults:
  run:
    shell: bash

on:
  push:
    branches:
      - main
  workflow_dispatch:

env:
  # M365_CICD_APP_CLIENT_ID: <repo.variable>
  # M365_CICD_APP_TENANT_ID: <repo.variable>

permissions:
  # req: Azure login for user-defined managed identity
  id-token: write
  # req: Azure login for user-defined managed identity
  contents: read

jobs:

  build:
    name: Production build, bundle, & package
    runs-on: ubuntu-latest
    env:
      SPPKG_FILENAME: "UNDEFINED"
    outputs:
      sppkgfilename: ${{ steps.getSppkg.outputs.filename}}
    steps:
      # build *.sppkg
      # ... multiple steps omitted for brevity

      # save *.sppkg for later use & job history
      - name: 💾  Upload SharePoint package (*.sppkg)
        uses: actions/upload-artifact@v4
        with:
          name: SHAREPOINT_PACKAGE
          path: sharepoint/solution/${{ env.SPPKG_FILENAME }}

  deploy:
    name: Deploy to production
    runs-on: ubuntu-latest
    needs:
      - build
    steps:
      # download *.sppkg from previous job
      - name: ⬇️  Download SharePoint package (*.sppkg)
        uses: actions/download-artifact@v4
        with:
          name: SHAREPOINT_PACKAGE
      # install CLI for M365
      - name: ⬇️  Install CLI for M365
        run: |
          npm install @pnp/[email protected] -g
      # signin > M365 tenant w/ Entra ID federated identity
      - name: 🔑  Sign in to M365 tenant
        run: |
          m365 login
              --authType ${AUTH_TYPE} \
              --clientId ${APP_ID} \
              --tenantId ${TENANT_ID}
        env:
          AUTH_TYPE: federated
          APP_ID: ${{ env.M365_CICD_APP_CLIENTID }}
          TENANT_ID: ${{ env.M365_CICD_APP_TENANTID }}
      # use CLI for M365 to deploy the package
      - name: 🚢  Deploy SharePoint package
        run: |
          m365 spo app deploy
              --name ${SPPKG_PATH} \
              --scope ${SCOPE} \
              --url ${APP_CATALOG_URL}
        env:
          SPPKG_PATH: SHAREPOINT_PACKAGE/${{ needs.build.outputs.sppkgfilename }}
          SCOPE: sitecollection
          APP_CATALOG_URL: ${{ env.TARGET_PROD_SITE }}
What about Azure DevOps Pipelines?
Unfortunately, this only works with GitHub Actions at this time. But there’s work ongoing to get this same process working for Azure DevOps Pipelines with the CLI for Microsoft 365. Keep an eye on issue pnp/cli-microsoft365#6649 for their progress!

Microsoft MVP, Full-Stack Developer & Chief Course Artisan - Voitanos LLC.
Andrew Connell is a full stack developer who focuses on Microsoft Azure & Microsoft 365. He’s a 21-year recipient of Microsoft’s MVP award and has helped thousands of developers through the various courses he’s authored & taught. Whether it’s an introduction to the entire ecosystem, or a deep dive into a specific software, his resources, tools, and support help web developers become experts in the Microsoft 365 ecosystem, so they can become irreplaceable in their organization.


