SharePoint Embedded provides a faster way to build file and document-focused apps. SharePoint Embedded is powered by SharePoint’s existing document management features and makes it easy for every developer, independent software vendor (ISV), and enterprise, to include critical Microsoft 365 file and document capabilities in every app they build without special or additional licenses and at the same time, keep all these files in their own Microsoft 365 tenants!
In this article, you’ll learn how to create a simple web application that demonstrates common scenarios and use cases developers can implement in their SharePoint Embedded enabled applications.
What Is SharePoint Embedded?
If you’re new to SharePoint Embedded and not sure what it is or why you’d use it as a developer, refer to my overview article ( SharePoint Embedded: Overview & Example Scenarios) & associated video on my YouTube channel.
Why Should you Consider Using SharePoint Embedded for Custom Applications?
Developers can create applications that utilize the powerful file and document management capabilities in SharePoint through SharePoint Embedded. These types of applications have two distinct components.
- One component is responsible for performing CRUD operations against SharePoint Embedded using Microsoft Graph APIs.
- The other component implements the interface for users to consume and store the documents stored in SharePoint Embedded.
That’s what SharePoint Embedded brings to developers. It provides a faster way for developers to create file and document-focused applications. SharePoint Embedded is powered by SharePoint. Developers can integrate the same powerful file and document capabilities that SharePoint has to offer in their own custom applications.
Another way to look at SharePoint Embedded is your custom application leverages SharePoint for all document storage and collaboration features. This effectively uses SharePoint Embedded as a “headless-API” to SharePoint’s document storage system.
Enable SharePoint Embedded in your Tenant
Before I can start creating a SharePoint Embedded application, the first thing I need to do is make sure SharePoint Embedded is enabled in your tenants.
This must be done in all relevant tenants. There are two categories of tenants involved in all SharePoint Embedded applications: a single provider tenant and one or more consumer tenants.
Consider the following two scenarios:
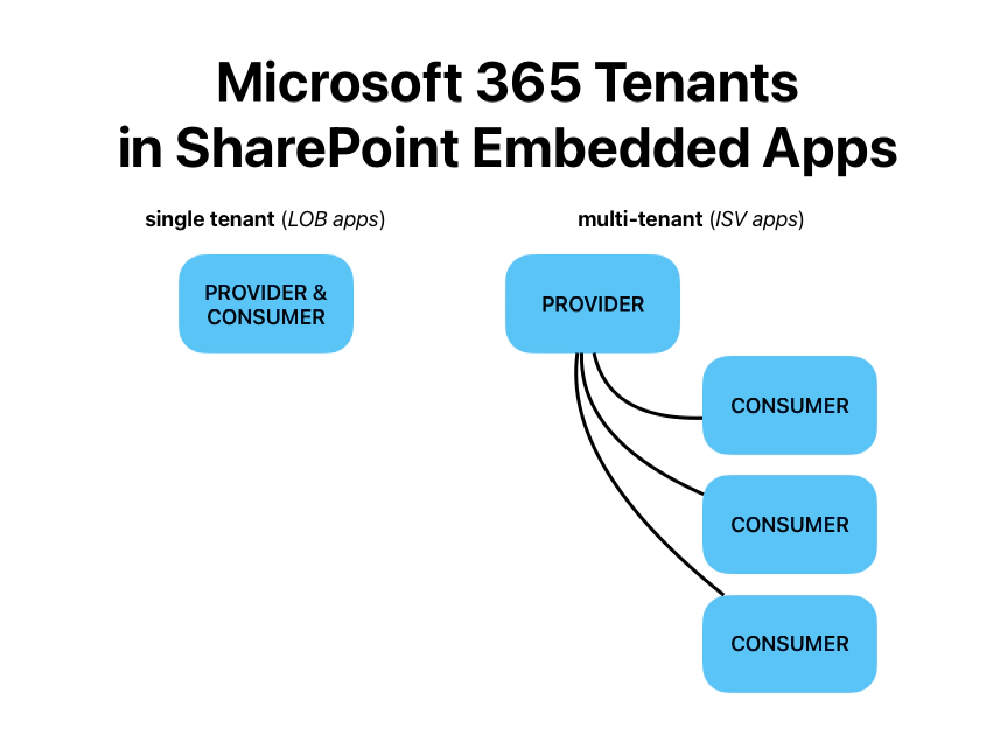
How single vs. multi-tenant SharePoint Embedded apps work in Microsoft 365 tenants
- Contoso is creating a new SharePoint Embedded application that they intend to sell to their customers, such as Adventure Works and Woodgrove Bank. These customers will use the app, but the app will store the data in the customer’s Microsoft 365 tenants. In this scenario, Contoso is the provider of the app while Adventure Works and Woodgrove Bank are consumers of the app. In this scenario, there are three Microsoft 365 tenants involved and all three of them must have SharePoint Embedded enabled.
- In the second scenario, Wingtip Toys is creating a new SharePoint Embedded line-of-business (LOB) application to enable their partners to use the application to submit designs, invoices, and other files to Wingtip Toys. In this scenario, Wingtip Toys is both the provider and consumer of their application so in this case, only a single Microsoft 365 tenant is involved but it serves both roles.
In these two scenarios, all provider and consumer tenants must have SharePoint Embedded enabled before I can create and use a SharePoint Embedded application.
Some Steps May Change During the Public Preview
I created this article during the public preview of SharePoint Embedded, in December 2023, so the steps may change before and after SharePoint Embedded reaches the General Availability milestone. Therefore I’m not going to cover that step here, and instead, I suggest referring to the docs for the most current steps on how to enable SharePoint Embedded in your tenants: Microsoft: Enable SharePoint Embedded.
For my demo, I’m focusing on the single-tenant set up so my single Microsoft 365 tenant serves as my provider and consumer tenant.
Set up the SharePoint Embedded App Requirements in the Provider Tenant
Once SharePoint Embedded has been enabled in the provider tenant, I then need to do a few things in your provider tenant before I can start coding up your SharePoint Embedded application:
In the provider tenant, I need to first create a new Microsoft Entra ID application and then create a new Container Type.
The Container Type does two things:
- It associates all storage Containers in a consumer’s tenant with the provider’s app and…
- … it links all the containers with a specific Azure subscription for billing purposes
After creating the Container Type in the provider’s tenant, I need to register the container type in the consumer tenant.
Create Microsoft Entra ID Application
Let’s start by creating the Microsoft Entra ID Application. This will be used to authenticate and obtain the necessary permissions to call the Microsoft Graph and Microsoft SharePoint APIs.
I’ll start by creating the Entra ID application using the Microsoft Entra ID admin enter and create a new app registration named My SharePoint Embedded app set it to be a single tenant app.
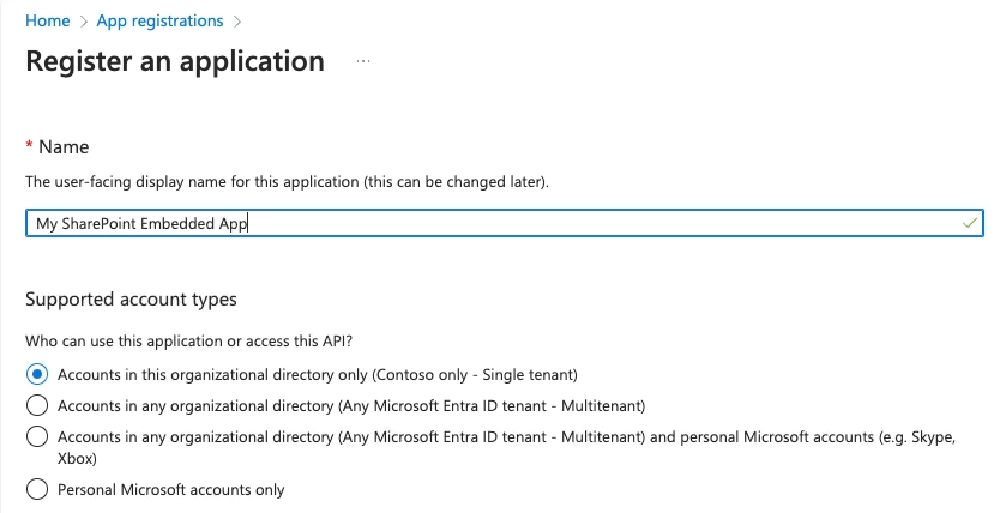
Create a new single-tenant Microsoft Entra ID application
Microsoft Entra ID will then display the details of the new app. Create a text file to keep track of multiple values you’ll need later in this app. Copy the Application (Client) ID & Directory (tenant) ID from the app’s overview page into the text file… I’ll need this later.
Next up - configure the authentication for the React-based SPA and set the redirect URI to http://localhost:3000.
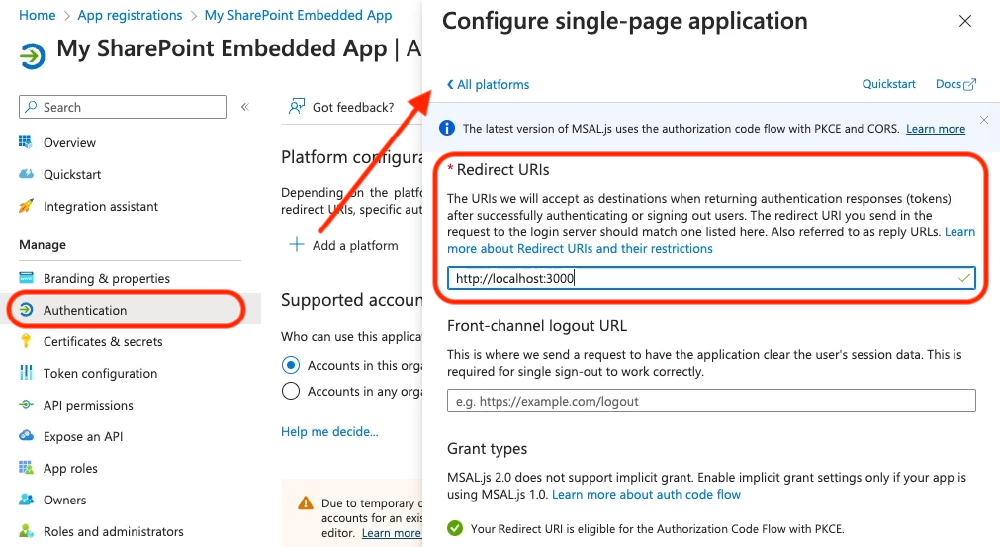
Configure the Entra ID app's authentication for a SPA
Configure API Permissions
Now I need to set the permissions the app will need so it can create and access Container Types and Containers:
At the time of writing this article, the two permissions I need to add aren’t yet visible in the list of permissions in the Microsoft Entra ID web interface to be selected. To get around this, I can manually add them to the app’s manifest.
From the Manifest page, I need to find the property requiredResourceAccess.
The existing resource with the resourceAppId set to00000003-0000-0000-c000-000000000000 is Microsoft Graph. Add the following application & delegated permission for the FileStorageContainer.Selected scope. The existing permission that’s already present is for the User.Read scope.
{
  "resourceAppId": "00000003-0000-0000-c000-000000000000",
  "resourceAccess": [
    // FileStorageContainer.Selected - Delegated
    {
      "id": "085ca537-6565-41c2-aca7-db852babc212",
      "type": "Scope"
    },
    // FileStorageContainer.Selected - Application
    {
      "id": "40dc41bc-0f7e-42ff-89bd-d9516947e474",
      "type": "Role"
    }
  ]
}
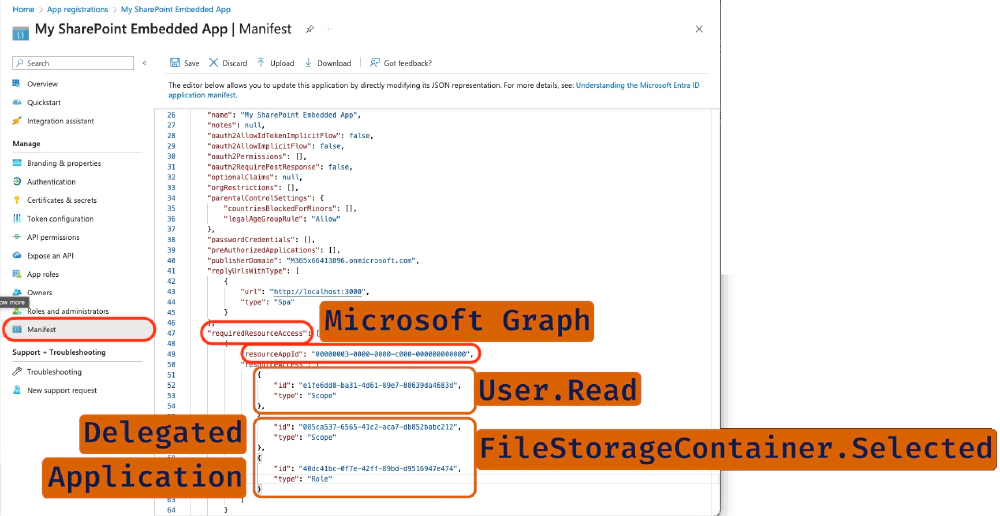
Manually adding app-only (application) & app+user (delegated) FileStorageContainer.Selected to Microsoft Graph
Next, I’ll add a new resourceAppId for SharePoint whose ID is 00000003-0000-0ff1-ce00-000000000000, and add the following application & delegated permissions for the Container.Selected FileStorageContainer.Selected scope:
The Container.Selected scope was renamed to FileStorageContainer.Selected since this article & the associated were published. Yes, this does mean that we now have two FileStorageContainer.Selected scopes: one for SharePoint Online & one for Microsoft Graph
{
  "resourceAppId": "00000003-0000-0ff1-ce00-000000000000",
  "resourceAccess": [
    // FileStorageContainer.Selected - Delegated
    {
      "id": "4d114b1a-3649-4764-9dfb-be1e236ff371",
      "type": "Scope"
    },
    // FileStorageContainer.Selected - Application
    {
      "id": "19766c1b-905b-43af-8756-06526ab42875",
      "type": "Role"
    }
  ]
},
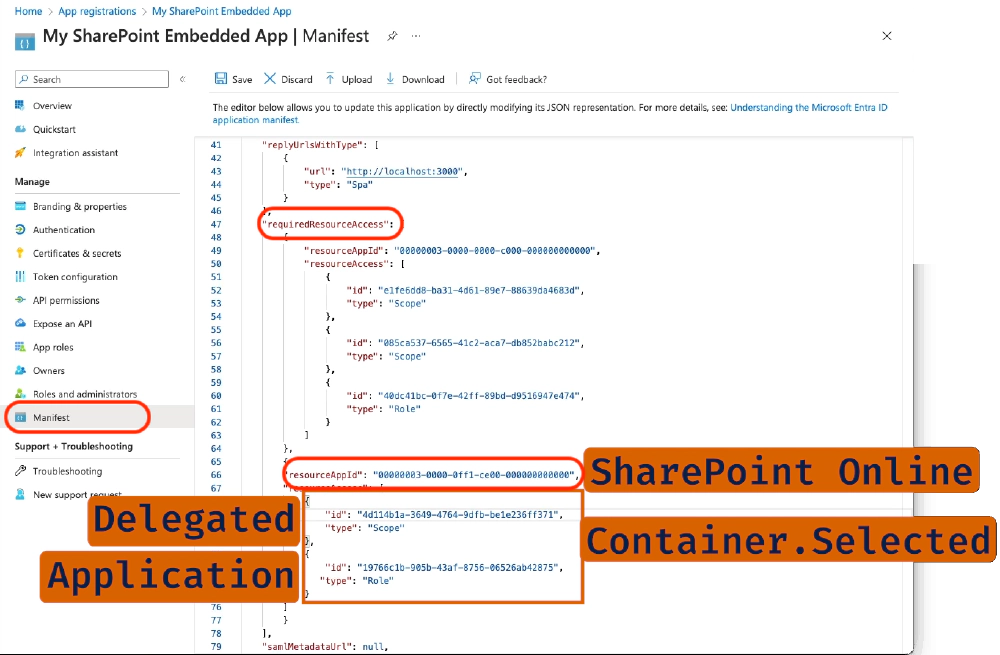
Manually adding app-only (application) & app+user (delegated) FileStorageContainer.Selected to SharePoint Online
Add a Custom Permission to the Microsoft Entra ID App
Next, let’s add a custom permission, or scope, to the application so an administrator can prompt the user to allow the app to manage containers. Note that this isn’t a SharePoint Online or Microsoft Graph permission - it’s a custom permission I’m creating for my web API.
On the Expose an API page, select the Set link next to the Application ID URI. This will default the app’s ID to api://<app-id>.
Next, select Add a scope to add a new permission for the app. Create a new scope using the following settings and then select Add scope:
- Scope name: Container.Manage
- Who can consent? Admins only
- Admin (& User) consent title: Manage SharePoint Embedded Containers.
- Admin (& User) consent description: The application can call this app’s API to manage SharePoint Embedded Storage Containers.
- State: Enabled
In the web API, I’ll ensure this permission has been granted to the application.
Grant admin consent to the new permissions
Some of the permissions require admin consent. From the API Permissions page, scroll to the bottom of the page, and select the link Enterprise applications.
On the Permissions page, select Grant admin consent for Contoso and then Accept the prompt to grant admin consent to the two pairs of permissions: FileStorageContainer.Selected for Microsoft Graph and SharePoint Online. The two pairs represent the application & delegated options for each of the two permissions.
Create a Client Secret
For an app to authenticate using the OAuth2 client credentials flow with Microsoft Entra ID, it needs both the client ID and a client secret.
On the Certificates & Secrets page, select the Client Secrets tab and create a new client secret. Set a description and select an expiration duration, then select Add.
When the secret is created, it will be shown one time so make sure you copy this as the client secret in your local text file for use later in this module. If you don’t copy this value, you’ll have to create a new secret as you can’t ever view a previously created secret.
Consider Using Two Entra ID Apps for Production Apps
In this demo, this is the same value as the API_ENTRA_APP_CLIENT_ID as we’re using the same Microsoft Entra ID application for configuring the SharePoint Embedded app and the web application. In a production scenario, these can be two different Microsoft Entra ID applications.
Create Container Type
The last step is to create a new Container Type. This can be done using the SharePoint Online PowerShell module. Make sure you have the latest version installed by either installing…
Install-Module "Microsoft.Online.SharePoint.PowerShell"
… or by upgrading the one you’ve previously installed to ensure you have the latest version…
Update-Module "Microsoft.Online.SharePoint.PowerShell"
Once you have the latest version, connect to your SharePoint Online site and create a new Container Type:
Import-Module "Microsoft.Online.SharePoint.PowerShell"
Connect-SPOService -Url "https://contoso-admin.sharepoint.com"
New-SPOContainerType -TrialContainerType
                     -ContainerTypeName "MyFirstSpeContainerType"
                     -OwningApplicationId "{{REPLACE >> AZURE_ENTRA_APP_ID}}"
Make sure to specify what you want to name the new Container Type, MyFirstSpeContainerType in my example, and the app/client ID of the Microsoft Entra ID application you previously created.
In this case, I’m creating a trial Container Type which means I don’t have to set any billing details. Trial Container Types are only valid for 30 days and limited to 100MB.
If you want to create a permanent one, you’ll need to set the Azure Subscription ID, resource group, and region to real values.
You can learn more about developer vs. production container types in the docs: SharePoint Developer Docs > SharePoint Embedded > Admin Experiences > Dev Admin.
After running this command, you’ll see the results from creating the Container Type. Copy the ContainerTypeId property as you’ll need this later.
===============================================================================
ContainerTypeId     : 1e59a44b-b77e-051e-3cba-dbf83007b520
ContainerTypeName   : MyFirstSpeContainerType
OwningApplicationId : 520e6e65-1143-4c87-a7d3-baf242915dbb
Classification      : Trial
AzureSubscriptionId : 00000000-0000-0000-0000-000000000000
ResourceGroup       :
Region              :
At this point, you should have the following values saved in a text file from the steps you’ve performed:
- Microsoft Entra ID App: The application you created that will be used by the app we’re about to create to communicate with SharePoint Online & Microsoft Graph.
- Client ID: the ID (GUID) of the Entra ID application
- Client Secret: the secret of the Entra ID application
- ContainerTypeId: the ID (GUID) of the SharePoint Embedded Container Type I created in the provider tenant.
Register Container Type in consuming tenant
Finally, as part of the last step, I need to register the Container Type (that’s currently defined in the provider tenant), in the consumer tenant(s). This is true for both single tenant and multi-tenant applications. This ensures that only specified applications have access to the Containers in their tenant.
If this step isn’t completed, your SharePoint Embedded application will get an access denied error when attempting any operation with a container.
To register a Container Type you’ll use the SharePoint Online REST API. The SharePoint Online REST API requires an application to authenticate with a certificate rather than just a client secret.
Create self-signed certificate
So, first, we need a certificate, which I’m going to create as a self-signed certificate. I can do this either using PowerShell and the New-SelfSignedCertificate cmdlet, or using the OpenSSL utility.
I’m personally not a fan of PowerShell and avoid it if at all possible, so I’ll use OpenSSL:
# Prompt for the certificate name
# ... if in a Bash shell, use this line:
read -p "Certificate name: " name
# ... if in a ZSH shell, use this line:
read "name?Certificate name: "

# ... once you have the name of the certificate, everything that
#     follows will run in a Bash or ZSH shell

# Generate a private key
openssl genpkey -algorithm RSA -out "$name.key" -pkeyopt rsa_keygen_bits:2048

# Generate a Certificate Signing Request (CSR) using the private key
openssl req -new -key "$name.key" -out "$name.csr" -subj "/CN=$name"

# Generate the self-signed certificate using the CSR, private key, and set it to expire in 365 days
openssl x509 -signkey "$name.key" -in "$name.csr" -req -days 365 -out "$name.cer"

# Export the private key to Base64 (PEM format is already Base64 encoded)
openssl pkey -in "$name.key" -out "$name.key.pem"

# Clean up the CSR as it's no longer needed
rm "$name.csr"
Regardless if you choose to use PowerShell or the OpenSSL utility to create a certificate, you’ll have a few files:
- *.cer: this is the self-signed certificate
- *.key: the private key
- *.key.pem: the private key in Base64 format
Add this key to the Microsoft Entra ID application in the Certificates & secrets page… you’ll upload the *.cer file.
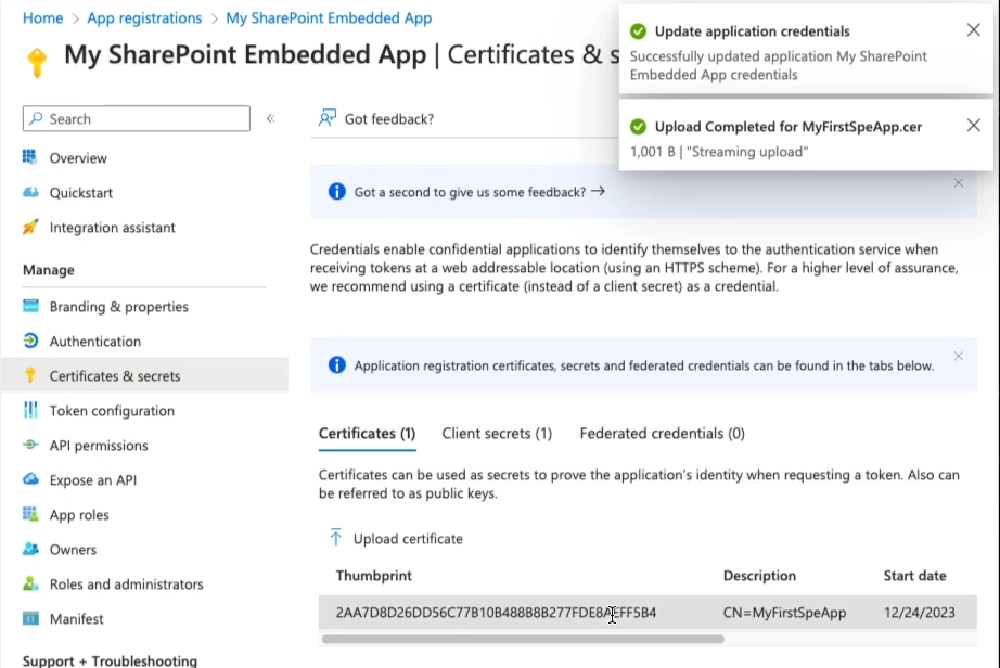
Upload the certificate to the Microsoft Entra ID application
Once this is done, you’ll see the generated Thumbprint. Save this value to the text file like we’ve done before.
Register Container Type in consumer tenant
To register the Container Type with the consumer’s tenant, I’ll use the SharePoint REST /_api/v2.1/storageContainerTypes/{{ContainerTypeId}}/applicationPermissions endpoint. The SharePoint Embedded team has made this easy by providing a Postman collection filled with lots of examples in calling the different SharePoint Online & Microsoft Graph endpoints.
In the SharePoint Embedded Samples repo, find the Postman collection and get the raw URL for it. Now, in Postman, I’ll import the collection.
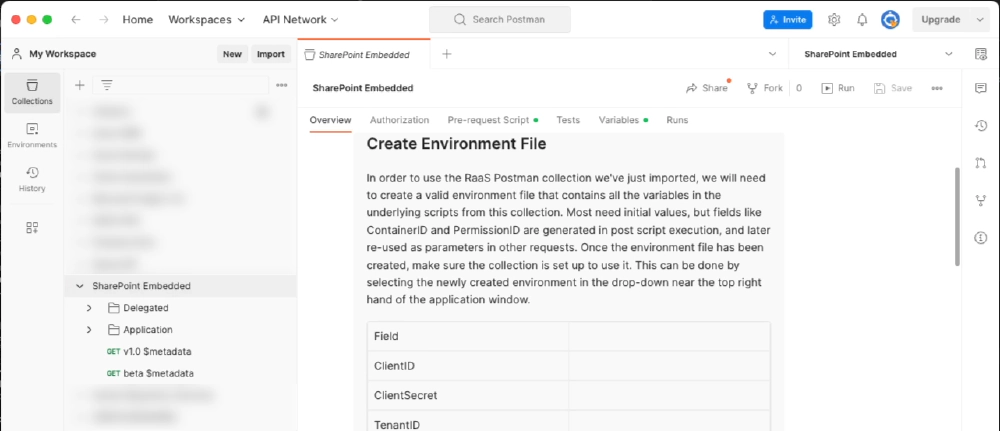
Postman SharePoint Embedded Collection
Notice the overview of the collection contains a bunch of documentation. One important section covers creating a Postman environment file to simplify setting the necessary values. I’ve already created one and just need to populate the values:
- ClientID: this is the Microsoft Entra ID application’s application or client ID.
- ClientSecret: this is the Microsoft Entra ID application’s client secret.
- ConsumingTenantId: this is the ID of the Microsoft 365 tenant of the consumer tenant you want to target.
- TenantName: this is the name of your tenant. That’s subdomain portion of your SharePoint Online site.
- RootSiteUrl: this is the root URL of your tenant.
- ContainerTypeID: this is the GUID of the Container Type I created in my provider tenant.
- CertThumbprint: this is the thumbprint of the certificate Microsoft Entra ID displayed after I successfully uploaded my certificate to my Microsoft Entra ID application.
- CertPrivateKey: this it the private key of my certificate. For this value, I want the one that’s in Base64 format, also known as PEM format.

Postman environment values for the SharePoint Embedded collection
The last two values, AppOnlyCertSPOToken and AppOnlyCertGraphToken, are going to be generated dynamically populated as explained in the rest of the Postman collection’s overview page.
Once my Postman collection and environment are set up, I’ll run the Register ContainerType request in the Application > Containers folder. Once that’s done, the app I’ll create will be able to manage and access storage containers in my Microsoft 365 tenant.
Create the SharePoint Embedded Application
At this point, you’ve enabled and set up the core pieces I need to start creating your first SharePoint Embedded application. The application will have a client-side interface that I’ll implement as a Single Page Application (SPA) with React, and a web API implemented as a Node.js-based REST server the SPA will use to perform more privileged operations.
Create the React SPA Scaffolding
Create the SPA using the Create React App (CRE) utility. Do this from a folder where I want the app to be created:
npx create-react-app my-first-spe-app --template typescript
Now let’s install a bunch of packages I’ll use in the SPA app by running the following command from within the folder the Create React App utility created for us (line breaks added for readability):
npm install @azure/msal-browser \
            @fluentui/react-components \
            @fluentui/react-icons \
            @microsoft/mgt-react \
            @microsoft/mgt-element \
            @microsoft/mgt-msal2-provider \
            -SE
This command will install the npm packages:
- @azure/msal-browser: Used to authenticate with Microsoft Entra ID.
- @microsoft/mgt-element, @microsoft/mgt-react, & @microsoft/mgt-msal2-provider: The Microsoft Graph Toolkit that contains UI components for React.
- @fluentui/react-components & @fluentui/react-icons: React components and icons from the Fluent UI v9 library.
Create the API Server Scaffolding
Next, let’s create and add the necessary scaffolding for the API server.
Start by running the following command to install some packages (line breaks added for readability):
npm install restify \
            @azure/msal-node \
            @microsoft/microsoft-graph-client \
            isomorphic-fetch \
            jsonwebtoken \
            jwks-rsa \
            -SE

npm install @types/restify \
            @types/jsonwebtoken \
            @types/isomorphic-fetch \
            -DE
This command will install the npm packages:
- restify & @types/restify: A Node.js-base API server and associated type declarations for TypeScript.
- @azure/msal-node: Used to authenticate with Microsoft Entra ID.
- @microsoft/microsoft-graph-client: Microsoft Graph JavaScript SDK.
- isomorphic-fetch: Polyfill that adds the browser
fetchAPI as a global so its API is consistent between the client & server. - jsonwebtoken: Implementation of JSON Web Tokens.
- jwks-rsa: Library to retrieve signing keys from a JSON Web Key Set (JWKS) endpoint.
Add a TypeScript compiler configuration for the web API project:
Add a new folder, ./server, to the root of the project.
Create a new file, ./server/tsconfig.json, and add the following code to it. This will configure the TypeScript compiler for the web API part of this project.
{
  "$schema": "<http://json.schemastore.org/tsconfig>",
  "compilerOptions": {
    "target": "ES2015",
    "module": "commonjs",
    "lib": [
      "es5",
      "es6",
      "dom",
      "es2015.collection"
    ],
    "esModuleInterop": true,
    "moduleResolution": "node",
    "strict": true
  }
}
Now, let’s add a placeholder for the web API to this project.
Create a new file, ./server/index.ts, folder and add the following code to it:
import * as restify from "restify";

const server = restify.createServer();
server.use(restify.plugins.bodyParser());

server.listen(process.env.port || process.env.PORT || 3001, () => {
  console.log(`\\nAPI server started, ${server.name} listening to ${server.url}`);
});

// add CORS support
server.pre((req, res, next) => {
  res.header('Access-Control-Allow-Origin', req.header('origin'));
  res.header('Access-Control-Allow-Headers', req.header('Access-Control-Request-Headers'));
  res.header('Access-Control-Allow-Credentials', 'true');

  if (req.method === 'OPTIONS') {
    return res.send(204);
  }

  next();
});
This creates a new Restify server and configures it to listen for requests on port 3001 and enables CORS.
Add project global settings and constants
Next, add a few constants to store your deployment settings
Create a new file, ./.env, to store settings for your API server. Add the following to the file:
API_ENTRA_APP_CLIENT_ID=
API_ENTRA_APP_CLIENT_SECRET=
API_ENTRA_APP_AUTHORITY=

CONTAINER_TYPE_ID=
Create a new file ./src/common/constants.ts to store settings for the React app. Add the following to the file:
export const CLIENT_ENTRA_APP_CLIENT_ID = '';
export const CLIENT_ENTRA_APP_AUTHORITY = '';

export const API_SERVER_URL = '';

export const CONTAINER_TYPE_ID = '';
Update the values in these two files using the following guidance:
- *_ENTRA_APP_CLIENT_ID: This is the application (client) ID of the Microsoft Entra ID application I created previously.
- *_ENTRA_APP_CLIENT_SECRET: This is the application (client) secret of the Microsoft Entra ID application I created previously.
- *_ENTRA_APP_AUTHORITY: This is the authority of the Microsoft Entra ID application. Use
https://login.microsoftonline.com/{{MS-ENTRA-TENANT-ID}}/where the tenant ID is the ID of the Microsoft Entra ID tenant where you created the Entra ID application previously. The other option,common, is applicable when you’re creating a multi-tenant application, but I created a single tenant application in this demo. - API_SERVER_URL: This is the URL of the web API server. Use
http://localhost:3001. - CONTAINER_TYPE_ID: This is the ID of the SharePoint Embedded Container Type that I created when setting up your environment previously.
Finally, add a new file, ./src/common/scopes.ts, to store a list of OAuth2 scopes (permissions) that I’ll use in the client-side application. This contains a list of all the permissions that I’ll use exported as constants for easy use.
// Microsoft Graph scopes
export const GRAPH_USER_READ = 'User.Read';
export const GRAPH_USER_READ_ALL = 'User.Read.All';
export const GRAPH_FILES_READ_WRITE_ALL = 'Files.ReadWrite.All';
export const GRAPH_SITES_READ_ALL = 'Sites.Read.All';
export const GRAPH_OPENID_CONNECT_BASIC = ["openid", "profile", "offline_access"];

// SharePoint Embedded scopes
export const SPEMBEDDED_CONTAINER_MANAGE= 'Container.Manage';
export const SPEMBEDDED_FILESTORAGECONTAINER_SELECTED= 'FileStorageContainer.Selected';
Create a copy of this file for the API server. Save the file to the following location in the project: ./server/common/scopes.ts.
Update Project Build Configuration
Now, I’m going to make some changes to the project to simplify building, running, and testing the app. I like to do this with npm scripts and two helpful utility packages.
Open a command prompt, set the current folder to the root of your project, and run the following command to install a few npm packages used in development:
npm install env-cmd npm-run-all -DE- The env-cmd package injects environment variables defined in a file into another process.
- The npm-run-all package includes utilities to run multiple commands, including npm scripts, in parallel or in a sequence.
Next, in the ./package.json file, I’ll update the
scriptsobject to the following:{ "scripts": { "build:backend": "tsc -p ./server/tsconfig.json", "start": "run-s build:backend start:apps", "start:apps": "run-p start:frontend start:backend", "start:frontend": "npm run start-cre", "start:backend": "env-cmd --silent -f .env node ./server/index.js", "start-cre": "react-scripts start", "build-cre": "react-scripts build", "test-cre": "react-scripts test", "eject-cre": "react-scripts eject" }, }
Let me explain what these scripts do:
- All the default create-react-app scripts were renamed to include the cre suffix in their name to indicate they’re associated with the create-react-app.
- The start script uses the run-s method from the npm-run-all npm package to run two scripts sequentially:
- It first runs the build script to transpile the entire project from TypeScript to JavaScript.
- Then, it runs the script start:apps.
- The start:apps script runs the start:frontend & start:backend scripts in parallel using the run-p method from the npm-run-all npm package.
- The start:backend script uses the env-cmd npm package to inject the environment variables in the ./.env file into the API server process.
At this point, I have a template project that you’ll use to add additional functionality.
Add sign in functionality to the front-end React SPA
I now want to do one final step in preparing my project - add support for user sign in to the React app. This involves adding some configuration code for the Microsoft Authentication Library (MSAL) and configuring the Microsoft Graph Toolkit with the necessary sign in details.
Set up the authentication provider
The Microsoft Graph Toolkit includes providers that enable authentication implementation for acquiring access tokens on different platforms. These also expose a Microsoft Graph client for calling Microsoft Graph APIs. One neat aspect about it is I can define a global provider that’s used throughout your app.
I’ll configure and add an MSAL provider in the root of the SPA (./src/index.tsx) before loading the React app:
import { Providers } from "@microsoft/mgt-element";
import { Msal2Provider } from "@microsoft/mgt-msal2-provider";
import * as Constants from "./common/constants"
import * as Scopes from "./common/scopes";

Providers.globalProvider = new Msal2Provider({
  clientId: Constants.CLIENT_ENTRA_APP_CLIENT_ID,
  authority: Constants.CLIENT_ENTRA_APP_AUTHORITY,
  scopes: [
    ...Scopes.GRAPH_OPENID_CONNECT_BASIC,
    Scopes.GRAPH_USER_READ_ALL,
    Scopes.GRAPH_FILES_READ_WRITE_ALL,
    Scopes.GRAPH_SITES_READ_ALL,
    Scopes.SPEMBEDDED_FILESTORAGECONTAINER_SELECTED
  ]
});
Update the app homepage to handle the sign-in and sign-out process
Now, let’s implement the sign-in process.
In the ./src/App.tsx file. Update the import statements to use some React hooks, and the necessary Microsoft Graph components, and import the permissions as well as the constants:
import React, { useState, useEffect } from "react";
import { Providers, ProviderState } from "@microsoft/mgt-element";
import { Login } from "@microsoft/mgt-react";
import { FluentProvider, Text, webLightTheme } from "@fluentui/react-components"
import {
  InteractionRequiredAuthError,
  PublicClientApplication
} from "@azure/msal-browser";
import './App.css';
import * as Scopes from "./common/scopes";
import * as Constants from "./common/constants";
The app needs the current user’s sign-in status. To do that, I’ll use the following custom React hook that I’ll add outside the existing App() function:
function useIsSignedIn() {
  const [isSignedIn, setIsSignedIn] = useState(false);

  useEffect(() => {
    const updateState = async () => {
      const provider = Providers.globalProvider;
      setIsSignedIn(provider && provider.state === ProviderState.SignedIn);
    };

    Providers.onProviderUpdated(updateState);
    updateState();

    return () => {
      Providers.removeProviderUpdatedListener(updateState);
    }
  }, []);

  return isSignedIn;
}
This creates a method, updateState(), that sets an internal state value based on the current user’s signed-in state. It then registers a listener to call the method when the provider is updated, sets the current state, and returns the user’s signed-in state.
Add a constant that uses this hook to the App() component:
function App() {
  const isSignedIn = useIsSignedIn();
}
Next, I need a handler to obtain an access token when the user completes the sign-in process. This handler, promptForContainerConsent(), uses a configured instance of an MSAL public client application to acquire the user’s access token from a successful authentication flow using either the token acquisition process of obtaining it from the cache silently or launching the popup sign-in process. Add this handler to the App() component:
const promptForContainerConsent = async (event: CustomEvent<undefined>): Promise<void> => {
  const containerScopes = {
    scopes: [Scopes.SPEMBEDDED_FILESTORAGECONTAINER_SELECTED],
    redirectUri: `${window.location.protocol}://${window.location.hostname}${(window.location.port === '80' || window.location.port === '443') ? '' : ':' + window.location.port}`
  };

  const msalInstance = new PublicClientApplication({
    auth: {
      clientId: Constants.CLIENT_ENTRA_APP_CLIENT_ID,
      authority: Constants.CLIENT_ENTRA_APP_AUTHORITY,
    },
    cache: {
      cacheLocation: 'localStorage',
      storeAuthStateInCookie: false,
    },
  });

  msalInstance.acquireTokenSilent(containerScopes)
    .then(response => {
      console.log('tokenResponse', JSON.stringify(response));
    })
    .catch(async (error) => {
      if (error instanceof InteractionRequiredAuthError) {
        return msalInstance.acquireTokenPopup(containerScopes);
      }
    });
}
With all this set, I’ll update the component’s rendering to include a sign-in button:
return (
  <FluentProvider theme={webLightTheme}>
    <div className="App">
      <Text size={900} weight='bold'>Sample SPA SharePoint Embedded App</Text>
      <Login loginCompleted={promptForContainerConsent} />
      <div>
      </div>
    </div>
  </FluentProvider>
);
Test the app by running npm run start, and sign in when the browser launches and loads your SPA. If you aren’t signed in, sign in.

Successful sign in of our Microsoft Entra ID enabled React SPA
Creating API endpoints that call endpoints on behalf of a user
Now that the basic project set up is complete and user authentication is configured, let’s move on to adding support for listing and selecting Containers in your tenant’s partition. But before I go there, I need to discuss some specifics around authentication and how to obtain access tokens for the application to call Microsoft Graph.
Interacting with SharePoint Embedded Containers is a privileged operation that’s carried out using the Microsoft Graph’s /storage/fileStorage/containers endpoint. In my app, Container management will only be handled by the web API which will authenticate as the app to obtain an access token for Microsoft Graph using app+user, also known as delegated, permissions.
In this scenario, the web API will use an identity other than its own to call another API, Microsoft Graph: the user’s identity. Using the OAuth 2.0 On-Behalf-Of (aka: OBO) flow, the web API will request an access token from Microsoft Entra ID for use with Microsoft Graph, but it will include the user’s access token that the SPA obtained when the user signed into the application.
The user’s access token is included in the OBO request as the assertion to prove to Microsoft Entra ID the identity of the user I want the web API to operate as.
You can learn more about the OAuth 2 OBO flow from the Microsoft’s documentation: Microsoft identity platform and OAuth 2.0 On-Behalf-Of Flow.
For this task, I’ll use the MSAL library. First, create a ConfidentialClientApplication for the Microsoft Entra ID application:
const msalConfig: MSAL.Configuration = {
  auth: {
    clientId: process.env['API_ENTRA_APP_CLIENT_ID']!,
    authority: process.env['API_ENTRA_APP_AUTHORITY']!,
    clientSecret: process.env['API_ENTRA_APP_CLIENT_SECRET']!
  }
};

const confidentialClient = new MSAL.ConfidentialClientApplication(msalConfig);
Then, include the user’s access token as the user assertion to obtain a new OBO access token:
// get user's access token from the request submitted by the React SPA
const [bearer, token] = (req.headers.authorization || '').split(' ');

// set that token to the assertion and the scopes to the permissions we
//    need in the access token to call Microsoft Graph
const graphTokenRequest = {
  oboAssertion: token,
  scopes: [
    Scopes.GRAPH_SITES_READ_ALL,
    Scopes.SPEMBEDDED_FILESTORAGECONTAINER_SELECTED
  ]
};

// obtain the OBO token using the ConfidentialClientApplication object
const ccaOboResponse = await confidentialClient.acquireTokenOnBehalfOf(graphTokenRequest);
const oboGraphToken = ccaOboResponse!.accessToken;
Once I have an OBO token, I can then create a Microsoft Graph client from Graph’s SDK to simplify issuing the calling the Graph…
const authProvider = (callback: MSGraph.AuthProviderCallback) => {
  callback(null, oboGraphToken);
};

const graphClient = MSGraph.Client.init({
  authProvider: authProvider,
  defaultVersion: 'beta'
});
… finally, I can submit the request to Microsoft Graph, for example, to create a new container:
const containerRequestData = {
  displayName: 'New container name',
  description: 'New container description',
  containerTypeId: process.env["CONTAINER_TYPE_ID"]
};

const graphResponse = await graphClient.api(`storage/fileStorage/containers`)
                                       .post(containerRequestData);
Let’s implement this in the application.
List and select Containers
To begin, I’ll create the necessary web API components to support the React app.
Add a utility method to retrieve an OBO token to call Microsoft Graph
I first need a utility file to obtain an access token using the OBO flow using the existing credential.
Create a new file, ./server/auth.ts, and add the following code to it:
import { ConfidentialClientApplication } from "@azure/msal-node";
require('isomorphic-fetch');
import * as MSGraph from '@microsoft/microsoft-graph-client';
import * as Scopes from './common/scopes';

export const getGraphToken = async (confidentialClient: ConfidentialClientApplication, token: string): Promise<[boolean, string | any]> => {
  try {
    const graphTokenRequest = {
      oboAssertion: token,
      scopes: [
        Scopes.GRAPH_SITES_READ_ALL,
        Scopes.SPEMBEDDED_FILESTORAGECONTAINER_SELECTED
      ]
    };
    const oboGraphToken = (await confidentialClient.acquireTokenOnBehalfOf(graphTokenRequest))!.accessToken;
    return [true, oboGraphToken];
  } catch (error: any) {
    const errorResult = {
      status: 500,
      body: JSON.stringify({
        message: `Unable to generate Microsoft Graph OBO token: ${error.message}`,
        providedToken: token
      })
    };
    return [false, errorResult];
  }
}
This will take a configured MSAL ConfidentialClientApplication and the user’s ID token to request a new token I can use to call Microsoft Graph.
Add Listing Containers to the Web API Project
Now create a handler to get a list of the Containers using Microsoft Graph to be returned to the React app. Create a new file, ./server/listContainers.ts, and add the following code to it.
This defines a new function, listContainers(), that I’ll link up to a listener in the restify server. When called, it will use an MSAL ConfidentialClientApplication to issue a call to the beta version of Microsoft Graph’s storage/fileStorage/containers endpoint matching the specific Container Type I created previously. The results of this call will be returned to the caller (our SPA) of the API’s new endpoint:
import {
  Request,
  Response
} from "restify";
import * as MSAL from "@azure/msal-node";
require('isomorphic-fetch');
import * as MSGraph from '@microsoft/microsoft-graph-client';
import { getGraphToken } from "./auth";

const msalConfig: MSAL.Configuration = {
  auth: {
    clientId: process.env['API_ENTRA_APP_CLIENT_ID']!,
    authority: process.env['API_ENTRA_APP_AUTHORITY']!,
    clientSecret: process.env['API_ENTRA_APP_CLIENT_SECRET']!
  },
  system: {
    loggerOptions: {
      loggerCallback(loglevel: any, message: any, containsPii: any) {
        console.log(message);
      },
      piiLoggingEnabled: false,
      logLevel: MSAL.LogLevel.Verbose,
    }
  }
};

const confidentialClient = new MSAL.ConfidentialClientApplication(msalConfig);

export const listContainers = async (req: Request, res: Response) => {
  if (!req.headers.authorization) {
    res.send(401, { message: 'No access token provided.' });
    return;
  }

  const [bearer, token] = (req.headers.authorization || '').split(' ');

  const [graphSuccess, oboGraphToken] = await getGraphToken(confidentialClient, token);

  if (!graphSuccess) {
    res.send(200, oboGraphToken);
    return;
  }

  const authProvider = (callback: MSGraph.AuthProviderCallback) => {
    callback(null, oboGraphToken);
  };

  try {
    const graphClient = MSGraph.Client.init({
      authProvider: authProvider,
      defaultVersion: 'beta'
    });

    const endpoint = `storage/fileStorage/containers?$filter=containerTypeId eq ${process.env["CONTAINER_TYPE_ID"]}`;
    const graphResponse = await graphClient.api(endpoint).get();

    res.send(200, graphResponse);
    return;
  } catch (error: any) {
    res.send(500, { message: `Unable to list containers: ${error.message}` });
    return;
  }
}
With the endpoint created, add it to the restify server (./server/index.ts) as a listener for HTTP GET requests to the /api/listContainers endpoint:
import { listContainers } from "./listContainers";

/* ... */

server.get('/api/listContainers', async (req, res, next) => {
  try {
    const response = await listContainers(req, res);
    res.send(200, response)
  } catch (error: any) {
    res.send(500, { message: `Error in API server: ${error.message}` });
  }
  next();
});
Update the React project to display the Containers
With the web API set up, I can update the React project to provide users with an interface to select an existing Container or create a new Container.
Start by creating a new interface, ./src/common/IContainer.ts, with the following properties representing the object I’ll send and receive in the calls to Microsoft Graph:
export interface IContainer {
  id: string;
  displayName: string;
  containerTypeId: string;
  createdDateTime: string;
}
Now, I’ll create a new service that will be used to call the web API endpoint or make direct calls from the React app to the Microsoft Graph. Create a new file ./src/services/spembedded.ts and add the following code to it:
import { Providers, ProviderState } from '@microsoft/mgt-element';
import * as Msal from '@azure/msal-browser';
import * as Constants from './../common/constants';
import * as Scopes from './../common/scopes';
import { IContainer } from './../common/IContainer';

export default class SpEmbedded {

  async getApiAccessToken() {
    const msalConfig: Msal.Configuration = {
      auth: {
        clientId: Constants.CLIENT_ENTRA_APP_CLIENT_ID,
        authority: Constants.CLIENT_ENTRA_APP_AUTHORITY,
      },
      cache: {
        cacheLocation: 'localStorage',
        storeAuthStateInCookie: false
      }
    };

    const scopes: Msal.SilentRequest = {
      scopes: [`api://${Constants.CLIENT_ENTRA_APP_CLIENT_ID}/${Scopes.SPEMBEDDED_CONTAINER_MANAGE}`],
      prompt: 'select_account',
      redirectUri: `${window.location.protocol}//${window.location.hostname}${(window.location.port === '80' || window.location.port === '443') ? '' : ':' + window.location.port}`
    };

    const publicClientApplication = new Msal.PublicClientApplication(msalConfig);
    await publicClientApplication.initialize();

    let tokenResponse;
    try {
      tokenResponse = await publicClientApplication.acquireTokenSilent(scopes);
      return tokenResponse.accessToken;
    } catch (error) {
      if (error instanceof Msal.InteractionRequiredAuthError) {
        tokenResponse = await publicClientApplication.acquireTokenPopup(scopes);
        return tokenResponse.accessToken;
      }
      console.log(error)
      return null;
    }
  };

}
The method getApiAccessToken()in the service will use an MSAL PublicClientApplication that I’ll use to call the web API, specifically the new listContainers endpoint.
Add the following listContainers() method that will call the web API to get a list of all the Containers. This will get the access token the getApiAccessToken() utility method returns and include it in calls to the web API. Recall that this access token is used to create an MSAL ConfidentialClientApplication to obtain an OBO token to call Microsoft Graph. That OBO token has more permissions granted to it that I can only get from a web call:
async listContainers(): Promise<IContainer[] | undefined> {
  const api_endpoint = `${Constants.API_SERVER_URL}/api/listContainers`;

  if (Providers.globalProvider.state === ProviderState.SignedIn) {
    const token = await this.getApiAccessToken();
    const containerRequestHeaders = {
      'Authorization': `Bearer ${token}`,
      'Content-Type': 'application/json'
    };
    const containerRequestOptions = {
      method: 'GET',
      headers: containerRequestHeaders
    };
    const response = await fetch(api_endpoint, containerRequestOptions);

    if (response.ok) {
      const containerResponse = await response.json();
      return (containerResponse.value)
        ? (containerResponse.value) as IContainer[]
        : undefined;
    } else {
      console.error(`Unable to list Containers: ${JSON.stringify(response)}`);
      return undefined;
    }
  }
};
Now, create a new React component that will handle all the Container tasks and UI. Create a new file, ./src/components/containers.tsx, and add the following code to it. This will serve as the scaffolding for this component as I’ll need to add a lot of business logic to it:
import React, { useEffect, useState } from 'react';
import {
  Button, Label, Spinner,
  Dialog, DialogActions, DialogContent, DialogSurface,
  DialogBody, DialogTitle, DialogTrigger,
  Dropdown, Option,
  Input, InputProps, InputOnChangeData,
  makeStyles, shorthands, useId
} from '@fluentui/react-components';
import type {
  OptionOnSelectData,
  SelectionEvents
} from '@fluentui/react-combobox'
import { IContainer } from "./../common/IContainer";
import SpEmbedded from '../services/spembedded';

const spe = new SpEmbedded();

const useStyles = makeStyles({
  root: {
    display: 'flex',
    flexDirection: 'column',
    alignItems: 'center',
    justifyContent: 'center',
    ...shorthands.padding('25px'),
  },
  containerSelector: {
    display: 'flex',
    flexDirection: 'column',
    alignItems: 'center',
    justifyContent: 'center',
    rowGap: '10px',
    ...shorthands.padding('25px'),
  },
  containerSelectorControls: {
    width: '400px',
  },
  dialogContent: {
    display: 'flex',
    flexDirection: 'column',
    rowGap: '10px',
    marginBottom: '25px'
  }
});

export const Containers = (props: any) => {
  const styles = useStyles();
  return ( );
}

export default Containers;
Aside from the typical imports and component declaration, this code contains a new instance of the SharePoint Embedded service I just created and a new method useStyles(). This is used to create an object that I’ll use to style the Fluent UI React components in the component.
The first step is to get a list of the Containers. Start by adding the following code to the component. This will set a few state values to hold the Containers retrieved from the web API:
const [containers, setContainers] = useState<IContainer[]>([]);
const [selectedContainer, setSelectedContainer] = useState<IContainer | undefined>(undefined);
const containerSelector = useId('containerSelector');
Next, add the following code that will do two things:
- Implement a React hook to get all Containers when the page loads and set the state object that will keep track of them.
- Create an event handler method when a user selects a Container from the dropdown control I’ll implement in the UX.
useEffect(() => {
  (async () => {
    const containers = await spe.listContainers();
    if (containers) {
      setContainers(containers);
    }
  })();
}, []);

const onContainerDropdownChange = (event: SelectionEvents, data: OptionOnSelectData) => {
  const selected = containers.find((container) => container.id === data.optionValue);
  setSelectedContainer(selected);
};
Update the rendering by adding the following to the return() method. This will create a DropDown control and a placeholder where I’ll add a list of the contents in the selected Container:
<div className={styles.root}>
  <div className={styles.containerSelector}>
    <Dropdown
      id={containerSelector}
      placeholder="Select a Storage Container"
      className={styles.containerSelectorControls}
      onOptionSelect={onContainerDropdownChange}>
      { containers.map((option) => (
        <Option key={option.id} value={option.id}>{option.displayName}</Option>
      )) }
    </Dropdown>
  </div>
  {selectedContainer && (`[[TOOD]] container "${selectedContainer.displayName}" contents go here`)}
</div>
The last step is to add the new Containers component to the app in the ./src/App.tsx file:
import Containers from "./components/containers";
Locate the <div></div> markup in the component’s return(). Replace that markup with the following to add the Containers component only if the user is signed in:
<div>
  {isSignedIn && (<Containers />)}
</div>
Checkpoint: Test the app to verify everything is working as expected…
If this is the first time you’re creating a SharePoint Embedded app, I won’t have any containers listed because I haven’t created any yet.
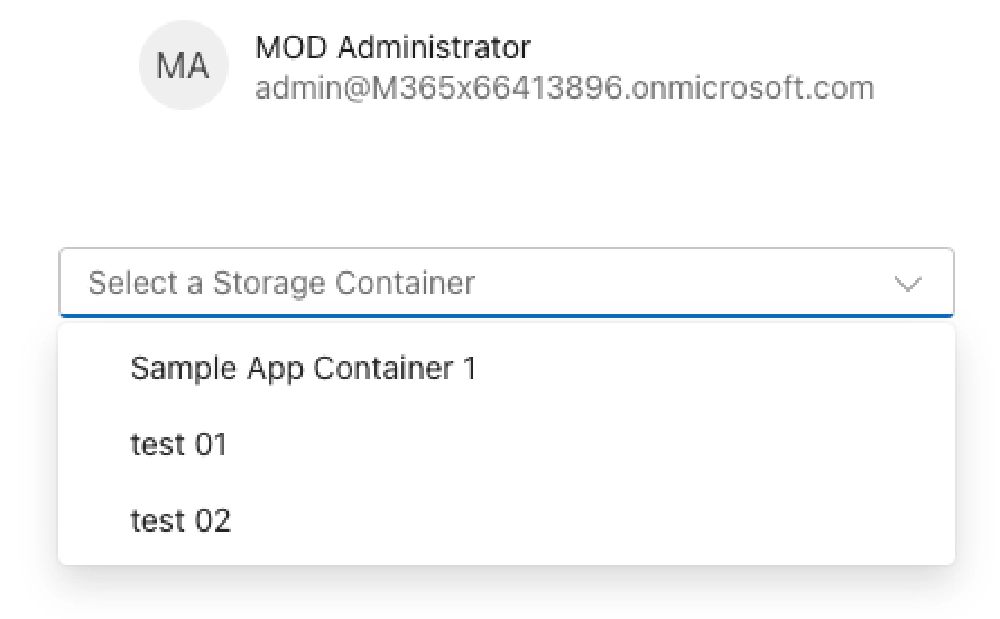
Screenshot of SharePoint Embedded containers in the SPA selector

Screenshot the contents placeholder when selecting a SharePoint Embedded Container
Create new Containers
The last thing to do with the Containers component is to add support for creating containers. I’ll start by first creating the web API parts to support the React app.
Add support to create Containers to the Web API project
Now let’s create the handler to create a Container using Microsoft Graph to be returned back to the React app. To simplify this, I’ll duplicate the ./server/listContainers.ts as a new file ./server/createContainer.ts since there are a lot of similarities.
- First, I’ll rename the main method to
createContainer()fromlistContainer()… - … then, I’ll add some error checking to ensure the body object in the request contains a property
displayNamefor the new Container to create… - … I’ll then create the payload I need to send to the Graph API to create a new Container…
- … and finally, update the call to Microsoft Graph to submit a POST to the Container endpoint to create the new Container.
import {
  Request,
  Response
} from "restify";
import * as MSAL from "@azure/msal-node";
require('isomorphic-fetch');
import * as MSGraph from '@microsoft/microsoft-graph-client';
import { getGraphToken } from "./auth";

const msalConfig: MSAL.Configuration = {
  auth: {
    clientId: process.env['API_ENTRA_APP_CLIENT_ID']!,
    authority: process.env['API_ENTRA_APP_AUTHORITY']!,
    clientSecret: process.env['API_ENTRA_APP_CLIENT_SECRET']!
  },
  system: {
    loggerOptions: {
      loggerCallback(loglevel: any, message: any, containsPii: any) {
        console.log(message);
      },
      piiLoggingEnabled: false,
      logLevel: MSAL.LogLevel.Verbose,
    }
  }
};

const confidentialClient = new MSAL.ConfidentialClientApplication(msalConfig);

export const createContainer = async (req: Request, res: Response) => {

  if (!req.headers.authorization) {
    res.send(401, { message: 'No access token provided.' });
    return;
  }

  const [bearer, token] = (req.headers.authorization || '').split(' ');

  if (!req.body?.displayName) {
    res.send(400, { message: 'Invalid request: must provide a displayName property in the query parameters or request body' });
    return undefined;
  }

  const [graphSuccess, graphTokenRequest] = await getGraphToken(confidentialClient, token);

  if (!graphSuccess) {
    res.send(200, graphTokenRequest);
    return;
  }

  const authProvider = (callback: MSGraph.AuthProviderCallback) => {
    callback(null, graphTokenRequest);
  };

  try {
    const graphClient = MSGraph.Client.init({
      authProvider: authProvider,
      defaultVersion: 'beta'
    });

    const containerRequestData = {
      displayName: req.body!.displayName,
      description: (req.body?.description) ? req.body.description : '',
      containerTypeId: process.env["CONTAINER_TYPE_ID"]
    };

    const graphResponse = await graphClient.api(`storage/fileStorage/containers`).post(containerRequestData);

    res.send(200, graphResponse);
    return;
  } catch (error: any) {
    res.send(500, { message: `Failed to create container: ${error.message}` });
    return;
  }
}
Add this new endpoint to the restify server (./server/index.ts) file, listening for HTTP POST requests to the /api/createContainers endpoint:
import { createContainer } from "./createContainer";

/* ... */

server.post('/api/createContainer', async (req, res, next) => {
  try {
    const response = await createContainer(req, res);
    res.send(200, response)
  } catch (error: any) {
    res.send(500, { message: `Error in API server: ${error.message}` });
  }
  next();
});
With the create Container process completed in the web API, I’m now going to add support for it to my SPA.
Update the React project to create a new Container
Add the following function to the ./src/services/spembedded.ts service in the SPA. This will submit the Container creation request to the web API and include the user’s access token so the API server can use that to authenticate the request to obtain an OBO token to call Microsoft Graph:
async createContainer(containerName: string, containerDescription: string = ''): Promise<IContainer | undefined> {
  const api_endpoint = `${Constants.API_SERVER_URL}/api/createContainer`;

  if (Providers.globalProvider.state === ProviderState.SignedIn) {
    const token = await this.getApiAccessToken();
    const containerRequestHeaders = {
      'Authorization': `Bearer ${token}`,
      'Content-Type': 'application/json'
    };

    const containerRequestData = {
      displayName: containerName,
      description: containerDescription
    };
    const containerRequestOptions = {
      method: 'POST',
      headers: containerRequestHeaders,
      body: JSON.stringify(containerRequestData)
    };

    const response = await fetch(api_endpoint, containerRequestOptions);

    if (response.ok) {
      const containerResponse = await response.json();
      return containerResponse as IContainer;
    } else {
      console.error(`Unable to create container: ${JSON.stringify(response)}`);
      return undefined;
    }
  }
};
This new method is similar to the existing listContainers() method, except it creates a new object and submits it as a POST to the web API.
The last step is to update the Containers component, the /.src/components/containers.tsx file, and update the UI to support creating a Container.
For this step, I’ll use a Fluent UI React Dialog component to prompt the user in a modal for the name of the new container. Start by adding the following state objects and UI component ID objects immediately after the existing state statements:
const [dialogOpen, setDialogOpen] = useState(false);
const containerName = useId('containerName');
const [name, setName] = useState('');
const containerDescription = useId('containerDescription');
const [description, setDescription] = useState('');
const [creatingContainer, setCreatingContainer] = useState(false);
Next, add the following event handlers after the existing event handler that will update the name and description properties for the new Container from the Input components that will be in the Dialog. They are also used to handle with the user clicks a button to create the Container:
const handleNameChange: InputProps["onChange"] = (event: React.ChangeEvent<HTMLInputElement>, data: InputOnChangeData): void => {
  setName(data?.value);
};

const handleDescriptionChange: InputProps["onChange"] = (event: React.ChangeEvent<HTMLInputElement>, data: InputOnChangeData): void => {
  setDescription(data?.value);
};

const onContainerCreateClick = async (event: React.MouseEvent<HTMLButtonElement>): Promise<void> => {
  setCreatingContainer(true);
  const newContainer = await spe.createContainer(name, description);

  if (newContainer) {
    setName('');
    setDescription('');
    setContainers(current => [...current, newContainer]);
    setSelectedContainer(newContainer);
    setDialogOpen(false);
  } else {
    setName('');
    setDescription('');
  }
  setCreatingContainer(false);
}
Finally, update the UX to add the following React code immediately after the existing <Dropdown> component. This will create a Fluent UI React Dialog component that’s triggered from a button:
<Dialog open={dialogOpen} onOpenChange={(event, data) => setDialogOpen(data.open)}>

  <DialogTrigger disableButtonEnhancement>
    <Button className={styles.containerSelectorControls} appearance='primary'>Create a new storage Container</Button>
  </DialogTrigger>

  <DialogSurface>
    <DialogBody>
      <DialogTitle>Create a new storage Container</DialogTitle>

      <DialogContent className={styles.dialogContent}>
        <Label htmlFor={containerName}>Container name:</Label>
        <Input id={containerName} className={styles.containerSelectorControls} autoFocus required
          value={name} onChange={handleNameChange}></Input>
        <Label htmlFor={containerDescription}>Container description:</Label>
        <Input id={containerDescription} className={styles.containerSelectorControls} autoFocus required
          value={description} onChange={handleDescriptionChange}></Input>
        {creatingContainer &&
          <Spinner size='medium' label='Creating storage Container...' labelPosition='after' />
        }
      </DialogContent>

      <DialogActions>
        <DialogTrigger disableButtonEnhancement>
          <Button appearance="secondary" disabled={creatingContainer}>Cancel</Button>
        </DialogTrigger>
        <Button appearance="primary"
          value={name}
          onClick={onContainerCreateClick}
          disabled={creatingContainer || (name === '')}>Create storage Container</Button>
      </DialogActions>
    </DialogBody>
  </DialogSurface>

</Dialog>
The dialog is shown when the dialogOpen state changes to true. This happens when the Button is clicked. The contents of the dialog contain a title, a form, and some buttons. The form consists of two input controls to collect the name and description of the new Container. Finally, the actions section contains two buttons to cancel or submit the request. When I submit the request by clicking the button, it triggers a spinner to appear and disables the buttons while I wait for the call to be submitted to the web API and onto Microsoft Graph to create the container. When it completes, the dialog is hidden.
Checkpoint: Test the app. Select the Create a new storage Container button and fill in the form, selecting the button when finished.
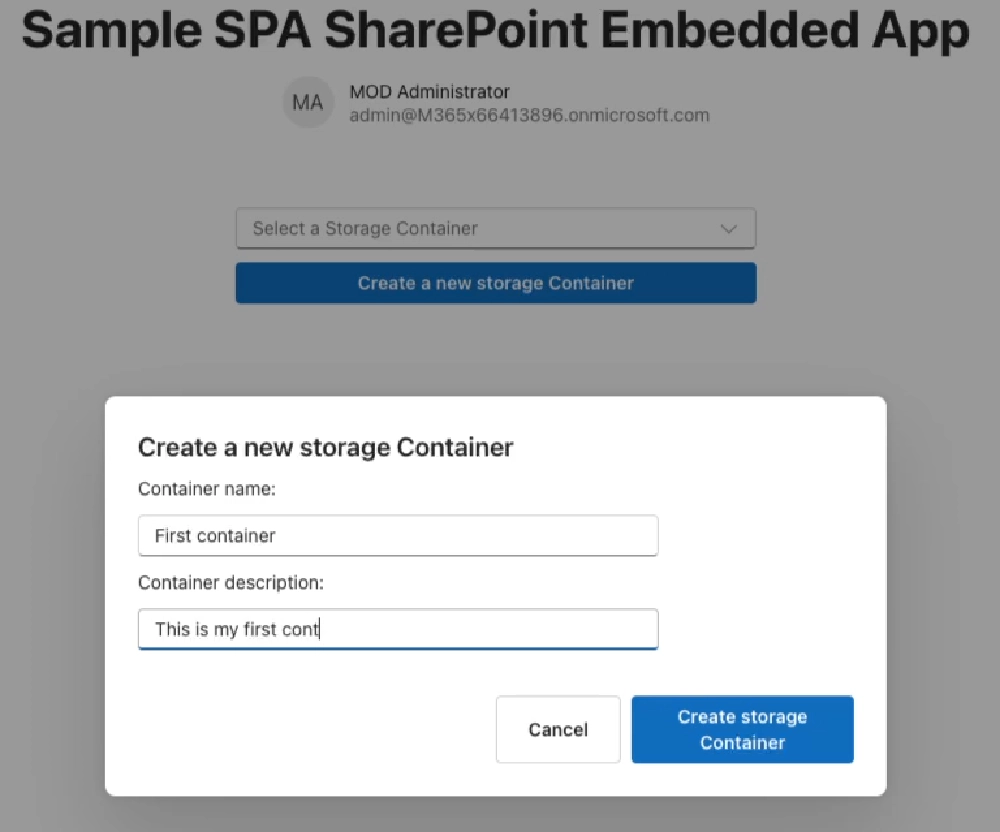
Creating a new SharePoint Embedded Container
A spinner will be displayed while we’re waiting for the operation to complete.
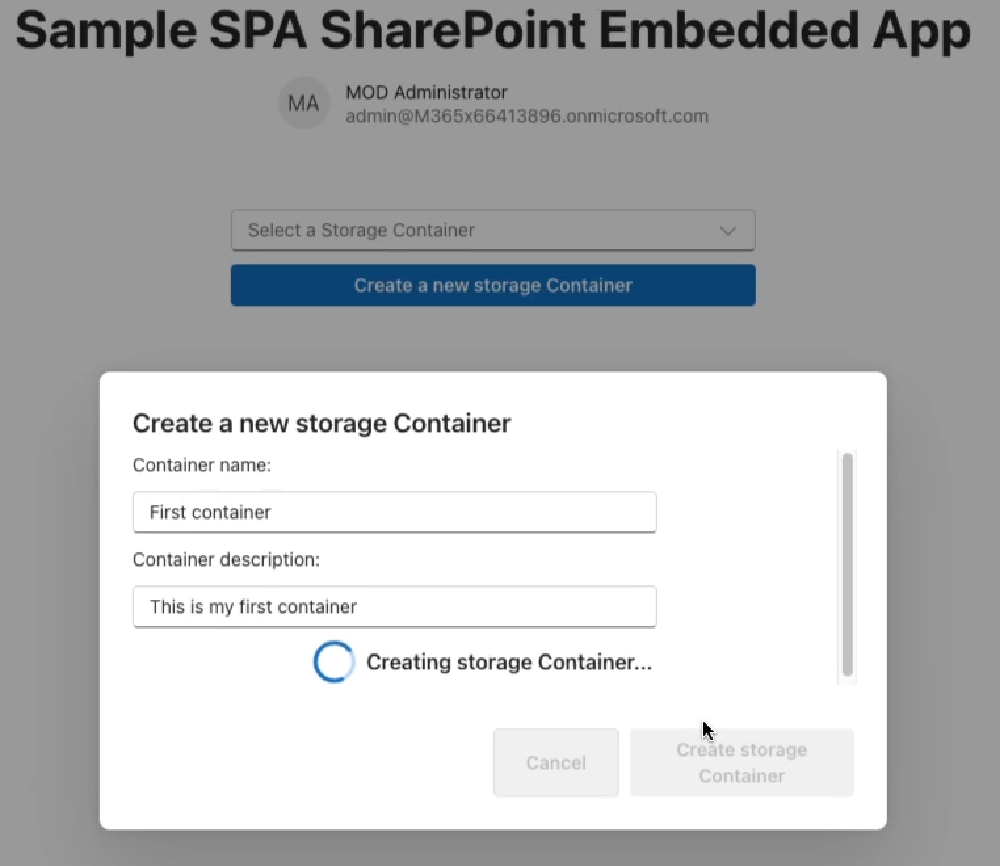
Creating a new SharePoint Embedded Container with the animated spinner control
Once it completes, select the Container dropdown selector to see the new Container!
Update the React containers component to display files
So, we’ve got the process of listing and creating new Containers complete, let’s see how I can view and manage the contents of these Containers.
If you recall, I left a placeholder in the Containers component that will be used to display the contents of the selected Container.
I want to replace this with a new Files component but first I need to make a few more edits to my project…
Add Microsoft Graph Type Declarations to the project
SharePoint Embedded Containers and their contents are just Drive and DriveItems in Microsoft Graph. So, to simplify my life a bit, I’ll use the types provided by the Microsoft Graph. Because I haven’t installed the npm package that includes them, I need to do that first.
From the command line, run the following command from the root folder for my project:
npm install @microsoft/microsoft-graph-types -DE
Now I can add the new Files component. Start by updating the Containers component to replace the placeholder with the Files component I’ll create.
In the ./src/components/containers.tsx file, find the line…
{selectedContainer && (`[[TOOD]] container "${selectedContainer.displayName}" contents go here`)}
… and replace it with the following:
// add this to the top of the file with the other imports
import { Files } from "./files";

// replace the line of code you found with this line
{selectedContainer && (<Files container={selectedContainer} />)}
Create the Files component
I’ll start by creating a new React component to display and manage the contents of the Containers.
I’ll create a new file, ./src/components/files.tsx, and add the following code to it. This is just a boilerplate component that includes all imports and the skeleton of my new Files component including the new interfaces I’ll use.
import React, {
  useState,
  useEffect,
  useRef
} from 'react';
import { Providers } from "@microsoft/mgt-element";
import {
  AddRegular, ArrowUploadRegular,
  FolderRegular, DocumentRegular,
  SaveRegular, DeleteRegular,
} from '@fluentui/react-icons';
import {
  Button, Link, Label, Spinner,
  Input, InputProps, InputOnChangeData,
  Dialog, DialogActions, DialogContent, DialogBody, DialogSurface, DialogTitle, DialogTrigger,
  DataGrid, DataGridProps,
  DataGridHeader, DataGridHeaderCell,
  DataGridBody, DataGridRow,
  DataGridCell,
  TableColumnDefinition, createTableColumn,
  TableRowId,
  TableCellLayout,
  OnSelectionChangeData,
  SelectionItemId,
  Toolbar, ToolbarButton,
  makeStyles
} from "@fluentui/react-components";
import {
  DriveItem
} from "@microsoft/microsoft-graph-types-beta";
import { IContainer } from "./../common/IContainer";
require('isomorphic-fetch');

interface IFilesProps {
  container: IContainer;
}

interface IDriveItemExtended extends DriveItem {
  isFolder: boolean;
  modifiedByName: string;
  iconElement: JSX.Element;
  downloadUrl: string;
}

const useStyles = makeStyles({
  dialogInputControl: {
    width: '400px',
  },
  dialogContent: {
    display: 'flex',
    flexDirection: 'column',
    rowGap: '10px',
    marginBottom: '25px'
  }
});

export const Files = (props: IFilesProps) => {

  const styles = useStyles();

  return (
    <div>
    </div>
  );
}

export default Files;
Display a list of the selected Container contents
The first thing I’ll do is display the contents of the selected Container. To do this, I’ll use the DataGrid component from the Fluent UI React library.
Add the following markup inside the <div> element in the return() statement:
The grid references a few objects I’ll create in a few minutes for the items to display, the columns in the grid, and settings for how I want the columns to be sized. The child components within the grid define the header rows and body, mapping them to methods I’m going to define in just a minute.
You can learn more about the DataGrid control from the Fluent UI docs: Fluent UI v9 DataGrid control.
<DataGrid
  items={driveItems}
  columns={columns}
  getRowId={(item) => item.id}
  resizableColumns
  columnSizingOptions={columnSizingOptions}>
  <DataGridHeader>
    <DataGridRow>
      {({ renderHeaderCell }) => (
        <DataGridHeaderCell>{renderHeaderCell()}</DataGridHeaderCell>
      )}
    </DataGridRow>
  </DataGridHeader>
  <DataGridBody<IDriveItemExtended>>
    {({ item, rowId }) => (
      <DataGridRow<IDriveItemExtended> key={rowId}>
        {({ renderCell, columnId }) => (
          <DataGridCell>
            {renderCell(item)}
          </DataGridCell>
        )}
      </DataGridRow>
    )}
  </DataGridBody>
</DataGrid>
I’ll start filling in these holes by implementing the things my DataGrid references like the collections, settings, and methods. I’ll start with the visual things, then I’ll get the data the grid will show.
The columns in the DataGrid can be resized according to the properties I set. Create a new constant, columnSizingOptions, and add the code immediately before the return() statement:
const columnSizingOptions = {
  driveItemName: {
    minWidth: 150,
    defaultWidth: 250,
    idealWidth: 200
  },
  lastModifiedTimestamp: {
    minWidth: 150,
    defaultWidth: 150
  },
  lastModifiedBy: {
    minWidth: 150,
    defaultWidth: 150
  },
  actions: {
    minWidth: 250,
    defaultWidth: 250
  }
};
Next, define the structure and rendering settings for all the columns in the DataGrid. Do this by creating a new collection, columns, and adding it immediately before the columnSizingOptions I just created. This defines three columns with properties and methods that the grid references to render the header and content cells for each row. This is done using the utility method createTableColumn() to give each column an ID and specify how the header and body cells in the table are rendered.
const columns: TableColumnDefinition<IDriveItemExtended>[] = [
  createTableColumn({
    columnId: 'driveItemName',
    renderHeaderCell: () => {
      return 'Name'
    },
    renderCell: (driveItem) => {
      return (
        <TableCellLayout media={driveItem.iconElement}>
          <Link href={driveItem!.webUrl!} target='_blank'>{driveItem.name}</Link>
        </TableCellLayout>
      )
    }
  }),
  createTableColumn({
    columnId: 'lastModifiedTimestamp',
    renderHeaderCell: () => {
      return 'Last Modified'
    },
    renderCell: (driveItem) => {
      return (
        <TableCellLayout>
          {driveItem.lastModifiedDateTime}
        </TableCellLayout>
      )
    }
  }),
  createTableColumn({
    columnId: 'lastModifiedBy',
    renderHeaderCell: () => {
      return 'Last Modified By'
    },
    renderCell: (driveItem) => {
      return (
        <TableCellLayout>
          {driveItem.modifiedByName}
        </TableCellLayout>
      )
    }
  })
];
With the DataGrid configured, I’ll add some constants to manage the React app’s state with the properties the existing code is using. I’ll put these at the top of my component.
const [driveItems, setDriveItems] = useState<IDriveItemExtended[]>([]);
const [selectedRows, setSelectedRows] = useState<Set<SelectionItemId>>(new Set<TableRowId>([1]));
Next, I’ll add some handlers to fetch and display the data from the Container.
This handler and React hook get the contents of the selected Container. The useEffect() hook will run the first time the component is rendered as well as when the <Files />component’s input properties change.
useEffect(() => {
  (async () => {
    loadItems();
  })();
}, [props]);

const loadItems = async (itemId?: string) => {
  try {
    const graphClient = Providers.globalProvider.graph.client;
    const driveId = props.container.id;
    const driveItemId = itemId || 'root';

    // get Container items at current level
    const graphResponse = await graphClient.api(`/drives/${driveId}/items/${driveItemId}/children`).get();
    const containerItems: DriveItem[] = graphResponse.value as DriveItem[]
    const items: IDriveItemExtended[] = [];
    containerItems.forEach((driveItem: DriveItem) => {
      items.push({
        ...driveItem,
        isFolder: (driveItem.folder) ? true : false,
        modifiedByName: (driveItem.lastModifiedBy?.user?.displayName) ? driveItem.lastModifiedBy!.user!.displayName : 'unknown',
        iconElement: (driveItem.folder) ? <FolderRegular /> : <DocumentRegular />,
        downloadUrl: (driveItem as any)['@microsoft.graph.downloadUrl']
      });
    });
    setDriveItems(items);
  } catch (error: any) {
    console.error(`Failed to load items: ${error.message}`);
  }
};
The loadItems function uses the Microsoft Graph client to get a list of all the files within the current folder, defaulting to the root if no folder is already selected.
It then takes the collection of DriveItems returned by the Microsoft Graph and adds a few additional properties to simplify the code later. At the end of the method, it calls the setDriveitems() state accessor method that will trigger a re-rendering of the component. The driveItems are set on the DataGrid.items property which explains why the table displays some information.
Checkpoint: Test the app to verify everything is working as expected. Select any of your existing Containers and if you’ve added files to them, you should see them:
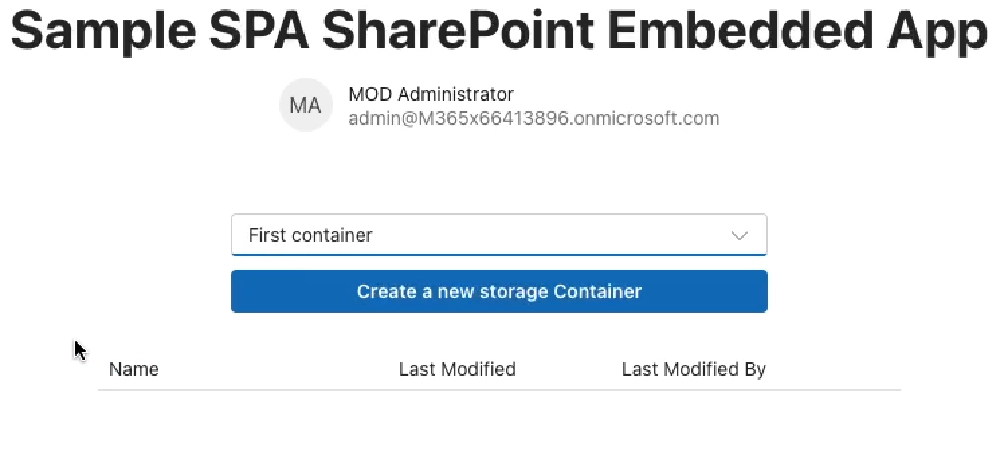
Empty DataGrid after selecting a Container with no folders or files in it.
Create folders in Containers
Let’s continue building out the <Files /> component by adding support to creating and displaying folders.
Start by adding the following code immediately alongside the existing React state statements. This will add the necessary React state values I’ll use:
const [folderId, setFolderId] = useState<string>('root');
const [folderName, setFolderName] = useState<string>('');
const [creatingFolder, setCreatingFolder] = useState<boolean>(false);
const [newFolderDialogOpen, setNewFolderDialogOpen] = useState(false);
To create a new folder, I’ll display a new modal popup with a Dialog component to the user when they click a button in the toolbar.
Within the return() method, immediately before the <DataGrid>, add the following code to implement the dialog:
<Toolbar>
  <ToolbarButton vertical icon={<AddRegular />} onClick={() => setNewFolderDialogOpen(true)}>New Folder</ToolbarButton>
</Toolbar>

<Dialog open={newFolderDialogOpen}>
  <DialogSurface>
    <DialogBody>
      <DialogTitle>Create New Folder</DialogTitle>
      <DialogContent className={styles.dialogContent}>
        <Label htmlFor={folderName}>Folder name:</Label>
        <Input id={folderName} className={styles.dialogInputControl} autoFocus required
          value={folderName} onChange={onHandleFolderNameChange}></Input>
        {creatingFolder &&
          <Spinner size='medium' label='Creating folder...' labelPosition='after' />
        }
      </DialogContent>
      <DialogActions>
        <DialogTrigger disableButtonEnhancement>
          <Button appearance="secondary" onClick={() => setNewFolderDialogOpen(false)} disabled={creatingFolder}>Cancel</Button>
        </DialogTrigger>
        <Button appearance="primary"
          onClick={onFolderCreateClick}
          disabled={creatingFolder || (folderName === '')}>Create Folder</Button>
      </DialogActions>
    </DialogBody>
  </DialogSurface>
</Dialog>
Now that the UI is set up, I now need to add some handlers. Add the following handlers after the existing loadItems() handler. These will handle opening the dialog, saving the value of the new folder’s name, and what happens when they select the button in the dialog:
const onFolderCreateClick = async () => {
  setCreatingFolder(true);

  const currentFolderId = folderId;
  const graphClient = Providers.globalProvider.graph.client;
  const endpoint = `/drives/${props.container.id}/items/${currentFolderId}/children`;
  const data = {
    "name": folderName,
    "folder": {},
    "@microsoft.graph.conflictBehavior": "rename"
  };
  await graphClient.api(endpoint).post(data);

  await loadItems(currentFolderId);

  setCreatingFolder(false);
  setNewFolderDialogOpen(false);
};

const onHandleFolderNameChange: InputProps["onChange"] = (event: React.ChangeEvent<HTMLInputElement>, data: InputOnChangeData): void => {
  setFolderName(data?.value);
};
Checkpoint: Test the app to verify everything is working as expected. Select an existing Container, and then select the button above the grid to create a new folder in the container.

Adding a folder to a SharePoint Embedded Container
I need to make one more change to the component. Right now, when I select a folder, it will launch the URL in a new tab leaving the app. That’s not what I want - I want it to simply drill into the folder.
I’ll fix that by locating the existing columns constant I previously added and finding the createTableColumn() that references the columnId: 'driveItemName'. In the renderCell property, replace the existing <Link /> component with the following code. This will generate two links based on whether the current item being rendered is a folder or a file:
{(!driveItem.isFolder)
  ? <Link href={driveItem!.webUrl!} target='_blank'>{driveItem.name}</Link>
  : <Link onClick={() => {
    loadItems(driveItem.id);
    setFolderId(driveItem.id as string)
  }}>{driveItem.name}</Link>
}
Now when I select a folder, the app will show the contents of the folder.
Upload files to the Container
Next, add the ability to upload files to a Container or a folder within a Container.
I’ll start by adding the following code alongside the other React state statements:
const uploadFileRef = useRef<HTMLInputElement>(null);
Next, I’ll implement a technique using a hidden <Input> control to upload a file. Add the following code immediately after the opening <div> in the component’s return() method:
<input ref={uploadFileRef} type="file" onChange={onUploadFileSelected} style={{ display: 'none' }} />
I need a button in the toolbar to trigger the file selection dialog. I’ll do this by adding the following code immediately after the existing toolbar button that adds a new folder:
<ToolbarButton vertical icon={<ArrowUploadRegular />} onClick={onUploadFileClick}>Upload File</ToolbarButton>
Finally, I’ll add the following code after the existing event handlers to add two event handlers. The onUploadFileClick() handler is triggered when I select the Upload File toolbar button and the onUploadFileSelected() handler is triggered when the user selects a file:
const onUploadFileClick = () => {
  if (uploadFileRef.current) {
    uploadFileRef.current.click();
  }
};

const onUploadFileSelected = async (event: React.ChangeEvent<HTMLInputElement>) => {
  const file = event.target.files![0];
  const fileReader = new FileReader();
  fileReader.readAsArrayBuffer(file);
  fileReader.addEventListener('loadend', async (event: any) => {
    const graphClient = Providers.globalProvider.graph.client;
    const endpoint = `/drives/${props.container.id}/items/${folderId || 'root'}:/${file.name}:/content`;
    graphClient.api(endpoint).putStream(fileReader.result)
      .then(async (response) => {
        await loadItems(folderId || 'root');
      })
      .catch((error) => {
        console.error(`Failed to upload file ${file.name}: ${error.message}`);
      });
  });
  fileReader.addEventListener('error', (event: any) => {
    console.error(`Error on reading file: ${event.message}`);
  });
};
Checkpoint: Test the app to verify everything is working as expected. Select an existing Container, and then select the button above the grid to upload a file.
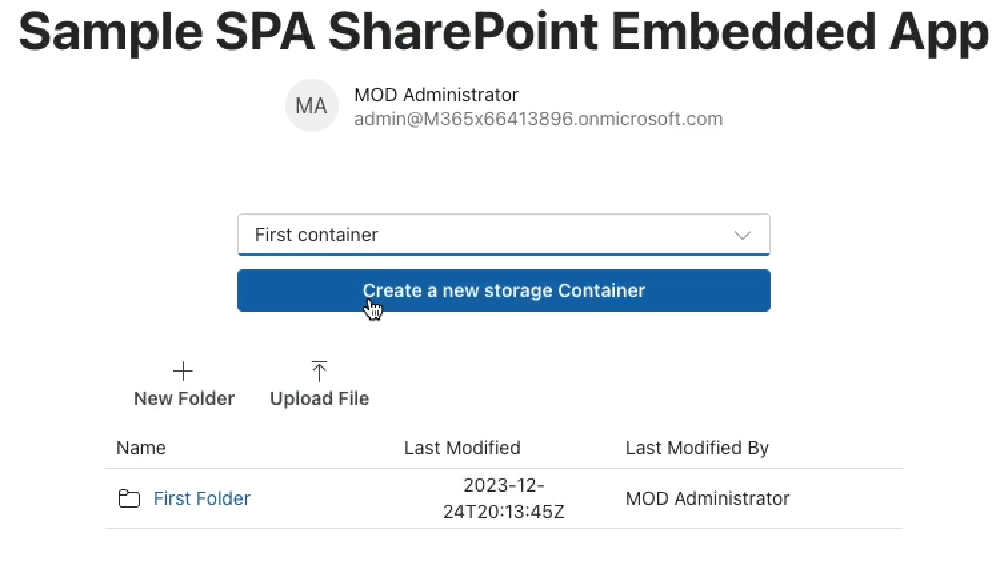
Screenshot showing the file upload button in the toolbar
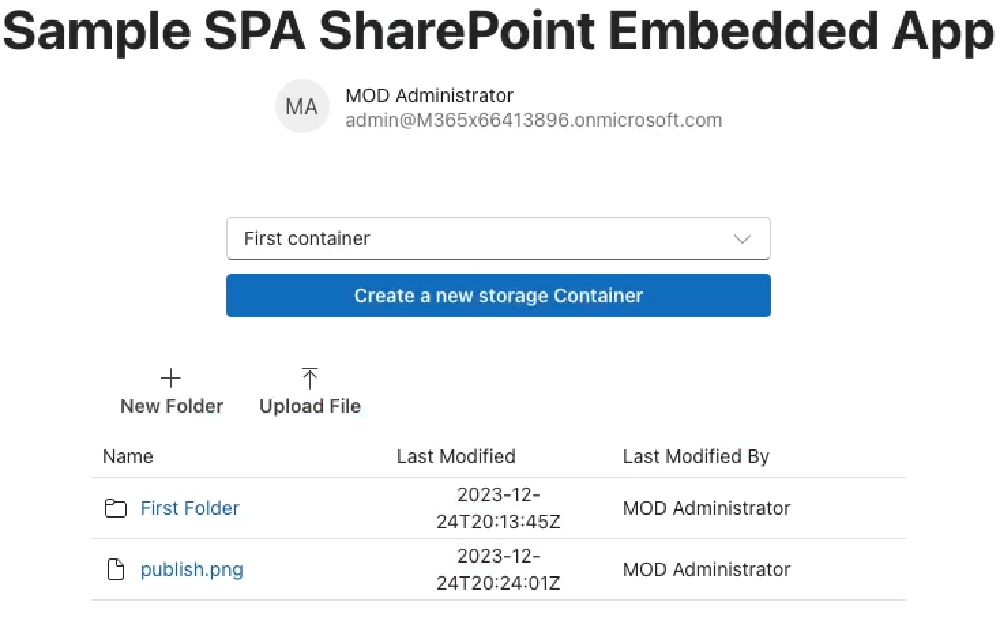
Results of uploading a new file to the Container
Alright, making process… let’s keep going!
Add file download support
With the content display feature complete, let’s update the component to support downloading files.
I’ll start by adding the following code alongside the existing React state statements:
const downloadLinkRef = useRef<HTMLAnchorElement>(null);
Next, I want to make sure an item in the DataGrid is selected before they can download it. Otherwise, the Download button will be disabled.
In the DataGrid, I’ll add three properties to set it to support a single item selection mode (selectionMode), keep track of which items are selected (selectedItems), and what to do when the selection changes (onSelectionChange).
<DataGrid
  ...
  selectionMode='single'
  selectedItems={selectedRows}
  onSelectionChange={onSelectionChange}>
Next, add the following handler after the existing handlers. This will fire when the file selection changes in the grid and set the selected items on the specified state object.
const onSelectionChange: DataGridProps["onSelectionChange"] = (event: React.MouseEvent | React.KeyboardEvent,
                                                               data: OnSelectionChangeData): void => {
  setSelectedRows(data.selectedItems);
}
The download option will use a hidden hyperlink that I’ll use to do the following:
- First, it sets the URL of the hyperlink to the download URL of the item.
- Then, it programmatically clicks the hyperlink.
This will trigger the download for the user.
Add the following markup just after the opening <div> in the return() method:
<a ref={downloadLinkRef} href="" target="_blank" style={{ display: 'none' }} />
Now, in the existing columns constant previously added, I’ll add a new column at the end of the array:
createTableColumn({
  columnId: 'actions',
  renderHeaderCell: () => {
    return 'Actions'
  },
  renderCell: (driveItem) => {
    return (
      <>
        <Button aria-label="Download"
          disabled={!selectedRows.has(driveItem.id as string)}
          icon={<SaveRegular />}
          onClick={() => onDownloadItemClick(driveItem.downloadUrl)}>Download</Button>
      </>
    )
  }
}),
Then, I’ll add the following handler immediately after the existing onSelectionChange() event handler I previously added. This will handle those two programmatic steps previously mentioned:
const onDownloadItemClick = (downloadUrl: string) => {
  const link = downloadLinkRef.current;
  link!.href = downloadUrl;
  link!.click();
}
Checkpoint: Test the app to verify everything is working as expected. Select an existing file and then select the Download button that is enabled once I select a file.
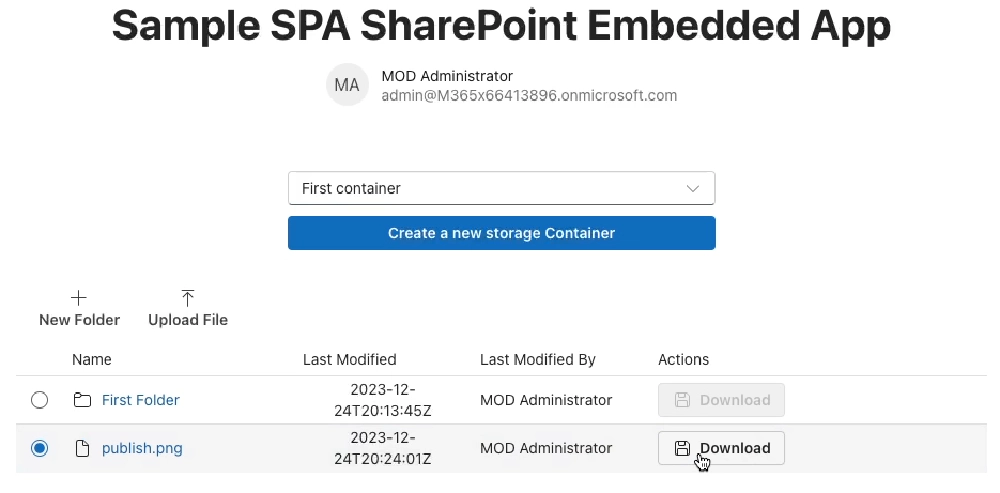
Download files once the item has been selected, otherwise the action buttons are disabled
Delete files & folders
The last step is to add the ability to delete a folder or file from the Container.
To do this, I’ll start by adding the following code to the existing list of useState() calls:
const [deleteDialogOpen, setDeleteDialogOpen] = useState(false);
Next, add a dialog to act as a confirmation when the user selects the Delete button. Add the following code just after the existing <Dialog> component in the return() method:
<Dialog open={deleteDialogOpen} modalType='modal' onOpenChange={() => setSelectedRows(new Set<TableRowId>([0]))}>
  <DialogSurface>
    <DialogBody>
      <DialogTitle>Delete Item</DialogTitle>
      <DialogContent>
        <p>Are you sure you want to delete this item?</p>
      </DialogContent>
      <DialogActions>
        <DialogTrigger>
          <Button
            appearance='secondary'
            onClick={() => setDeleteDialogOpen(false)}>Cancel</Button>
        </DialogTrigger>
        <Button
          appearance='primary'
          onClick={onDeleteItemClick}>Delete</Button>
      </DialogActions>
    </DialogBody>
  </DialogSurface>
</Dialog>
I’ll then add a delete button by finding the existing columns constant I added previously and find the createTableColumn() that references the columnId: 'actions'. In the renderCell property, add the following after the existing button:
<Button aria-label="Delete"
        icon={<DeleteRegular />}
        onClick={() => setDeleteDialogOpen(true)}>Delete</Button>
Finally, add the following handler after the others to handle the deletion of the currently selected item:
const onDeleteItemClick = async () => {
  const graphClient = Providers.globalProvider.graph.client;
  const endpoint = `/drives/${props.container.id}/items/${selectedRows.entries().next().value[0]}`;
  await graphClient.api(endpoint).delete();
  await loadItems(folderId || 'root');
  setDeleteDialogOpen(false);
}
Checkpoint: Test the app to verify everything is working as expected. Select an existing file or folder and then select the Delete button that is enabled once I select something. Within a second or two, you’ll see the item disappear because it’s been deleted!
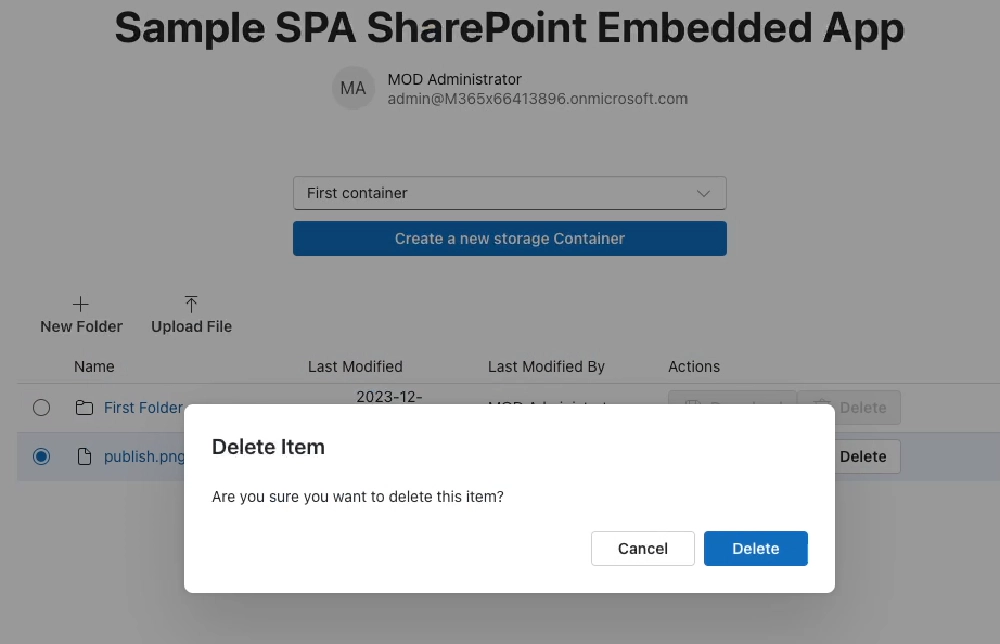
Show a dialog confirming if the user wants to delete the file
And there you have it… while it’s simple, we’ve built out a SharePoint Embedded application that can list and create containers, as well as create folders and even upload, download, and delete files within those containers!
What do you think about SharePoint Embedded?
Do you have ideas for how you’d use it in a future project or where it would have been useful in a previous project?
Please feel free to reach out to me using the links below to ask questions on LinkedIn or 𝕏, and let me know if you want to see more about SharePoint Embedded!
If you want to see this in action, check out the video on our YouTube channel that shows this entire process.
Download Article Resources
Want the resources for this article? Enter your email and we'll send you the download link.
Microsoft MVP, Full-Stack Developer & Chief Course Artisan - Voitanos LLC.
Andrew Connell is a full stack developer who focuses on Microsoft Azure & Microsoft 365. He’s a 20+ year recipient of Microsoft’s MVP award and has helped thousands of developers through the various courses he’s authored & taught. Whether it’s an introduction to the entire ecosystem, or a deep dive into a specific software, his resources, tools, and support help web developers become experts in the Microsoft 365 ecosystem, so they can become irreplaceable in their organization.


