One of the more common myths among both those who are just getting into and those seasoned in SharePoint development topics is that it is not possible to leverage the ASP.NET technique of leveraging code behind files in custom master pages or site pages. I call this a myth because that is just what it is… completely false. In a post on my blog, I touched on how this can be done, but I didn’t provide any details. This article expands on this statement to explain not only how it can be done, but also to explain what is different between the native ASP.NET 2.0 and SharePoint development experience.
Overview of the SharePoint Site Architecture
SharePoint sites are structured in a very different way than native ASP.NET 2.0 sites are. The pages in ASP.NET 2.0 sites primarily live within folders on the file system. It is fairly easy to take a URL and map it to a file on the file system for the most part. However SharePoint sites are very different. The primary difference is that most files in SharePoint sites live exclusively in the database.
This virtualized file system facilitates vast numbers of sites within a farm as it is not uncommon for a enterprise SharePoint farm to host thousands if not tens or hundreds of thousands of sites. The files, pages as well as images and other files, that live in the database are called instances. Initially when a site is created, many of these instances are simply pointers to files on the file system, or templates. What makes SharePoint different from native ASP.NET 2.0 sites is that SharePoint promotes (and arguably encourages) customization of the pages on a site-by-site basis. In order to support this, customizations are saved in the SharePoint content database (a Microsoft SQL Server database). This allows sites to leverage underlying file templates until they are customized.
In native ASP.NET 2.0 sites, adding new pages involves dropping a new ASPX file into the desired folder in the site. In SharePoint, while it is possible to drop files within the webroot of the SharePoint site, it is not recommended. Rather, developers should create a template (just an ASP.NET 2.0 file) and then provision an instance of the file into the SharePoint site that points to the file on the file system. In both environments, the assembly containing the compiled code behind file of the ASP.NET 2.0 page is deployed to either the site’s \BIN directory or the server’s GAC.
For a deeper and more comprehensive explanation of the SharePoint architecture and how it interacts with ASP.NET 2.0, refer to Ted Pattison’s & Dan Larson’s book Inside Microsoft Windows SharePoint Services v3 book by MSPRESS… specifically chapter 2.
Creating Code Behind Files with Visual Studio 2005 in ASP.NET 2.0 Pages
Before jumping in to see how to create code behind files for ASP.NET 2.0 pages used in SharePoint sites, it makes sense to take a step back and review how it’s done in native ASP.NET 2.0 pages within Visual Studio 2005. Visual Studio makes it real easy to add and leverage code behind files in ASP.NET 2.0 pages. A developer simply has to right-click the design surface of an ASPX / ASCX file or right-click the file in the Solution Explorer tool window and select View Code. This automatically creates (if it wasn’t already created) a file with the name [Filename.aspx].cs with a class of the same name of the page that inherits from the System.Web.UI.Page class. It also adds a pointer to the class in the code behind file to the Inherits attribute of the Page directive: <% @Page Inherits="" %>.
In addition, when new Web controls are dropped on the design surface, Visual Studio adds a protected field for each Web control to the code behind.
Creating ASP.NET 2.0 Pages with Code Behind Files in SharePoint v3 Sites
Before walking through the steps necessary to leverage code behind files in ASP.NET 2.0 pages within a SharePoint site, take a look at it from the perspective of a native ASP.NET 2.0 site. In an ASP.NET 2.0 environment, Visual Studio knows how to do a lot of stuff for the developer. Unfortunately Visual Studio does not have the hooks into SharePoint to really understand what to do or how it works. This does not mean it isn’t possible (if it did, the article would end here… duh!), it means that the process will be a little different. Specifically, creating and implementing code behind files with ASP.NET 2.0 pages used within a SharePoint site, the process will be completely manual. Not ideal, but at least we aren’t left with a lack of functionality between the two platforms (ASP.NET 2.0 & SharePoint).
There are two main differences in creating custom ASPX pages for use in a SharePoint site vs. an ASP.NET 2.0 site is that the file you create (ASPX) is used as a template for the real file (instance) within the SharePoint site. After creating the ASPX page, an instance needs to be provisioned into the SharePoint site. This is done using a SharePoint Feature.
I like to create all my Features that contain some sort of compiled code using a Class Library project template. Then I set up the project to be signed to generate a strong named assembly and create the folders necessary for a Feature. Next, add a reference to System.Web. Nope… no reference to Microsoft.SharePoint is necessary! See… SharePoint development IS ASP.NET 2.0 development at the core!
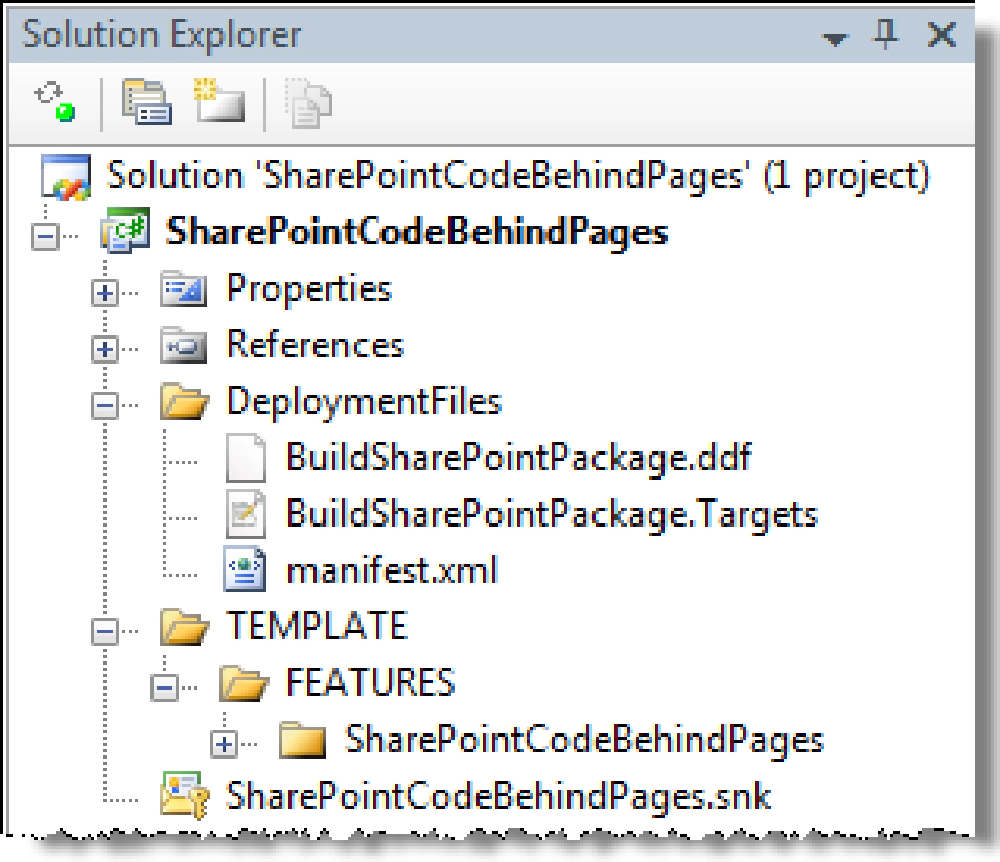
Last set up bit is to add a custom MSBuild targets file and stuff necessary to automatically build and package the Feature into a WSS Solution Package (*.WSP) using the technique I wrote about here. Here’s what my project looks like now:

Figure 1: SharePointCodeBehindPages Visual Studio 2005 project
Next, create the ASPX page that will be added to the SharePoint site and put it in the Feature folder: SharePointCodeBehindPage. With the file created, add whatever is necessary to implement the page the way you want it. The one thing to point out is you should use one of the four SharePoint master page tokens as the value in the MasterPageUrl attribute in the Page directive. Here’s a simple ASPX file that has a TextBox and Button for the user to enter some text and see it rewritten back to a Literal control on the page. It is a real simple example, but the simplicity makes it easy to see how to do code behind files in SharePoint:
<%@ Page MasterPageFile="~masterurl/default.master"
         Debug="true"
         Inherits="AndrewConnell.SharePoint.Samples.PageTemplate,SharePointCodeBehindPages,
                   Version=1.0.0.0, Culture=neutral, PublicKeyToken=8b71068d79515ff9"
         meta:progid="SharePoint.WebPartPages.Document" %>

<asp:Content ContentPlaceHolderID="PlaceHolderPageTitle" runat="server">
  Demonstration of ASP.NET Code Behind Files in SharePoint
</asp:Content>

<asp:Content ContentPlaceHolderID="PlaceHolderMain" runat="server">
  <h2>Debunking the Myth</h2>
  <h3>ASP.NET 2.0 page with compiled code-behind in a SharePoint site</h3>
  Enter some text and press the button: <asp:TextBox ID="TextInput" runat="server"/>
  <asp:Button ID="Trigger" Text="Submit" runat="server" />

  <p>The text entered was <b><asp:Literal ID="TextOutput" runat="server" /></b>
  and was submitted at <b><asp:Literal ID="Timestamp" runat="server"/></b>.</p>
</asp:Content>
Three things to note here:
- This page implements two
ContentPlaceHoldersdefined in SharePoint master pages. I recommend you implement SharePoint ContentPlaceHolders or, your own that you’ve defined in your own custom master page… but you must be sure your master page is being used in order to use this page. - The
meta:progidattribute on thePagedirective is necessary if the page will ever be opened in SharePoint Designer. You should include this as site pages are supposed to support customization and thus, be opened in SharePoint Designer. If you don’t want to allow pages to be opened and customized in SharePoint Designer, then you should do that through permissions, not at the page level. - The event handler for the button is not in the ASPX file. Putting it here would be adding inline script to the page which should never be done. Inline script will work when the page is uncustomized, but once it is customized, SharePoint’s safe mode parser will block the page from being executed.
The next thing to do is to create the code file that will act as the code behind file. Create a new C# file using the same name as the ASPX page except tack on the .cs suffix to the end. There is no requirement for the name, but to stay with the native ASP.NET 2.0 model and to make it easy to figure out which one it goes with, this is just a good idea.
Within this file you should set the class to inherit from the System.Web.UI.Page class. Here’s what mine looks like for the ASPX page shown in Figure 1 above:
using System;
using System.Web.UI;
using System.Web.UI.WebControls;

namespace AndrewConnell.SharePoint.Samples {
  public class PageTemplate : Page{

    protected TextBox TextInput;
    protected Button Trigger;
    protected Literal TextOutput;
    protected Literal Timestamp;

    protected override void OnInit (EventArgs e) {
      Trigger.Click += new EventHandler(Trigger_OnClick);
    }

    protected void Trigger_OnClick(object sender, EventArgs e) {
      TextOutput.Text = TextInput.Text.Trim();
      Timestamp.Text = DateTime.Now.ToString();
    }

  }
}
With the ASPX page and code behind created, now the two need to be linked together. Recall how Visual Studio does it… it adds an Inherits attribute to the Page directive in the ASPX automatically. So… we can do it manually! So what do we put in this attribute? The full name to the type, or class, of our page object. This is also known as the 5-part name. The five parts are: [full type name], [assembly name], [version], [culture], [public key token]. Everyone has different ways of getting this. One of the easiest is to build the project and then open the file using Lutz’s Reflector. This gives you the last four parts of the name, also called the assembly full name. Note that the type name needs to also include the namespace. For the code in Figure 3 above, here’s what my Inherits attribute is:
<%@ Page MasterPageFile="~masterurl/default.master"
         Debug="true"
         Inherits="AndrewConnell.SharePoint.Samples.PageTemplate,
                   SharePointCodeBehindPages, Version=1.0.0.0,
                   Culture=neutral, PublicKeyToken=8b71068d79515ff9"
         meta:progid="SharePoint.WebPartPages.Document" %>
Don’t include the line breaks in the Inherits attribute as shown in the image… they are present just for readability.
We now have the page template and code behind created as well as wired together. The next step is to create the Feature that will provision the file into a SharePoint site as an uncustomized instance pointing to the template. First, create the Feature definition file. Nothing special here… just a site-scoped Feature. Note that I’ve added the ASPX file in the Feature definition.
Now… the element manifest file(s) within a Feature is where all the work happens. In this case I do two things. First I provision the file using the and site elements. The code below creates a new file (CodeBehindDemo.aspx) within a SharePoint site that is based off a template (PageTemplate.aspx) and puts this new file in the Samples subfolder in the site. Next I create a new menu item in the Site Actions menu on the site giving me an easy way to navigate to this sample page (and also to see if the Feature has been activated):
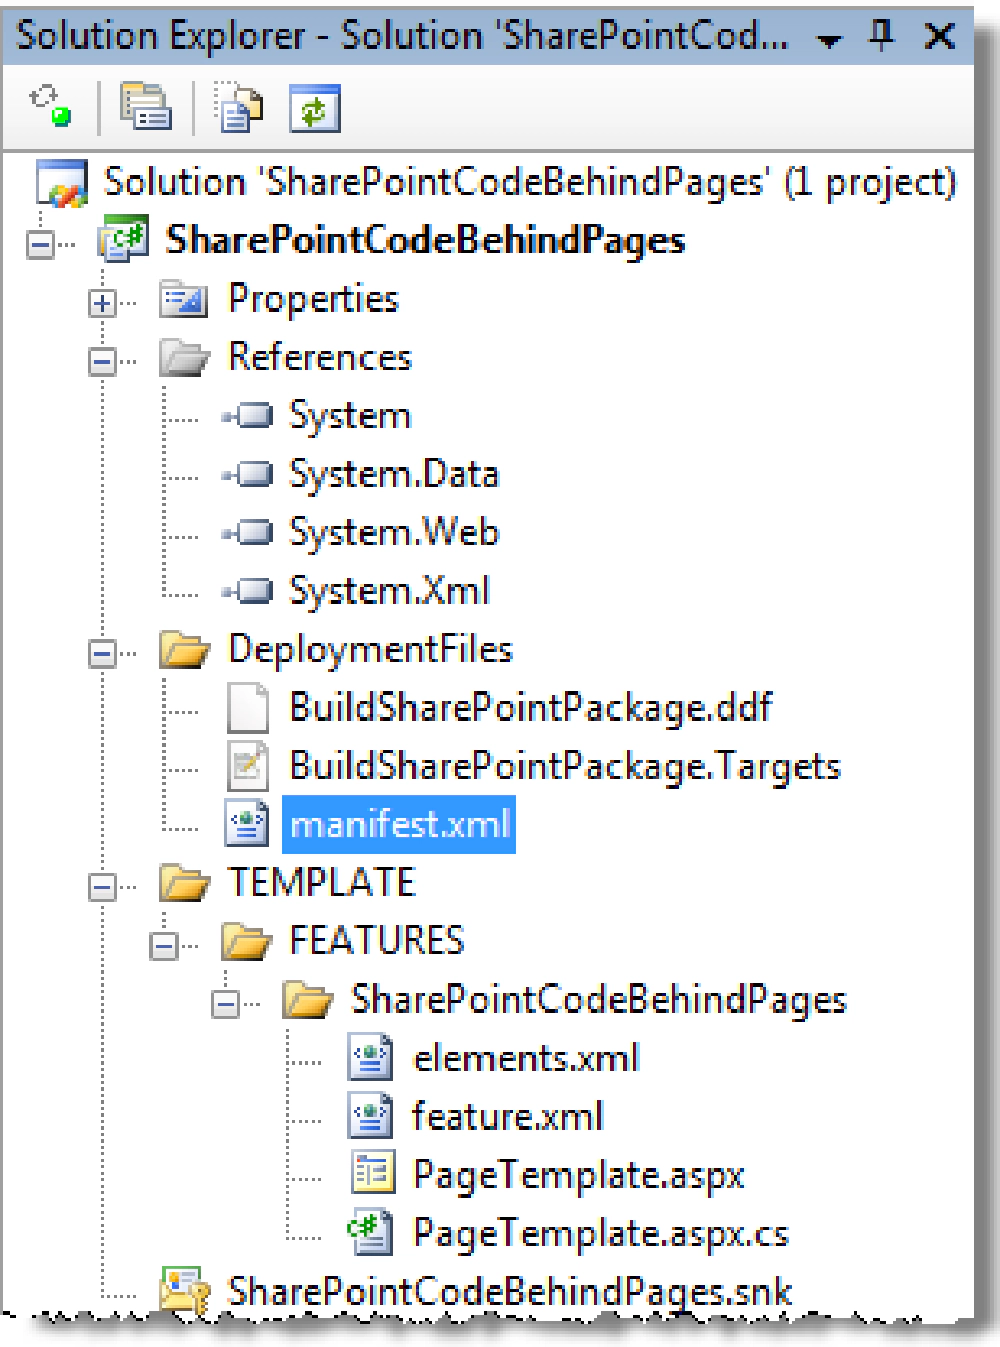
That’s it! Now package everything up into a WSS solution package file. I’ll put the *.WSP’s manifest.xml and generated assembly in the root of the *.WSP file. The Feature is added as a subfolder. Here’s what the manifest.xml file looks like.
Notice the markup in Figure 7 is adding a safe control entry to the web.config for the destination Web application. This is because SharePoint must be aware that the types within the assembly we are deploying are safe and ok to execute. At this point, here’s what my Visual Studio project looks like:

Figure 2: Visual Studio project
Now, add the solution to the SharePoint farm’s solution store and deploy. Go to your nearest WSS site and activate the Feature as shown in Figure 9. Notice how after activating the Feature (#1) a new item shows up in the Site Actions menu (#2).

Figure 3: Site Features page
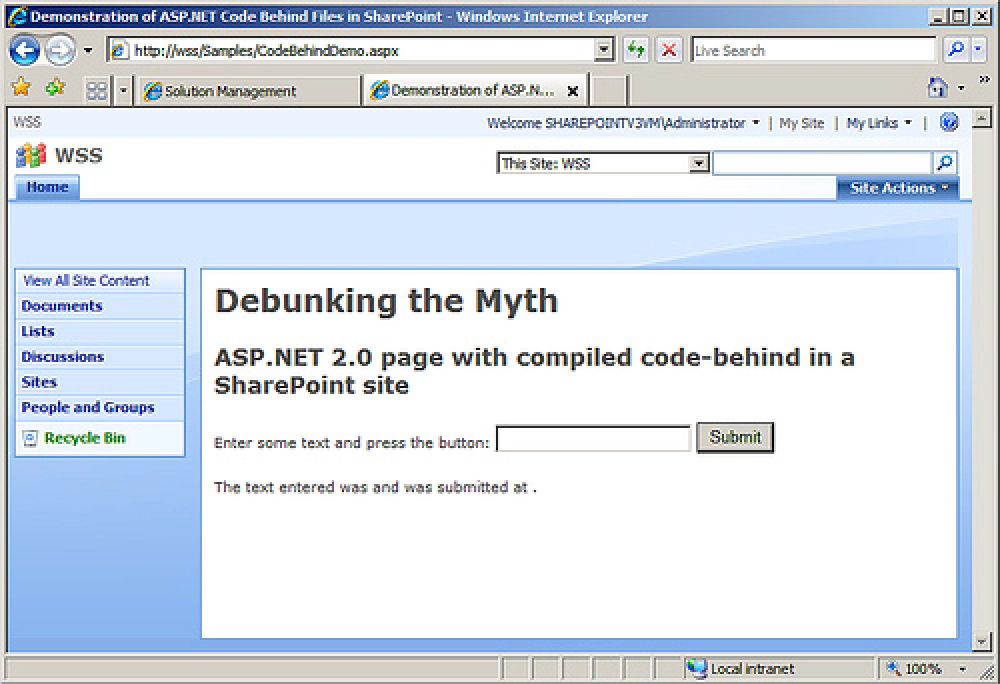
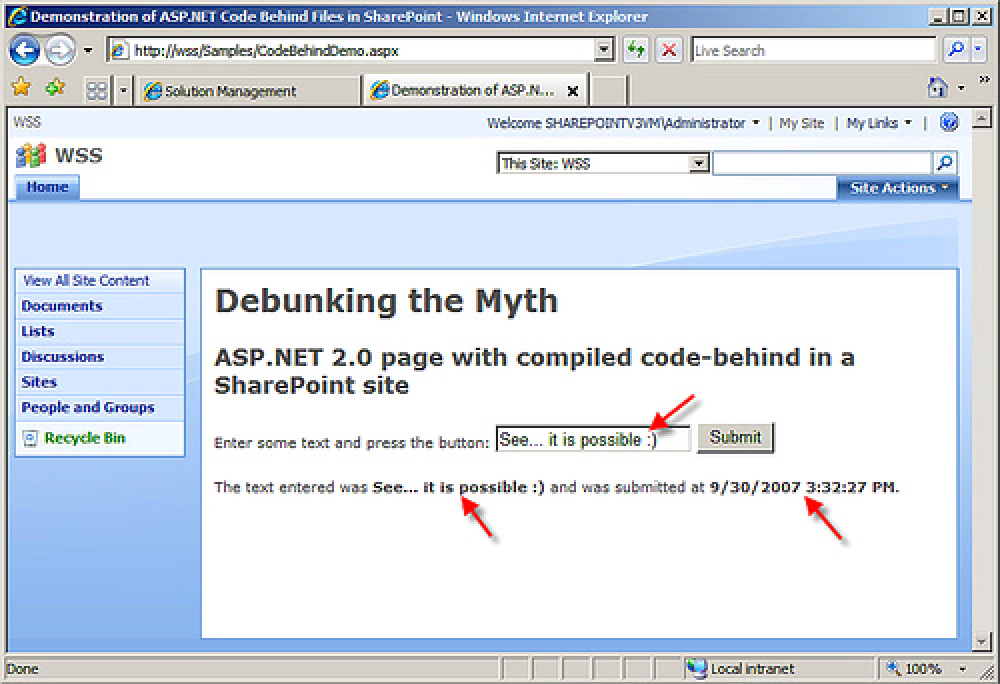
Click on the item in the Site Actions menu. You’ll see a page that looks like the first image below. If you enter some text and click the button, poof… it works!

Figure 4

Figure 5
I hope this helps explain how to do ASPX pages with code behind files in SharePoint v3 sites. The same process works for mater pages and page layouts within Publishing sites, you just need to make sure you inherit from the proper class in your code behind. Same deal with user controls except these should be deployed to a folder within the [..]\12\TEMPLATE\CONTROLTEMPLATES directory, specifically a project subfolder within that folder. Before I wrap this up, let me address two points that I can already expect I’ll see:
- How do you debug your code behind? You’ll have to manually attach the debugger to the W3WP.EXE process that’s running the application pool for your site. Go here for an explanation with screenshots as well as a little trick.
- Can’t I just use inline script (ie:
<script runat="server">) in the ASPX file instead of using a code behind? Yes and no… but I’ll highly recommend against it. The “yes” part of the answer is that you can do it and it will work… for now. The “no” part is that inline script is blocked by SharePoint when the page becomes customized (edited in SharePoint Designer). Why? Because more than just developers use SharePoint Designer and Microsoft didn’t want some admin assistant who picked up a C# dummies book over the weekend to have the ability to add C# code to pages on the company intranet… and I’m sure your server admins wouldn’t care for that either! So… since site pages can be customized, you should never use inline script.
By the way, I understand that there is some extra work you need to do in order to get this to work. The goal here is to show you that SharePoint supports code behind files. Now… we just need better development tools!
Want the resources for this article? Enter your email and we'll send you the download link.
Microsoft MVP, Full-Stack Developer & Chief Course Artisan - Voitanos LLC.
Andrew Connell is a full stack developer who focuses on Microsoft Azure & Microsoft 365. He’s a 20+ year recipient of Microsoft’s MVP award and has helped thousands of developers through the various courses he’s authored & taught. Whether it’s an introduction to the entire ecosystem, or a deep dive into a specific software, his resources, tools, and support help web developers become experts in the Microsoft 365 ecosystem, so they can become irreplaceable in their organization.


