The way Chrome handles certs recently changed and this process doesn’t work as well as it used to. See this post for an updated process: Updated: Creating and Trusting Self-Signed Certs on MacOS and Chrome.
Last week I put together two sample Apps for Office for use at the hackathon at ng-conf. Two two apps, one for Excel & one for Outlook, were a bit different from your typical App for Office because of a few things:
- Built without Visual Studio (I used WebStorm / Brackets)
- Built using Angular & Angular Material
- Built on OSX, not Windows
These decisions were made because the majority of the audience used OSX and the goal was to get people aware of and ideally interested in building Apps for Office. Well it worked!
If you aren’t familiar with Apps for Office, in a nutshell you create an XML manifest file that registers the app & points to a website. The app is then run as a website within the Office client. This website can be publicly accessible but during development you likely want to run off localhost for speed & simplicity. For the host Office client to load the app, it must be at an HTTPS endpoint. When you’re on Windows, setting up a self-signed certificate isn’t hard… Windows does this for you.
But I found getting this set up on OSX is no small feat. There are three things I had to do:
- Set up a web server: There are plenty of options for this. If I was going to make just a static site, I’d use superstatic. But getting this to respect an SSL cert was not easy so I moved on and just created a simple express server.
- Create a self-signed certificate: Again, not terribly hard. On Windows I use the makecert.exe tool & on OSX I used openssl.
- Configuring my machine to trust the self-signed cert: This turned into a much more un-intuitive process than I expected.
Therefore in the interest of using my blog as a “note-to-self”, here’s how I did it.
The Goal
The ultimate goal was to get a web server locally that served a static site on HTTPS and have the browser trust the certificate. Here’s the script I used to host the site (notice it needs) two certificates that I’m loading in lines 7-10:
// Express webserver hosting static site with locally with HTTPS
'use strict';

var fs = require('fs'),
    express = require('express'),
    https = require('https');

var https_options = {
  key: fs.readFileSync('./localhost-key.pem'),
  cert: fs.readFileSync('./localhost-cert.pem')
};

var PORT = 8443,
    HOST = 'localhost';

var app = express();

// set static routes
app.use('/', express.static(__dirname + '/src'));
app.use('/vendor', express.static(__dirname + '/bower_components'));

var server = https.createServer(https_options, app)
                  .listen(PORT, HOST);

console.log('+-+-+-+-+-+-+-+-+-+-+-+-+-+-+-+-+-+-+-+-+-+-+-+-+-+');
console.log('HTTPS Server listening @ https://%s:%s', HOST, PORT);
console.log('+-+-+-+-+-+-+-+-+-+-+-+-+-+-+-+-+-+-+-+-+-+-+-+-+-+');
Then I needed the browser to not show this:

Create Self-Signed Certs on MacOS
Rather I needed it to show this when hitting the site:

Create Self-Signed Certs on MacOS
So here’s how you do it:
Create Self-Signed Certificate & Key
The first step is to create the self-signed certificate & key that will be used by the web server.
Open a Terminal prompt and enter the following command:
$ openssl genrsa -out localhost-key.pem 1024
Next, create the certificate request:
$ openssl req -new -key localhost-key.pem -out localhost.csr
At this stage the openssl tool will prompt you for a few more items. These values will get added to the certificate request that you are generating to get the private key. What follows is an example of some options you can use. The important point is to use localhost for the Common Name request.
$ openssl x509 -req -in localhost.csr
      -signkey localhost-key.pem
      -out localhost-cert.pem
Now create the certificate from the certificate request:
Country Name (2 letter code) [AU]:US
State or Province Name (full name) [Some-State]:Washington
Locality Name (eg, city) []:Redmond
Organization Name (eg, company) [Internet Widgits Pty Ltd]:Contoso
Organizational Unit Name (eg, section) []:corp
Common Name (e.g. server FQDN or YOUR name) []:localhost
Email Address []:[email protected]

Please enter the following 'extra' attributes
to be sent with your certificate request
A challenge password []:
An optional company name []:
At this point you have the public-private key pair for the certificate.
You can use these in the files in the script at the top of these instructions. However you will notice that, as stated previous, the browser won’t respect the certificate. You will see a Your connection is not private message in Chrome and the URL will show an error with the certificate:

Create Self-Signed Certs on MacOS
To fix this, you need to add the certificate as a trusted root authority.
Add the Certificate as a Trusted Root Authority
This process wasn’t anything close to being intuitive… but here it is anyway.
Assuming you are using the Chrome browser…
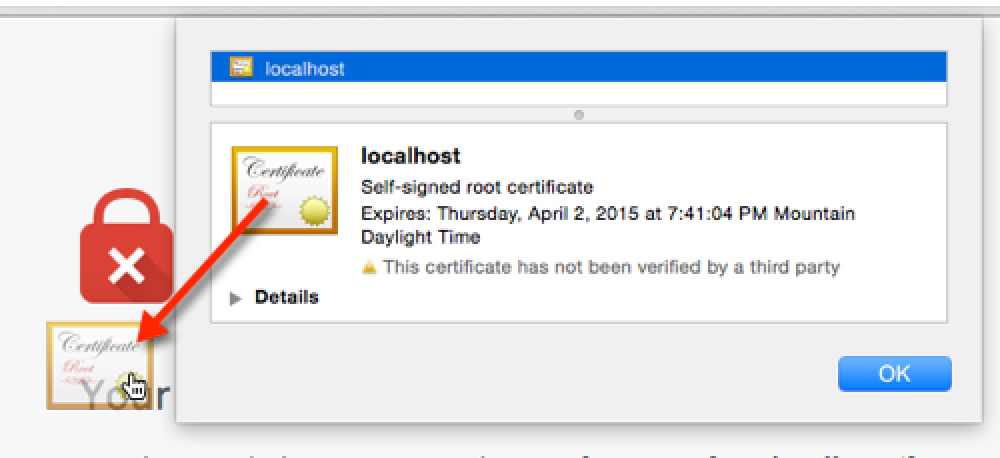
In the address bar, click the little lock with the X. This will bring up a small information screen. Click the button that says “Certificate Information”.
Click and drag the image to your desktop. It looks like a little certificate.
Create Self-Signed Certs on MacOS
Open the Keychain Access utility in OS X. Select the System option on the left. Click the lock icon in the upper-left corner to enable changes.
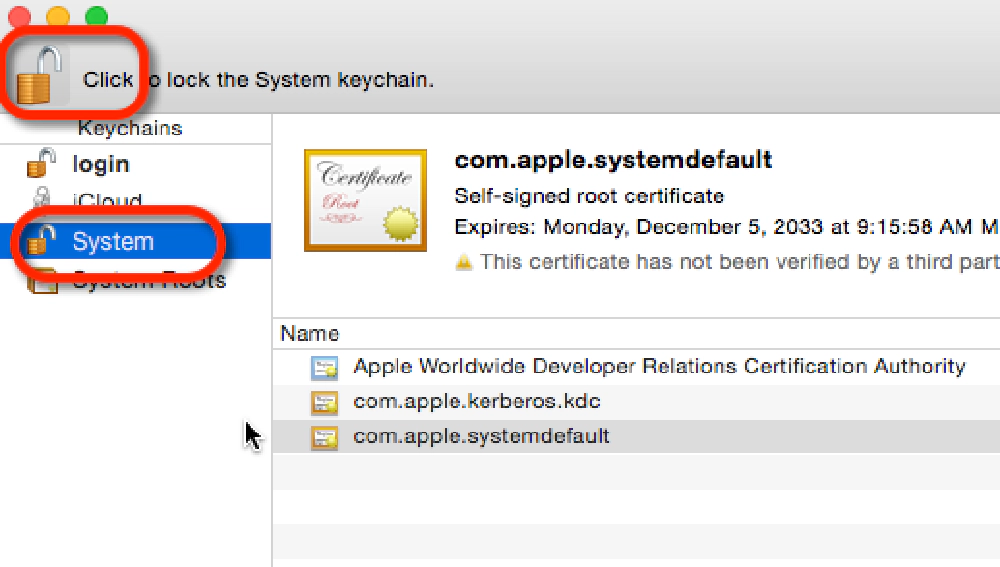
Create Self-Signed Certs on MacOS
Click the plus button at the bottom and select the localhost.cer file you copied to the desktop. In the dialog that comes up, click Always Trust.
After localhost gets added to the System keychain, double-click it to open it again. Expand the Trust section and for the first option, pick Always Trust.
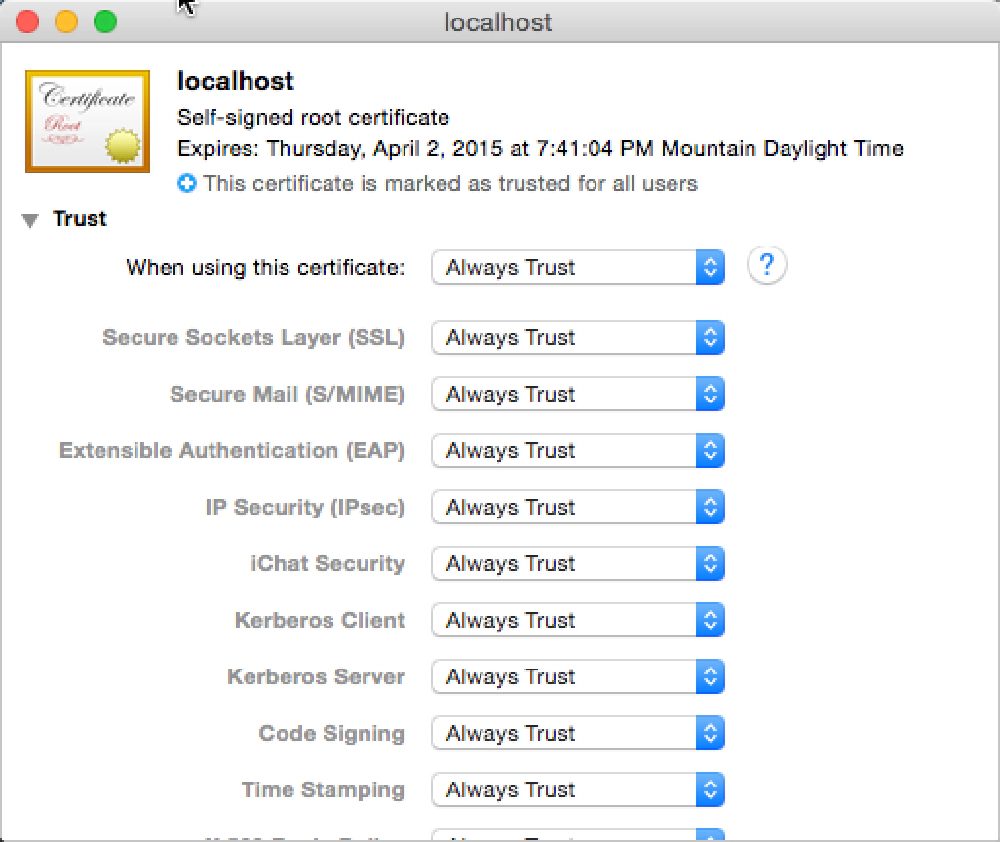
Create Self-Signed Certs on MacOS
At this point everything has been configured. Quick Chrome and all other browsers (this is required), fire up the web server and try again to navigate to the local HTTPS site. The browser should report it as a valid certificate:

Create Self-Signed Certs on MacOS

Microsoft MVP, Full-Stack Developer & Chief Course Artisan - Voitanos LLC.
Andrew Connell is a full stack developer who focuses on Microsoft Azure & Microsoft 365. He’s a 21-year recipient of Microsoft’s MVP award and has helped thousands of developers through the various courses he’s authored & taught. Whether it’s an introduction to the entire ecosystem, or a deep dive into a specific software, his resources, tools, and support help web developers become experts in the Microsoft 365 ecosystem, so they can become irreplaceable in their organization.
