I recently published a new chapter in my Mastering the SharePoint Framework on-demand course for developers that included a section that showed how to call a REST API deployed using an Azure Function App and secured with Microsoft Entra ID from the SharePoint Framework.
The course, Mastering the SharePoint Framework, is the leading SPFx training resource trusted by over 1,000 SPFx developers over the last two years. With over 20hrs of demo-heavy content, it’s a great resource to get ramped up on the SharePoint Framework. As part of a recent release, I am offering $50 off the price of the Fundamentals or Ultimate Bundle. Use the code FUNDAMENTALSISDONE to save $50… this offer expires at 11:59pm on Friday, February 22, 2019 EST so don’t delay!
When I was working on this chapter, it felt like the process of configuring an Azure Function App to be secured with Entra ID was harder and more complex than it should have been. Specifically, some of the things you do aren’t explained as well… so I decided to blog about it here!
Overview of the Process
Before I dive into the steps for enabling this, it is first best to understand how it works.
When you secure an Azure Function App with Entra ID, you first create an Entra ID application that is then associated with the Azure Function.
Once that is done, a caller of the Azure Function must first authenticate with Entra ID, requesting an OAuth access token for the intended resource. In this case, the resource is the Azure Function App. The user must first be granted permission to the app which is usually done with another Entra ID application (aka: client Entra ID).
In the case of the SharePoint Framework, this client Entra ID app is the special SharePoint Online (SPO) Entra ID app Microsoft created for all tenants. When you granted the API permission in SPO using either PowerShell, the Office 365 CLI, or via the API management page in the SPO Admin Center site, you granted this special Entra ID app permission to the Entra ID app that secured the target endpoint.
Once the caller has the OAuth token, they can then issue the request to the Azure Function App. The Entra ID integration with Azure Function Apps intercepts the request and does the following:
- validate the token was issued by Entra ID (a trusted resource)
- verify the token is intended for this Azure Function App
Once that is done, it passes the request onto the Azure Function App for processing.
Now that I’ve covered the process overview, let’s see how to set this up.
Enabling an Azure
I’ll start by assuming you have already deployed a working REST API as an Azure Function App… a process well documented here: MSFT: Create a serverless API using Azure Functions.
Within the Azure Function App, select the option Authentication / Authorization under the Platform Features tab:
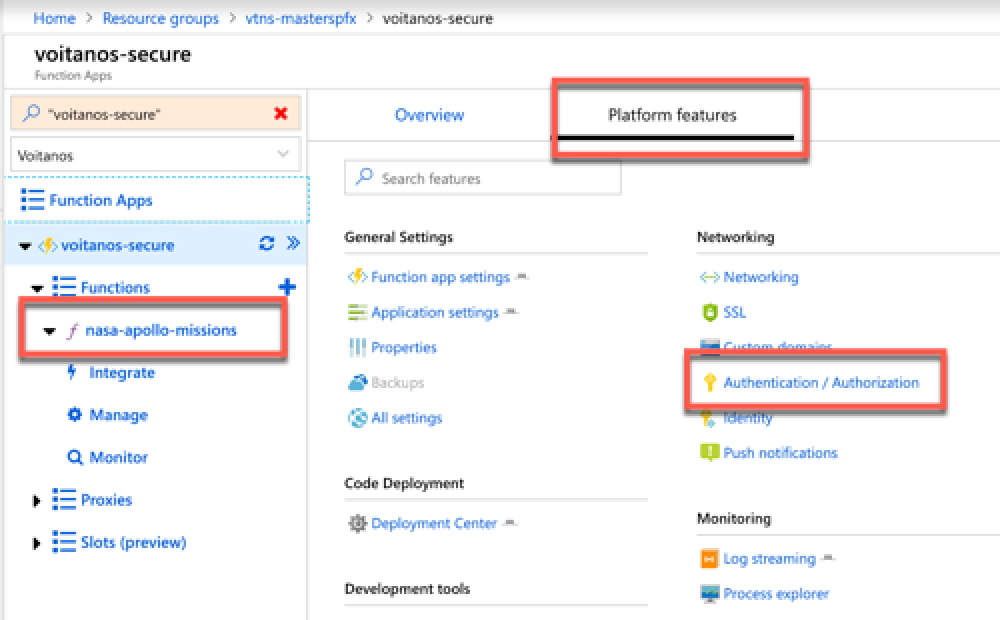
Azure Function - Authentication/Authorization
Next, turn on Entra ID authentication by setting the App Service Authentication to On and set the Action to take when request is not authenticated to Log in with Azure Active Directory:
Under the Authentication Providers section, select Azure Active Directory:
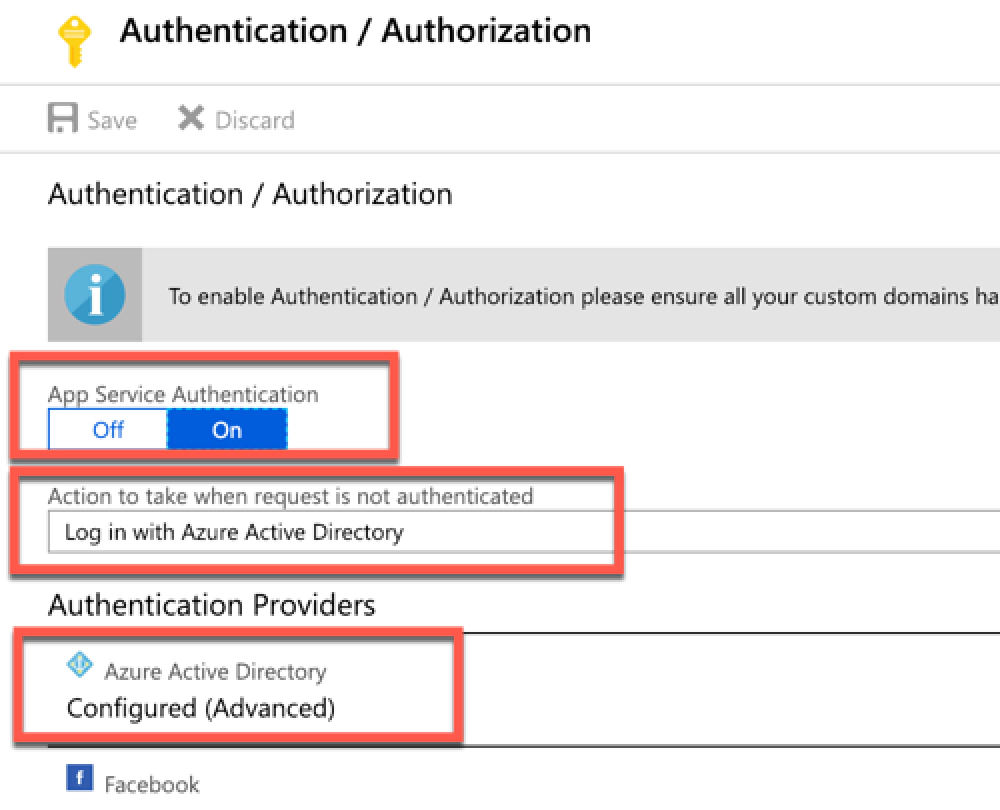
Configure Azure Function for Entra ID authentication
On the Azure Active Directory Settings blade set the Management Mode to Express. This mode makes it easy to create a new Entra ID application for your Azure Function App.
Give it a name and select OK at the bottom of the blade:

Create a new Entra ID application for the Azure Function
The blade will close, but make sure you select Save on the Authentication / Authorization blade to save your changes.
After saving your changes, there is one more step you want to do or at least verify.
From the Authentication / Authorization blade, go back to the Azure Active Directory Settings blade by selecting Azure Active Directory from the Authentication Providers section.
Switch the Management Mode to Advanced.
Notice the section at the bottom that talks about token audiences. When a caller submits an HTTP request to the Azure Function App, Entra ID is going to validate the token. Part of this validation is to ensure that the token is intended to be used for the specified Entra ID application.
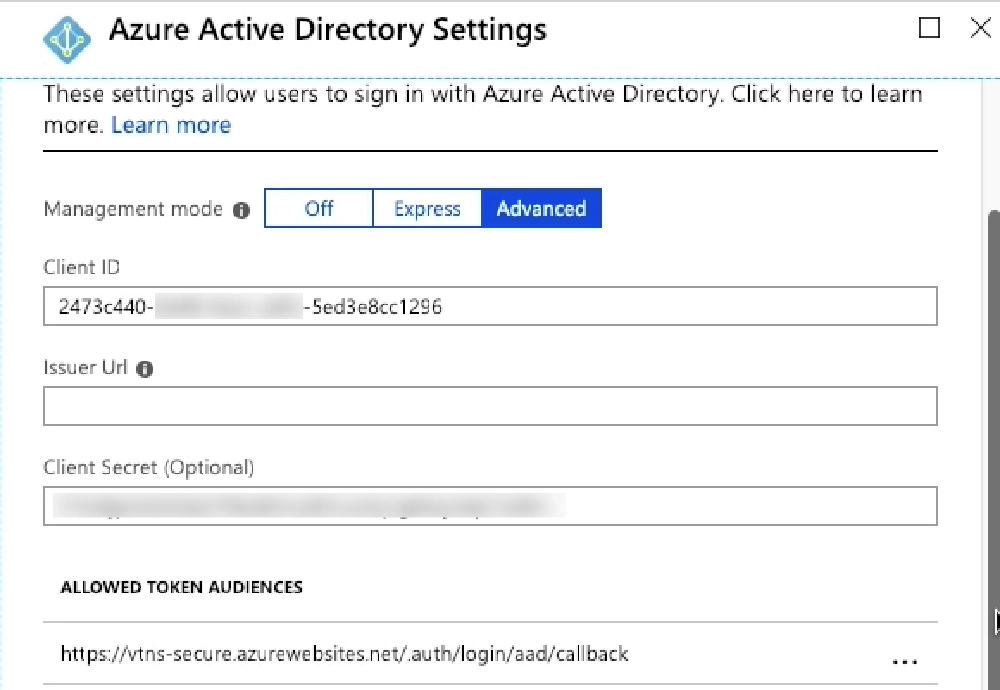
Obtain the unique client ID for the new Entra ID app
In other words, this is Entra ID saying “while this is a valid token created & signed by Entra ID, I’m going to also ensure it’s been created for use by this app.” Another way to think about this is if you are trying to get into your house. While anyone has a key, this step ensures THAT key is intended to be used for THIS house. Without this check, any key, of which there are likely billions of legitimate keys out there, could be used to get into your house. You want to ensure only specific keys intended to be used for your house is allowed to unlock your front door.
That default token audience that’s listed may not be what you are getting back from Entra ID. In the case of SPO and SPFx, it won’t be. Without the correct match here, you’ll get an HTTP status 401 code back that says something about the token not being valid for the intended resource.
Instead, you want to replace it with the correct audience. An easy way to see what this should be for your endpoint is to get the OAuth access token, decode it using a tool like jwt.io, and look at the aud or audience property. This tells the recipient of the token who the token was created for. In the case of the picture below, that’s `https://vtns-secure.azurewebsites.net``. I need to add this URL to the list of Allowed Token Audiences in order for Entra ID to validate and allow HTTP requests to my Azure Function App to pass through.
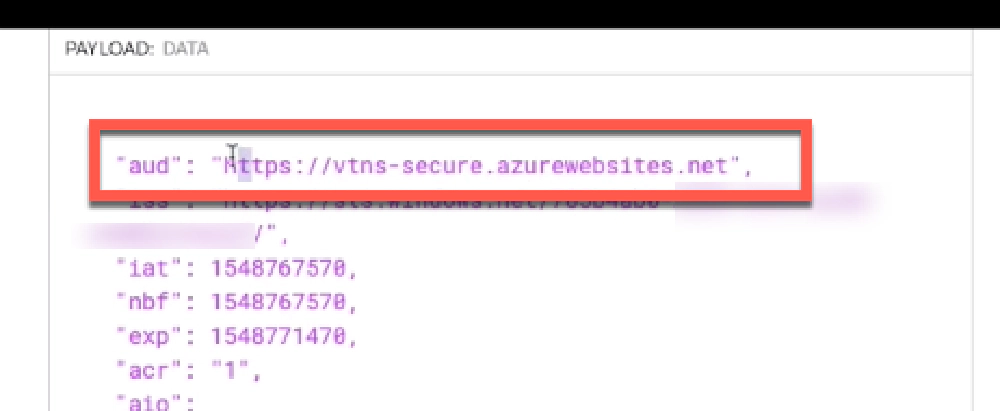
Resource for the Entra ID app & Azure Function
Don’t forget to save your changes to the Azure Function App!
That’s it! Now you can easily call your Azure Function App that’s been secured with Entra ID!
Hopefully, this helps… in future posts I’ll dig a bit deeper and show you how to do some neat things with this set up in your Azure Function App that’s secured with Entra ID.

Microsoft MVP, Full-Stack Developer & Chief Course Artisan - Voitanos LLC.
Andrew Connell is a full stack developer who focuses on Microsoft Azure & Microsoft 365. He’s a 21-year recipient of Microsoft’s MVP award and has helped thousands of developers through the various courses he’s authored & taught. Whether it’s an introduction to the entire ecosystem, or a deep dive into a specific software, his resources, tools, and support help web developers become experts in the Microsoft 365 ecosystem, so they can become irreplaceable in their organization.
