This Post Is Part of a Four-Part Series on Using Angular in SharePoint Framework Projects
This four-part blog post series covers the challenges developers face trying to incorporate modern Angular apps in SharePoint Framework projects, two approaches to incorporating Angular projects in SPFx project, and finishes off with the ‘good, bad & the ugly’ review.
You can get all four parts of the series here: Using Angular Elements in SharePoint Framework projects
Check out our Mastering the SharePoint Framework course that contains a chapter on using Angular Elements in SharePoint Framework projects including step-by-step demonstrations on how to make this work using the latest version of Angular.
In my last post, I talked about using Angular Elements in SharePoint Framework projects. That post showed how to do this using a single SharePoint Framework Project. In this post, I show you a much better option that uses two projects.
Using a single SharePoint Framework project to create a custom element using Angular Elements is not a good option. Not only can you not use the Angular CLI but the resulting payload was way too big to be a viable option.
The way I’d recommend you do it by using two projects:
- Use the Angular CLI to create a custom element using Angular CLI
- Create an SPFx project that imports the resulting bundle from the Angular CLI project
The advantage of this approach is it negates the two downsides to the single-project approach. This means not only can you use the Angular CLI to create your custom element with Angular Elements, but you can also use it to run, debug, test and upgrade your application.
The only downside to this approach is you now have two projects, a small trade-off.
Create the Custom Elements with Angular Elements
The first step is to create your custom element using the Angular CLI. I showed the relevant code in the first part of this series. Refer to that post or scroll to the end of this post to download the code.
Configure the Angular CLI Project
This step isn’t required but it will make your life easier. When the Angular CLI builds your project for production using AOT, it will generate four hashed JavaScript files. I like to add an extra step to the build process to concatenate all four of these files into a single bundle and add it to the SPFx project.
Assuming the following:
- My Angular CLI project is named ngElementsHelloWorld
- My SPFx project is named ngElementsHelloWorldSPFx
- The two projects are living side by side
I added the following npm script to my Angular CLI project’s package.json file:
"spfx-build":
  "ng build ngElementsHelloWorld --prod --output-hashing=none
   && cat dist/ngElementsHelloWorld/{runtime,polyfills,scripts,main}.js
   > ../ngElementsHelloWorldSPFx/src/webparts/helloWorld/app/ngElementsHelloWorld.js"
Now, when I run npm run spfx-build, the Angular CLI will build the project with AOT. I’ve told it to not add the hash to the filenames as it will be hard to work with these files in the remainder of the script.
The script then concatenates all four files runtime.js, polyfills.js, scripts.js and main.js into a single file ngElementsHelloWorld.js into the ./src/webparts/helloWorld/app/ folder within my SPFx project.
Use the Custom Element Bundle in an SPFx Web Part
Now for the fun part… let’s get this working in a SharePoint Framework project.
The first step is to add a npm packages used to act as an additional polyfill to fix browsers who don’t yet natively support custom elements and shadow DOM:
yarn add @webcomponents/custom-elements/src/native-shim @webcomponents/webcomponentsjs/bundles/webcomponents-sd-ce
Now, update your web part to import the polyfill, the custom element and use it in your web part:
// polyfill for ES5 code as doesn't include native implementation for customElements
import '@webcomponents/custom-elements/src/native-shim';
// polyfill for browsers that don't support shadowDom & customElements (IE & Edge)
import '@webcomponents/webcomponentsjs/bundles/webcomponents-sd-ce';
// angular elements application
import './app/ngElementsHelloWorld';

export default class HelloWorldWebPart extends BaseClientSideWebPart<IHelloWorldWebPartProps> {
  public render(): void {
    this.domElement.innerHTML =
      `<app-hello-world message="${ this.properties.description }"></app-hello-world>`;

    const element = this.domElement.getElementsByTagName('app-hello-world')[0];
    element.addEventListener('elementButtonClick', (event: any) => {
      alert(event.detail);
    });
  }
}
Test & Enjoy Manageable Payloads!
Let’s see this work. First, build the Angular project using the custom script we created:
npm run spfx-build
Now run your SharePoint Framework project:
gulp serve
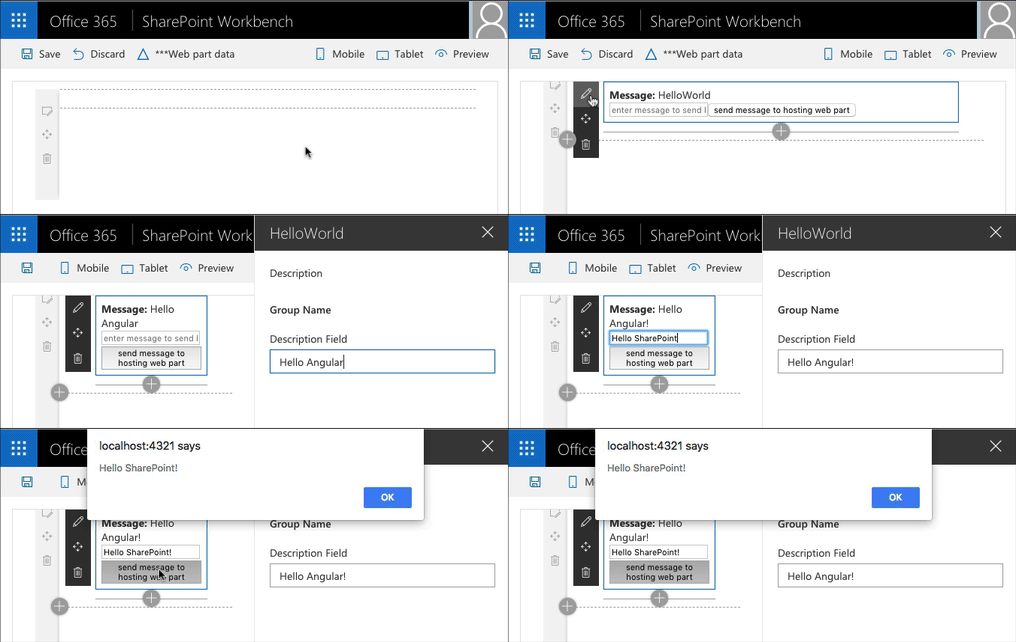
Add your web part to the page to see it work in the local workbench:

Angular Elements in SPFx
SPFx web part loading an Angular Elements app
We eliminated the “can’t use the Angular CLI” downside of the previous “one-project” approach, but did we eliminate the payload issue too? You bet… check this out!

SPFx project payload
Moving to two projects significantly reduces the payload
330kB!
That’s a 90% reduction from the “one-project” approach. If you deploy this to production, the Office 365 CDN or your CDN of choice will gzip the file down to 328kB (125kB gzipped). That’s a perfectly acceptable sized web part. Success!
But Wait… It’s Going to Get Better!
Can it get even better? Yup!
Angular v7, due out in September / October… just a month or so after this post has been published… will include a brand new rendering engine.
This new rendering engine, named Ivy, was built from the ground up with speed & tree-shaking in mind. While we haven’t seen the final results, not only is the rendering blazing fast, but it’s resulting in payloads around 3kB gzippedd for typical Angular Hello World projects. What will the final size of an SPFx bundle be? We’ll see when Ivy ships!
Your existing projects likely won’t have to be touched other than updating the package dependencies. Just run the Angular CLI project upgrade process that will update the packages, rebuild & redeploy everything.
But if you did the “one-project” approach, you wouldn’t be able to benefit from this because, as I explained in the second post in this series, no AOT for you!
My Opinion: Two Projects is a Good & the Only Approach
The evidence speaks for itself… having two projects to deal with is not a big deal or a slight to your productivity. Most of us are using VSCode as our editor and having two instances open, one with each project loaded, is not a big deal in any way.
Because of this, I recommend using the two-project approach. You get the benefit of using the Angular CLI as well as a manageable resulting bundle that you can deliver to your customers.
This Post Is Part of a Four-Part Series on Using Angular in SharePoint Framework Projects
This four-part blog post series covers the challenges developers face trying to incorporate modern Angular apps in SharePoint Framework projects, two approaches to incorporating Angular projects in SPFx project, and finishes off with the ‘good, bad & the ugly’ review.
You can get all four parts of the series here: Using Angular Elements in SharePoint Framework projects
Check out our Mastering the SharePoint Framework course that contains a chapter on using Angular Elements in SharePoint Framework projects including step-by-step demonstrations on how to make this work using the latest version of Angular.

Microsoft MVP, Full-Stack Developer & Chief Course Artisan - Voitanos LLC.
Andrew Connell is a full stack developer who focuses on Microsoft Azure & Microsoft 365. He’s a 20+ year recipient of Microsoft’s MVP award and has helped thousands of developers through the various courses he’s authored & taught. Whether it’s an introduction to the entire ecosystem, or a deep dive into a specific software, his resources, tools, and support help web developers become experts in the Microsoft 365 ecosystem, so they can become irreplaceable in their organization.


