This post is one of three posts in a short series. The first post, Microsoft Entra ID & Office 365 APIs - Creating an Microsoft Entra ID App with a Wizard & Manually is a brief overview. The second post (this one), is creating an Azure app using a wizard in Visual Studio 2013. The third post, Creating Microsoft Entra ID Apps for Office 365 Using the Azure Management Portal, shows how to create the Microsoft Entra ID App manually.
This is what every article seems to show from the Office 365 APIs. I’m going to assume you’ll be starting with an ASP.NET MVC project and you’ve done nothing to the codebase or settings… just File - New project and run through the wizard.
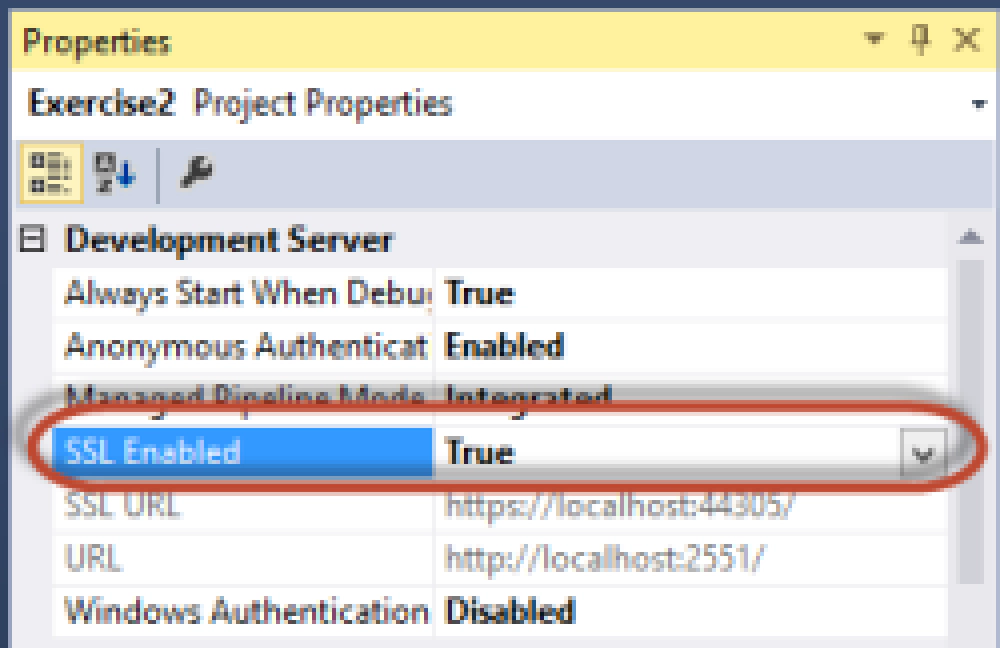
The first thing I’d recommend you do is make sure you do all your auth work over SSL. To do this look at the project’s properties and set the SSL Enabled flag to true:

Microsoft Entra ID Authentication
After doing that, make sure you change the startup path for the project to always use SSL. Do this by right-click the project in the Solution Explorer window and select Properties. Select the Web tab and find the Start Action. Click the radio button for Start URL and set it’s value to the SSL endpoint of your development site.
Now you’re ready to run through the wizard that will create the Microsoft Entra ID app. Right-click the project in the Solution Explorer tool window and select Add - Connected Service.

Microsoft Entra ID Authentication
After you sign in using your Org ID, click the App Properties link. Notice you have a place to set the name of the app, if it is single / multi-tenant (pick single for now… I’ll explain this in a later post this week), and there are two start URLs. Make sure you get rid of the HTTP URL and leave the HTTPS one. If you hadn’t done the step where you configured this site for HTTPS, you’d have to manually change this later which isn’t a big deal, but it saves you some time. You also want to ensure there is only the HTTPS one listed as that tells Azure when the user successfully authenticates, it will redirect them back to the secure page which is what you want because Azure will be sending some important stuff along.
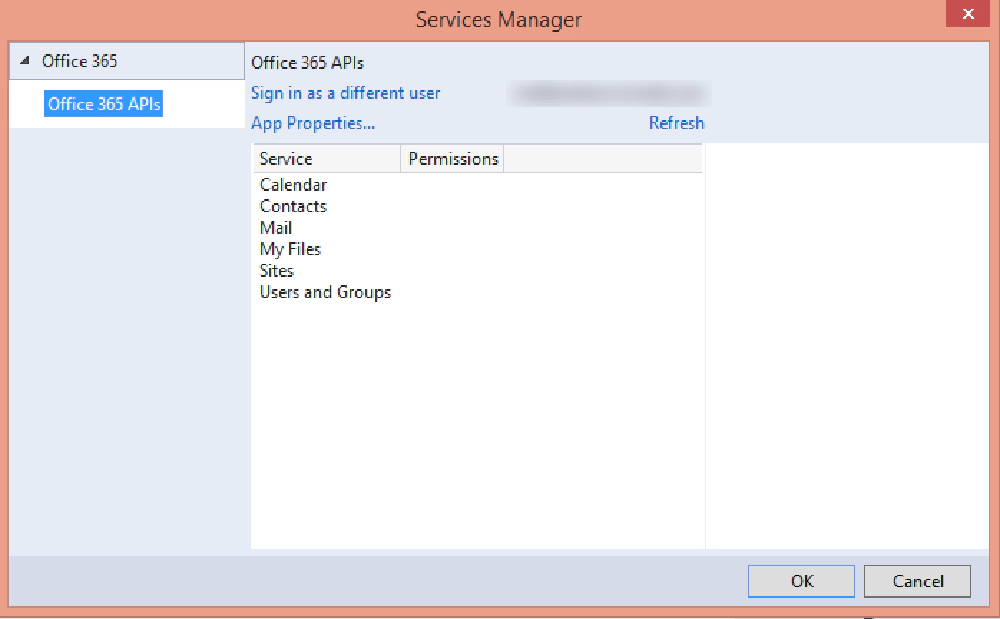
OK, the rest of this is pretty simple… pick the service and check of the permissions your app needs. Click OK and poof, the wizard will add all the necessary NuGet packages & web.config values for your app.
The issue I have with this approach is that so much stuff is done for you and “behind the scenes”. So while you can get things working fairly quickly, you get to that “ok, so how do I set this up in production… do I really need to re-do this with VS against my production Azure subscription?” No you don’t… let me know you the manual way…

Microsoft MVP, Full-Stack Developer & Chief Course Artisan - Voitanos LLC.
Andrew Connell is a full stack developer who focuses on Microsoft Azure & Microsoft 365. He’s a 20+ year recipient of Microsoft’s MVP award and has helped thousands of developers through the various courses he’s authored & taught. Whether it’s an introduction to the entire ecosystem, or a deep dive into a specific software, his resources, tools, and support help web developers become experts in the Microsoft 365 ecosystem, so they can become irreplaceable in their organization.


