Many (if not most) traditional SharePoint developers are new to the dev stack and build tool chain Microsoft selected for SharePoint Framework (SPFx) development. This style of development leverages popular open source tools built on Node.js and developers spend more time in the terminal/console than they are used to. In spending time with and talking to developers making this jump, I find they’re interested in some of the tools and things I use to simplify this process. This is one of a series of posts that aren’t specific to the SPFx but are tangentially related to the development experience.
Many open source tools these days are built on top of Node.js. Node.js is a popular choice because its cross platform by nature so tools you write for it will run on Windows, MacOS, and Linux. Installing Node.js is quite easy… just head to the Node.js website, select your platform (Windows / MacOS / Linux), and then select the long-term support (LTS) version or download a specific version from their Node.js Release Working Group page on GitHub and install away.
While that’s a simple set up that most sites will point you to do, the default install has three characteristics that I find limiting. To be clear, there’s nothing wrong with the Node.js default install. Its just that some aspects of the normal process have some downsides that can be addressed with a popular community tool.
Issues with the Default Node.js Install
Let’s start by looking at these limitations with the default Node.js installer.
The Node.js installer places Node.js on your machine in a specific location, just like all other installers. On Windows that location is c:\Program Files (x86)\nodejs and on MacOS it’s /usr/local/bin/node. It also adds the path to Node to your PATH environment variable so you can run Node.js from anywhere on your machine.
So what’s wrong with this?
Administrative Command Prompts
Ever notice when you are doing something on Node.js, like installing a global package, that sometimes you are prompted to elevate your command prompt? On Windows, you’ll frequently have to launch an administrative command prompt or PowerShell session & on MacOS or Linux you have to preface your commands with sudo. Why?
When you install Node.js packages using npm globally, it needs to place them into a location you might not have default permissions to on your system. On Windows that’s c:\Program Files (x86)\node_modules and on MacOS that’s /usr/local/lib/node_modules.
Each OS handles system integrity different ways (on Windows you’ve heard of User Access Control / UAC). In order to perform those operations, you need to do them as an administrator. Windows handles that by asking you to run them within an administrative command prompt / PowerShell session. MacOS & Linux ask you to preface the command with sudo… “superuser do”.
This isn’t a big deal for many developers, but it’s a bit of a pain and hassle. However some developers don’t have admin rights on their workstation and this requirement can add the time consuming process of opening a support ticket to get an IT admin for your org to install a global package.
Only One Version of Node.js can be Installed at a Time
When you install Node.js, you install a single version.
But Node.js is a frequently updating platform with two different branches. There’s an LTS branch that enterprises like to use because new features aren’t added to the platform… instead only fixes are added. The current branch contains the latest features.
Some tools may not work well on the current branch so they require LTS, but what if you want to use the latest features?
Only One Collection of Globally Installed Packages
Recall above when you install Node.js, it also creates a central location where globally installed packages go. On Windows that’s c:\Program Files (x86)\node_modules and on MacOS that’s /usr/local/lib/node_modules.
In addition to having just one version of Node.js running at any time, you only have one collection of globally installed packages. That means if you upgrade one of your globally installed packages, say TypeScript, then all Node.js based utilities will use the new version. Maybe that’s what you want, but maybe it isn’t.
Add Node.js Flexibility with NVM
There is a very simple solution to mitigate all the issues I previously covered. But it doesn’t stop there - it also brings much needed flexibility to your environment.
It’s called Node Version Manager (aka NVM). While it originated on MacOS NVM, there’s a popular Windows port nvm-windows. Both of these are community maintained open source solutions that are hugely popular. NVM has over 77k stars on it’s GitHub repo while the Windows port has over 35k stars
How Does NVM Work?
How does NVM work and how does it help address these three things above? The solution to the above challenges is very simple.
There are subtle differences between NVM (for MacOS) and NVM-Windows (for Windows), but for the most part, they are the same. When there’s a difference between the two, I’ll call it out.
Before installing Node.js, you install NVM. NVM is a console tool that manages Node.js installs for you. It looks at the nodejs.org master registry of all the Node.js versions that you can install.
When you tell NVM to install Node.js, it installs the specified version:
- into your user profile folder and…
- into a subfolder for the specific version
This specific Node.js install not only contains the Node.js version you specified, it also includes a dedicated global package folder for that install. This means that each Node.js install has its own unique global package folder.
After installing a version of Node.js, NVM changes your PATH environment variable to point to the location where Node.js was installed… the specific version.
If you install a second (or third or fourth) version of Node.js with NVM, each time you switch NVM to use a different installed version of Node.js, it simply updates the PATH environment variable to point to the version you want to use.
Seeing it in Action
Let’s see this in action… I’ll use my MacOS environment to show the screenshots. NVM-Windows has similar commands… refer to the docs to see how to perform the same things. Just keep in mind they both (NVM & NVM-Windows) do the same thing.
At the command prompt, entering nvm ls will tell NVM to list all installed versions of Node.js on my system:
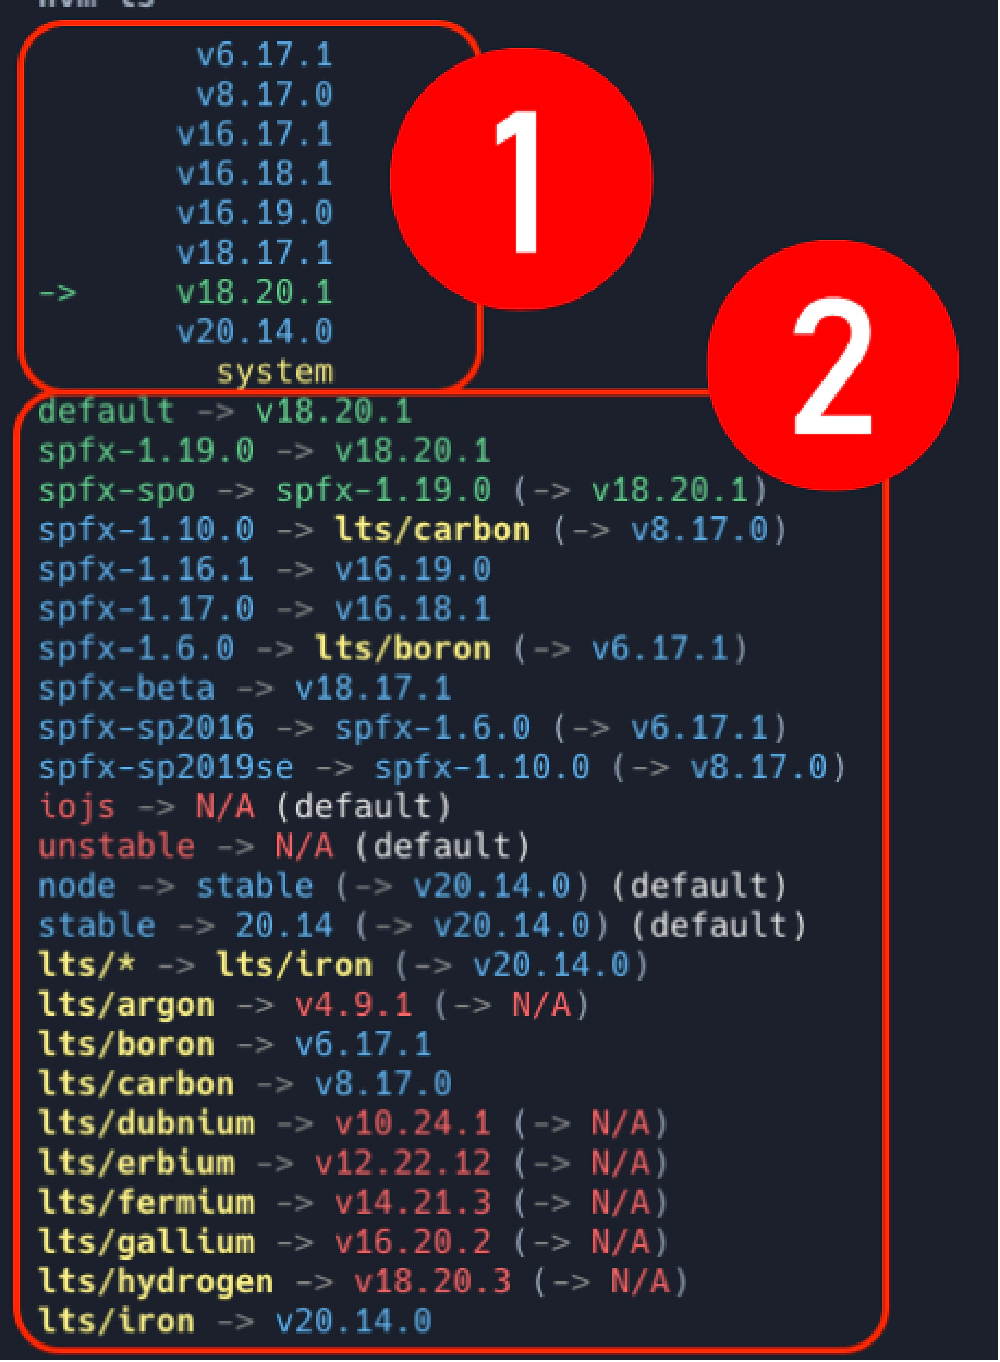
NVM List command output
Results of the ls command, showing all installed Node versions known to NVM
Here you see two sections. The first section (#1) lists the versions of Node.js I have installed. The blue versions are installed versions. The green version with the arrow pointing to it is not only installed, but it’s the version I’m currently set on. Switching to another version is as easy as running nvm use v16.19.0.
The second section (#2) is a list of aliases. The default alias points to the version of Node.js I want my console to default to when booting up. Other aliases point to other things.
You can even create your own aliases. You can see I did that for the spfx-1.16.1 alias. I’ll explain how I used that in a moment.
The screenshot above also shows default aliases for Node.js named branches like stable and the published lts versions.
Let’s see how the switching and isolation works. I’m currently on Node.js v18.20.1… let’s see what globally installed packages are present:
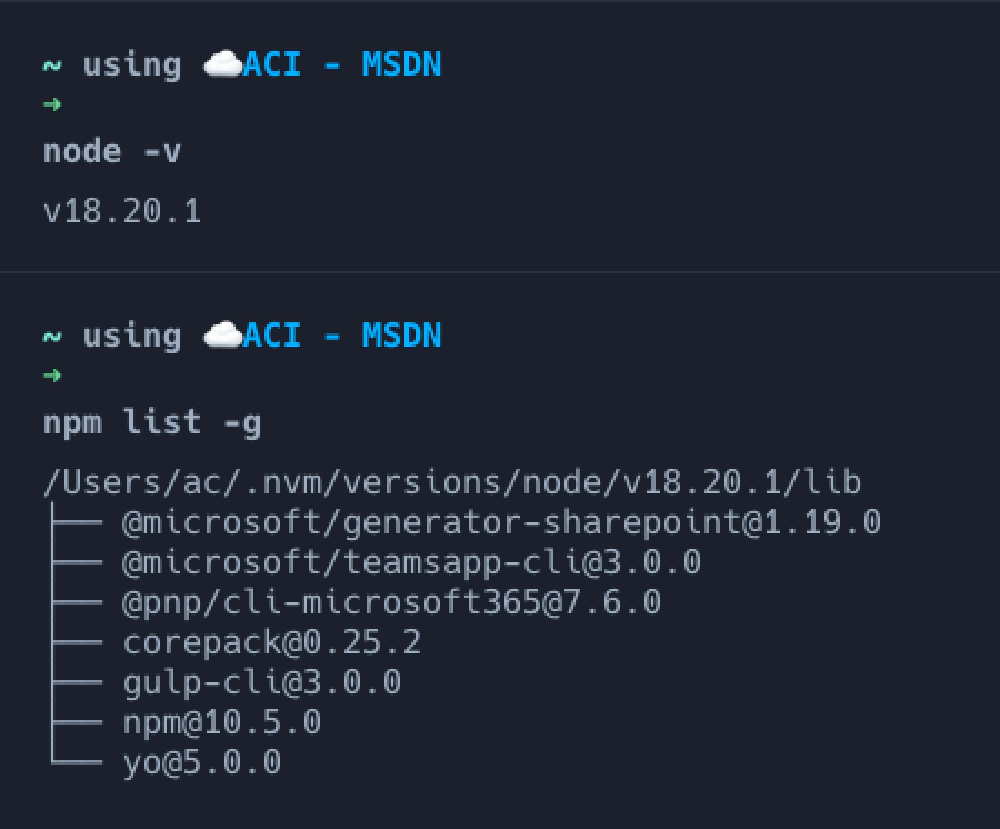
List of globally installed packages under Node v18.20.1
Demonstrating how two different Node installs under NVM have their own unique globally installed packages
Notice I have the SPFx v1.19.0 & the Teams Toolkit CLI packages installed.
Next, I’ll switch to another Node.js version, v16.19.0 using the command nvm use v16.19.0 or the alias nvm use spfx-1.16.1 which is an alias that points to that version of Node:
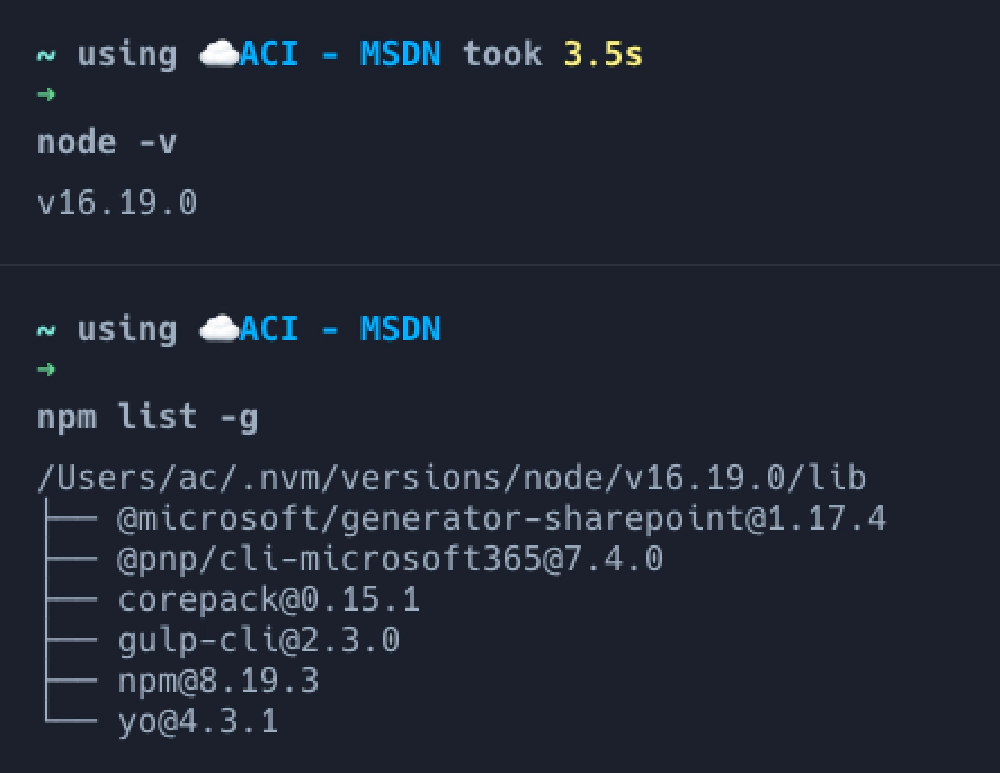
List of globally installed packages under Node v16.19.0
Demonstrating how two different Node installs under NVM have their own unique globally installed packages
This time you can see a completely different set of packages versions installed. You can even see the version of npm in that Node.js instance is outdated.
To prove out this isolation, I’ll ask my system what the location of Node.js is:

Reveal install path of current Node version
Output of the which node command, displaying the path to the currently active Node.js version
Take a look at that path. You can see each version is in its own subfolder… furthermore…
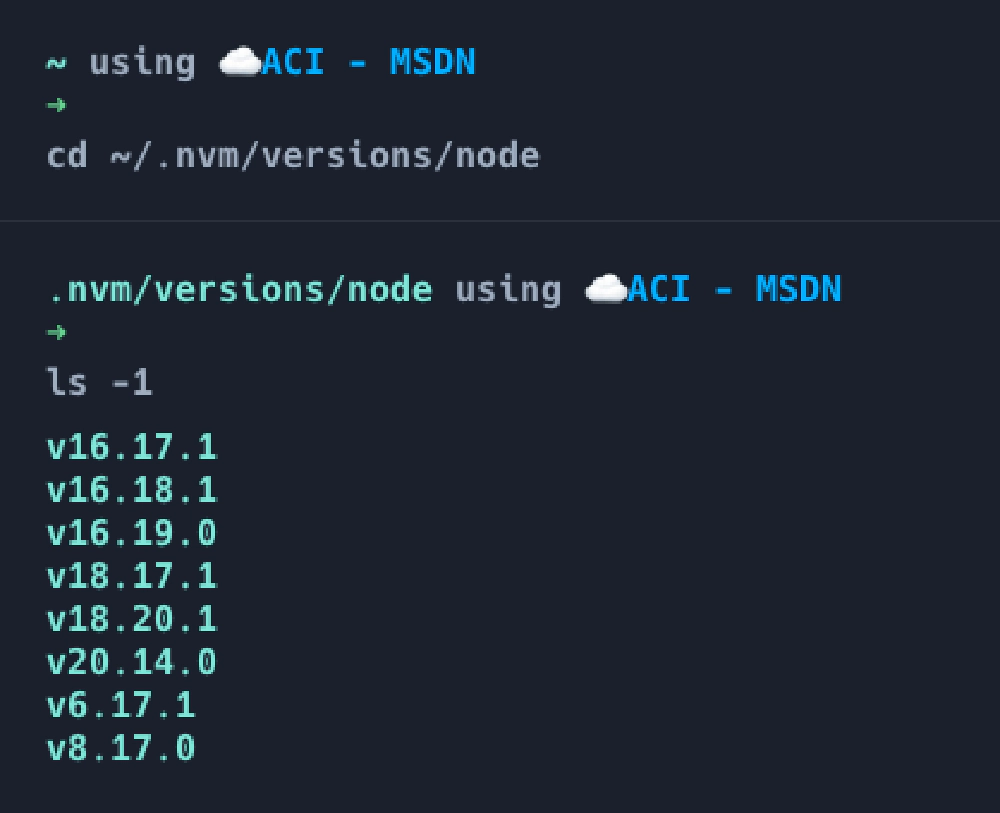
List of Node installs
Output of the contents of the NVM managed folder where Node installs are located
You can see all the versions installed!
Querying, Installing & Uninstalling Node.js Versions with NVM
Figuring out what versions are available is really simple. Just ask NVM about its commands.
To get a list of all installed versions of Node.js, enter nvm ls on MacOS or nvm list on Windows.
To get a list of all available Node.js versions, enter nvm ls-remote on MacOS or nvm list available on Windows.
Install a new version using nvm install v20.15.0 on MacOS or nvm install 20.15.0 on Windows (*notice the Windows port doesn’t use ‘v’ in the version name).
If you include –reinstall-packages-from={version} on MacOS, it will automatically install all the global packages you installed from another install in the new Node.js version. So… nvm install v20.15.0 –reinstall-packages-from=v18.20.3 will install all the packages installed under Node.js v18.20.3 into the new v20.15.0 install. Unfortunately, this feature isn’t available in the Windows port.
Uninstall a version using nvm uninstall v20.15.0 on MacOS or nvm uninstall 20.15.0 on Windows.
Benefits to using NVM
Why bother? I already mentioned the characteristics of a Node.js install that NVM addresses, but how about some real world scenarios?
NVM Scenario #1 - Testing Node.js Versions
Sometimes a tool will tell you they only support a specific version of Node.js. I prefer to use the current branch, but I get that when there’s an issue, I should go with what the vendor says they support.
Take the SPFx for instance. Microsoft tells you to use a LTS version of Node.js. When I ran into a bug a few weeks back, before posting the issue, I verified the bug existed on their supported plan. So I quickly jumped over to a LTS version (v18.*) to verify the bug was still present on their supported stance.
Without NVM, I would have to uninstall Node.js and reinstall with an LTS version followed by installing the global packages I needed for SPFx development. The other option was just to live on an LTS version… but my life it’s all SPFx so it would have blocked some of the Node.js v18 features I was leveraging.
NVM made this really easy.
NVM Scenario #2 - Unique Global Packages
When we were going through the developer preview phase of the SPFx, Microsoft would release a new version of the Yeoman generator with each dev preview drop. While the tools were updated on the day they released, it could take a few days or weeks for the supported libraries to make it to your Office 365 developer tenant.
We were in this state where “I can do local dev with the latest dev preview drop, but I have to wait until the new stuff gets deployed to my tenant before I can do any more live testing in Office 365” or you had to wait to install the latest drop when the new bits made it to your Office 365 tenant.
Not with NVM… I kept two versions going… one with the old Yeoman generator (say, drop 5) and one with the new version (drop 6) and just jumped between the two as necessary
NVM Scenario #3 - Troubleshooting Projects
Above I mentioned the alias spfx-1.16.1 I created… what’s up with that?
That is from testing a project one of my students was having trouble with. He was on an older version of the SPFx. I didn’t want to uninstall and change my installed setup just to test his project, so I installed a specific version of Node that was supported for SPFx v1.16.1, installed what I needed to make SPFx v1.16.1 in that version, and test away. When I was done, I could have easily deleted that install.
That’s Awesome, But I Already Installed Node.js! Can I Switch to NVM?
Yup… it’s not hard. You simply have to uninstall your version of Node.js, then install NVM and reinstall Node.js with NVM. But, you don’t have to uninstall that version! In fact, I have a system installed version… I just don’t use it.
Before you do that, I suggest you get a list of all the global packages you have installed. Here’s a little video how I do it real quick:
Using NVM on MacOS? Check This Out!
If you’re on MacOS and using NVM, there’s a nifty little argument --reinstall-packages-from that will automatically install all the packages from another previous install.
For example, say you have Node.js v16.20.2 installed via NVM and you want to install Node.js v18.20.2 but you want all the globally installed packages under v16.20.2 installed when you install v18.20.2. Just do this:
nvm install v18.20.2 --reinstall-packages-from=v16.20.2
What if you’re on Windows and using NVM? Unfortunately that argument isn’t in the Windows port of NVM.
Installing NVM is easy… you can use CURL or WGET or Homebrew, which I prefer:
# install with CURL
curl -o- https://raw.githubusercontent.com/nvm-sh/nvm/v0.39.7/install.sh | bash

# install with WGET
wget -qO- https://raw.githubusercontent.com/nvm-sh/nvm/v0.39.7/install.sh | bash

# install with Homebrew
brew install nvm
For nvm-windows, there’s an MSI installed to make it real easy… just head to the main project site and grab the installer.

Microsoft MVP, Full-Stack Developer & Chief Course Artisan - Voitanos LLC.
Andrew Connell is a full stack developer who focuses on Microsoft Azure & Microsoft 365. He’s a 20+ year recipient of Microsoft’s MVP award and has helped thousands of developers through the various courses he’s authored & taught. Whether it’s an introduction to the entire ecosystem, or a deep dive into a specific software, his resources, tools, and support help web developers become experts in the Microsoft 365 ecosystem, so they can become irreplaceable in their organization.
