Recently I ran across a scenario and found myself coming up empty in looking for resources on how to solve it. I didn’t think the scenario was all that unique, but I could find not a single article or post on how to solve this problem. It’s situations like these that interest me because not only do i want to figure it out, but I want to write about it as well to help others who may run into this.
In this post, I’ll explain how I used Azure Data Factory to move millions of files between to file-based stores (Azure Blob Storage containers) but using a value within the contents of each file as a criteria where the file would go be saved to.
Overview of the scenario
Let me first take a minute and explain my scenario. A few years ago, over the span of 10 months, I had webhooks from various SaaS products submitting HTTP POSTS to an Azure Function. I didn’t have time to build the process that would actually use and store the data in the way I needed it, but I knew I didn’t want to ignore this time.
So, during this time, I took the easy way out: the Azure Functions just saved the raw webhook payload to one of a few Azure Storage Blob containers (one for each SaaS source). Later, I took a few days to update the Azure Function to process the data and send it to it’s final location.
But I was left with a problem: multiple containers with millions of JSON files in the root of each container. A few months later I tried to work with this data but quickly had the realization: “I can’t do anything with this as the datasets are too big… I should have partitioned the data somehow.” What I should have done was set up a folder structure where I used the timestamp of the webhook submission to create the following partition: [container]/YYYY-MM-DD/HH/<file>.json
This is a common pattern to follow that many tools and systems understand. A new folder would be created for each day and within that, there would be 24 folders, one for each hour of the day. The webhook post files would go into each of these buckets depending when they were submitted.
I realized moving the data to this new partitioned set up would take time, so I did what so many others do: I decided it’s not critical and put it off.
Until this weekend…
Always wanting to learn something new, I decided to use Azure Data Factory (ADF) pipelines to move this around. Unfortunately, I found it much harder to figure out as the docs tutorials and docs for ADF had some significant gaps, and ot make matters worse there weren’t too many people who had the same questions I had in various communities.
This blog post will explain how I figured this out.
Overview of the solution & process
Before diving in, let’s take a look at an overview of the solution and process.
Recall I have multiple containers, each with millions of JSON files in them. I wanted to move all contents into new containers but use the event date, indicated with a timestamp property within each JSON file, into a folder partition using the scheme [container]/YYYY-MM-DD/HH/<file>.json.
The process was simple:
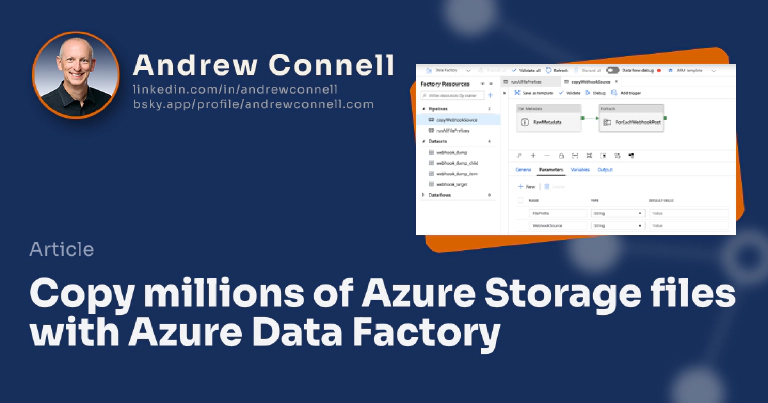
- Pipeline copyWebhookSource
- for each file in a container
- open the file and get the timestamp property
- copy the file to the new location, using the specified timestamp to generate the nested structure
- for each file in a container
The first time I ran the above, I keep running into timeouts and limit errors. Apparently ADF doesn’t like working with more than 1M in a collection. So, I created my own partition of 36 groupings for each container: instead of “for each file”, I had to get a subset of files who’s names started with 0-9,a-z. I had to go even further on one container and two two characters in the filename prefix. This resulted in another pipeline:
- Pipeline runAllFilePrefixes
- for each item in an array (the array contained file prefixes)
- execute pipeline runAllFilePrefixes & pass in the prefix to use
- for each item in an array (the array contained file prefixes)
Creating the inner loop “copyWebhookSource” pipeline
The first step was to create a connection to the Azure Blob Storage resource where everything resided. This is called a linked service:
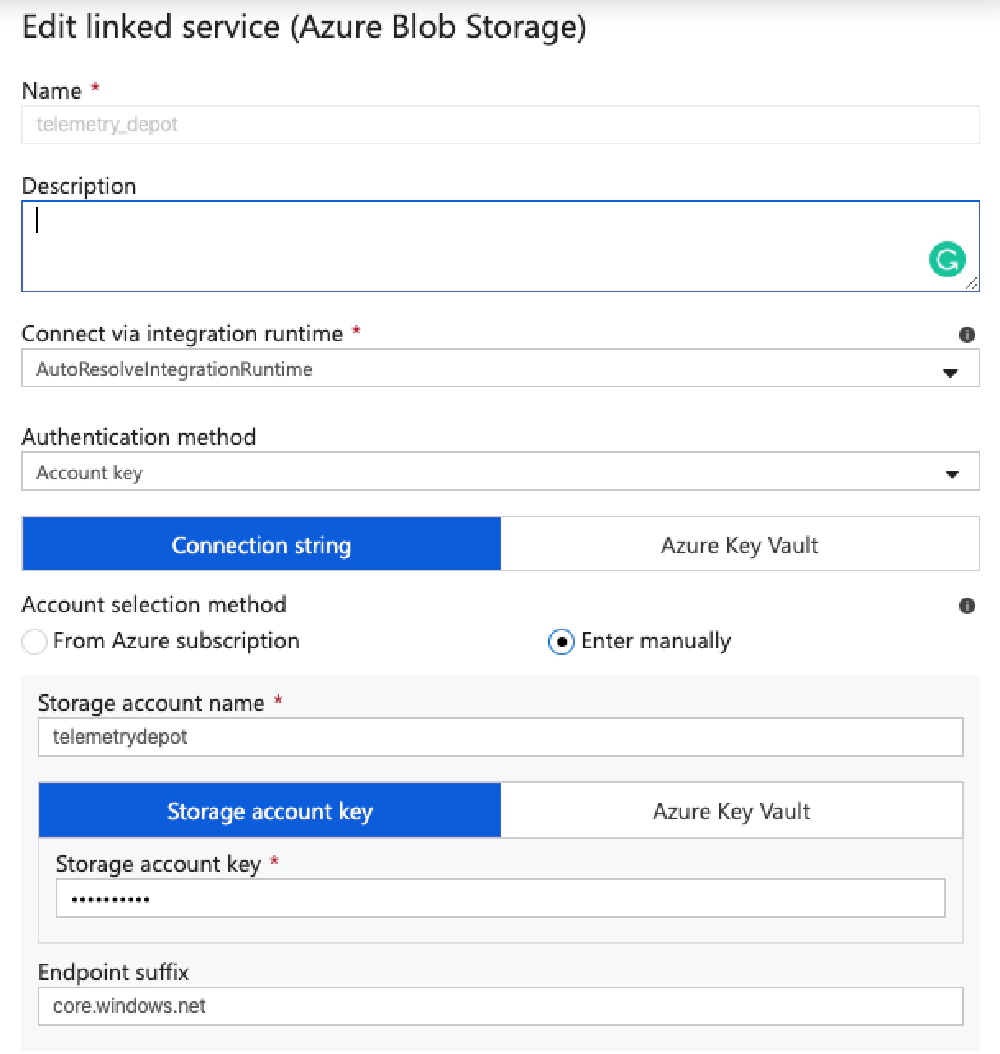
Linked connection to Azure Blob Storage account
Once that’s created, I created the pipeline copyWebhookSource. this contains two input parameters. One was for the name of the webhook source (WebhookSource) and one for the FilePrefix to use.
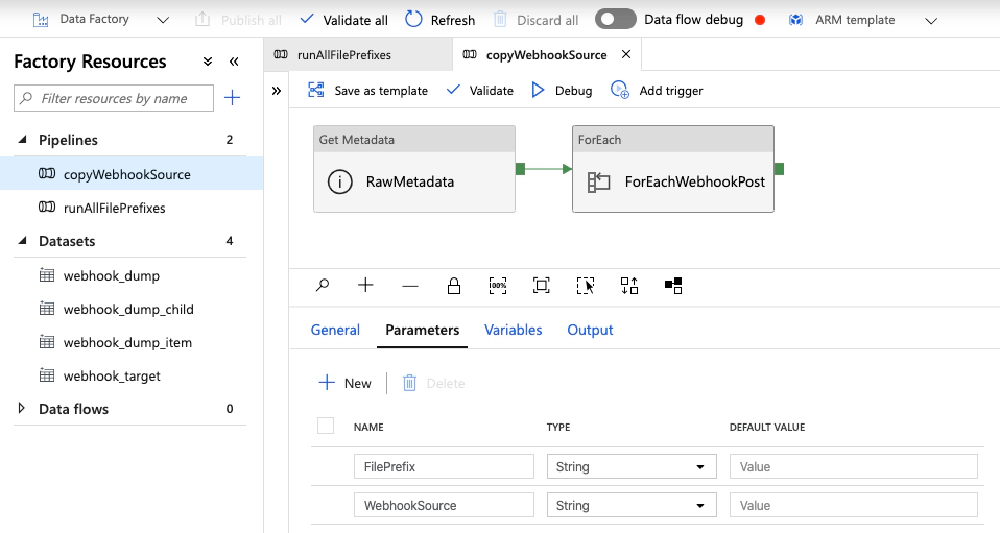
Pipeline: copyWebhookSource
Next, I added two activities to the pipeline.
Get a list of all files to process
The first activity, Get Metadata is used to get a list of all the files using the file prefix.
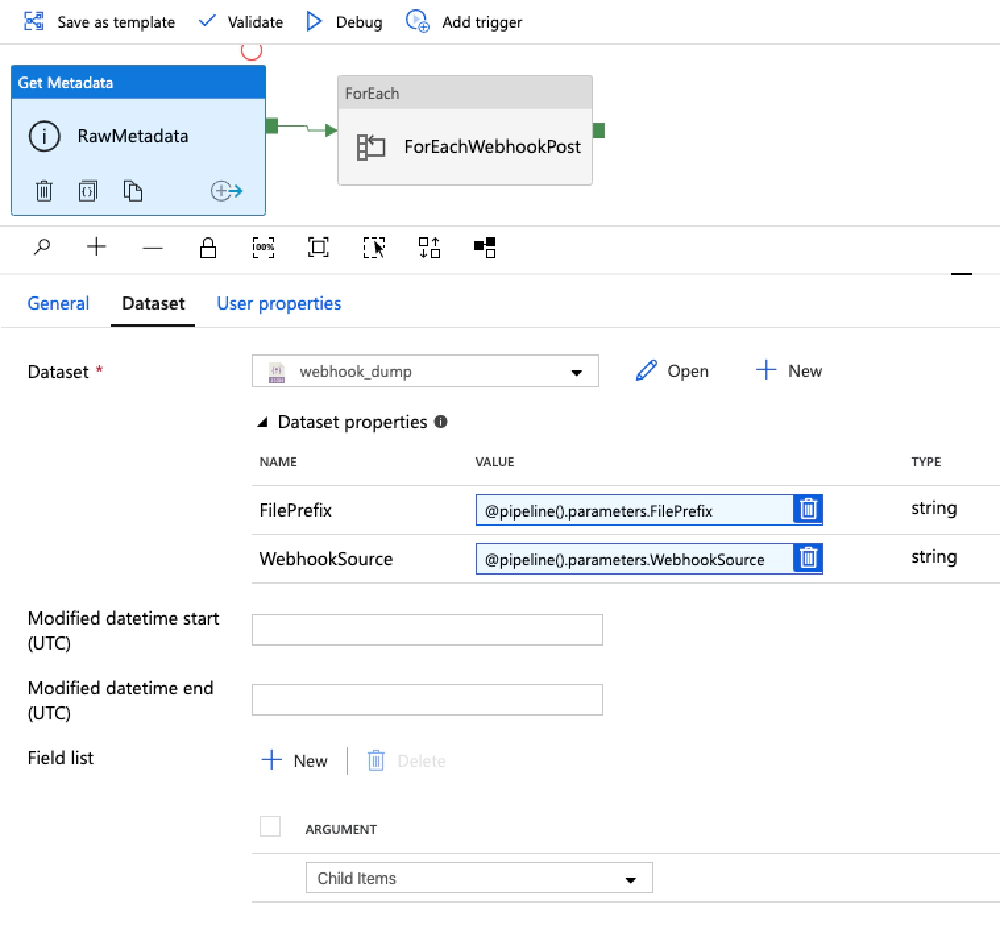
Get Metadata activity - used to get files to process
This activity needs a dataset to know where to fetch the files from, so I created a new dataset webhook_dump:
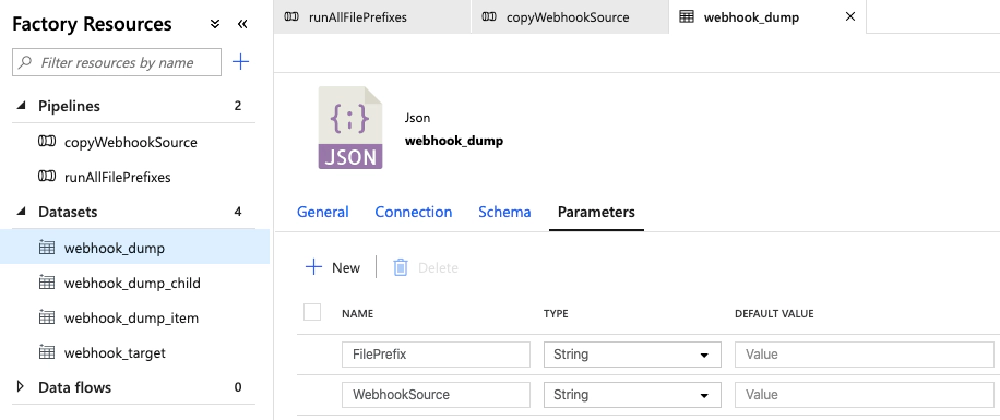
Input parameters for the 'webhook_dump' dataset
This dataset has two parameters, WebhookSource & FilePrefix. These are used in the Connection tab to make the query a bit more dynamic:

Connection settings for the 'webhook_dump' dataset
Working With Dynamic Content
The two properties in the previous screenshot, File path & File, support dynamic content. This is an expression you can use to make things dynamic.
When adding dynamic content, you can’t just type it in, you need to select the Add dynamic content link the appears just below the input box to open the panel where you can write the expression.
If you simply try to type it in, it won’t be evaluated. You can tell it’s been properly added because the input box is a little blue with a trashcan icon in the input box to clear it.
Now what I have my data, go back to the Get Metadata activity. I had to configure it to expose the field Child Items as an argument to other activities. Unfortunately, this option never appeared for me… the ADF pipeline editor thought I was getting a single file.
To override this, there’s a Code button in the top-right corner of the ADF editor. I selected that, found the activity. Look for the property fieldList. I set the property to expose to childItems:
"activities": [{
  "name": "RawMetadata",
  "type": "GetMetadata",
  "dependsOn": [],
  "policy": {
    "timeout": "7.00:00:00",
    "retry": 0,
    "retryIntervalInSeconds": 30,
    "secureOutput": false,
    "secureInput": false
  },
  "userProperties": [],
  "typeProperties": {
    "dataset": {
      "referenceName": "webhook_dump",
      "type": "DatasetReference",
      "parameters": {
        "FilePrefix": {
          "value": "@pipeline().parameters.FilePrefix",
          "type": "Expression"
        },
        "WebhookSource": {
          "value": "@pipeline().parameters.WebhookSource",
          "type": "Expression"
        }
      }
    },
    "fieldList": [
      "childItems"
    ],
    "storeSettings": {
      "type": "AzureBlobStorageReadSettings",
      "recursive": true
    }
  }
},
Enumerate through all files
The next step was to add a ForEach activity to enumerate through all the files. Connect it to the Get Metadata activity by dragging a success path over to it (click the green box on the side of the activity and drag it to the ForEach). Use dynamic content to set the Items setting on this activity to define the collection it will enumerate over:
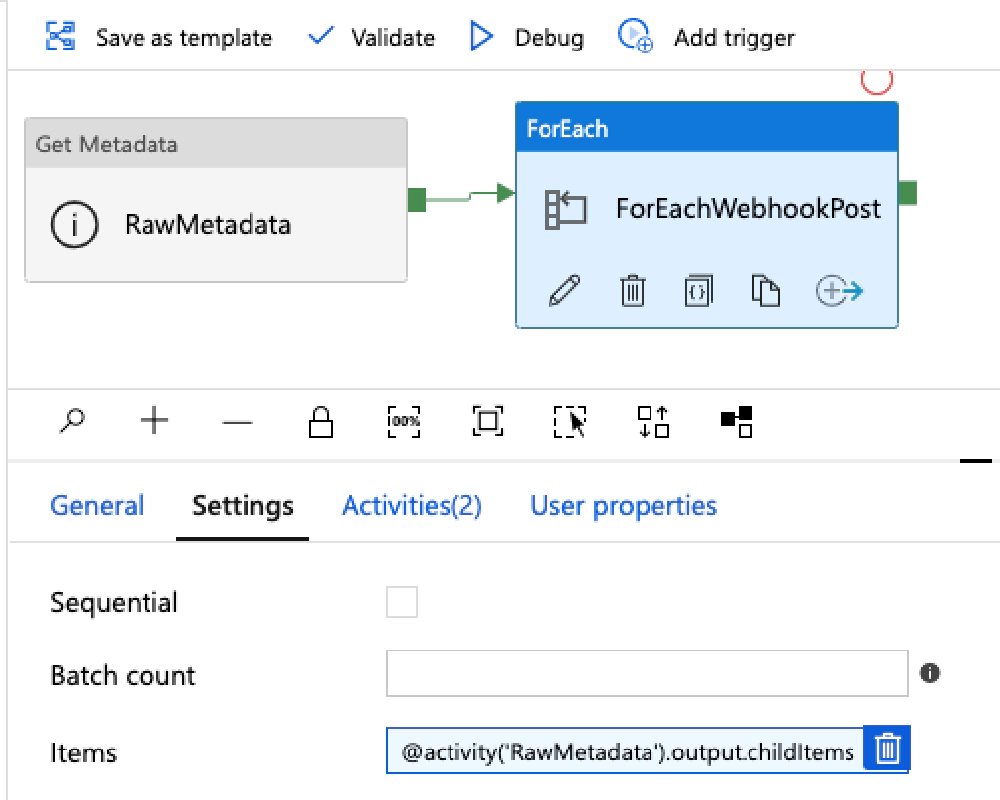
Enumerating through files using the ForEach activity
Do this by referencing the Get Metadata activity by name and using the output property childItems I specified previously.
Next up, define what happens in the loop. Select the pencil icon on the activity or the Activities tab followed by Edit activities.
For each file, I need to do two things:
- Open the file & get the timestamp property
- Copy the file to the specified container & folder using the timestamp property to determine the location
I added a Lookup activity to open the file. This activity needs a new dataset, webhook_dump_item, to know where to pull the file from. I parameterized this by adding the name of the file and the source of the webhook as input parameters. Then I used those values on the Connection tab to fetch the file:

Connection settings for the 'webhook_dump_item' dataset
Back on the Lookup activity, I set the value of the FileName parameter on the dataset to the name of the file the ForEach activity enumerator is currently on. This is done by referencing the name property on the @item().
I also configured it to only get the first item in the returned collection. Because I was selecting a specific file, it’s a collection of one, but this made working with the data a bit easier:
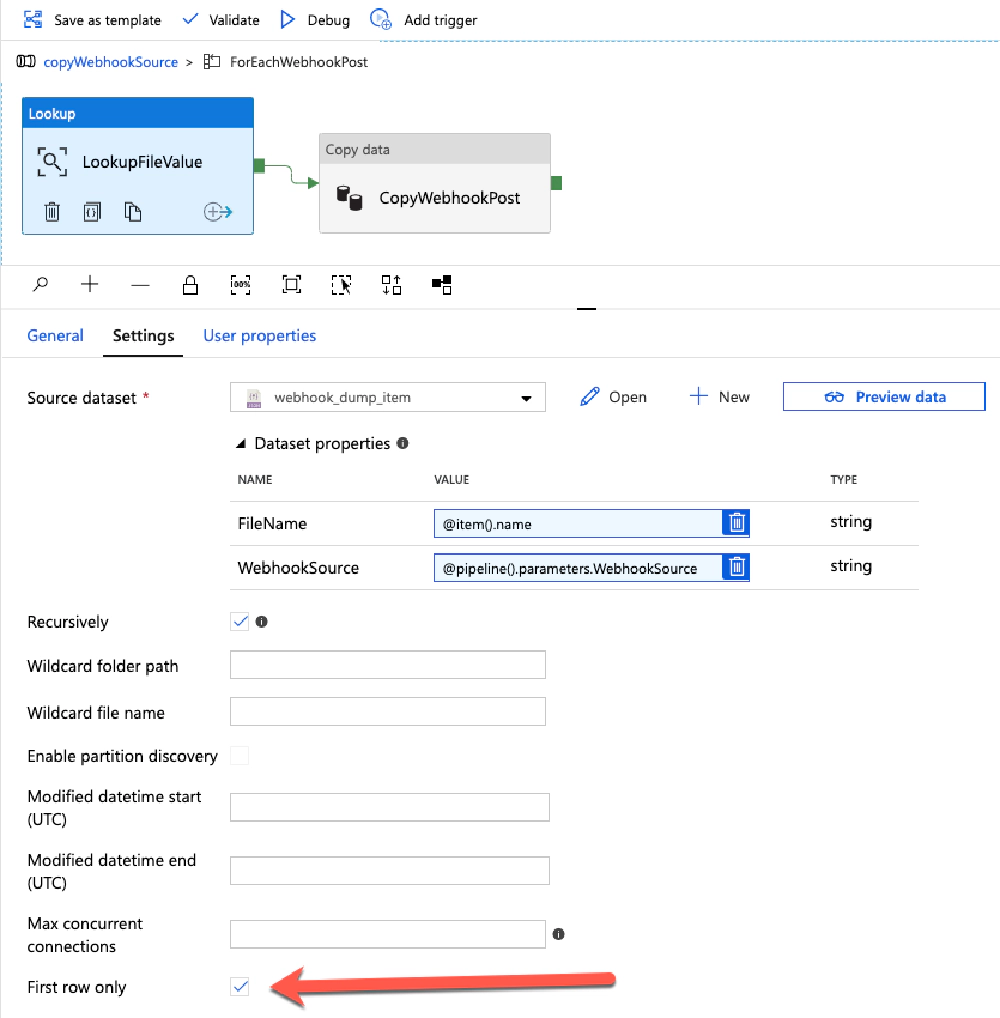
Get a specific file to read it's contents using the Lookup activity
The last step: copy the file!
Add another activity Copy data and drag the success path from the Lookup to it.
Set the Source property to use the same dataset you just created as you are pulling a specific file. In the following screenshot, you can see I created another dataset webhook_dump_child, but I didn’t need to. I could use the same one as before as I’m just selecting a single file.
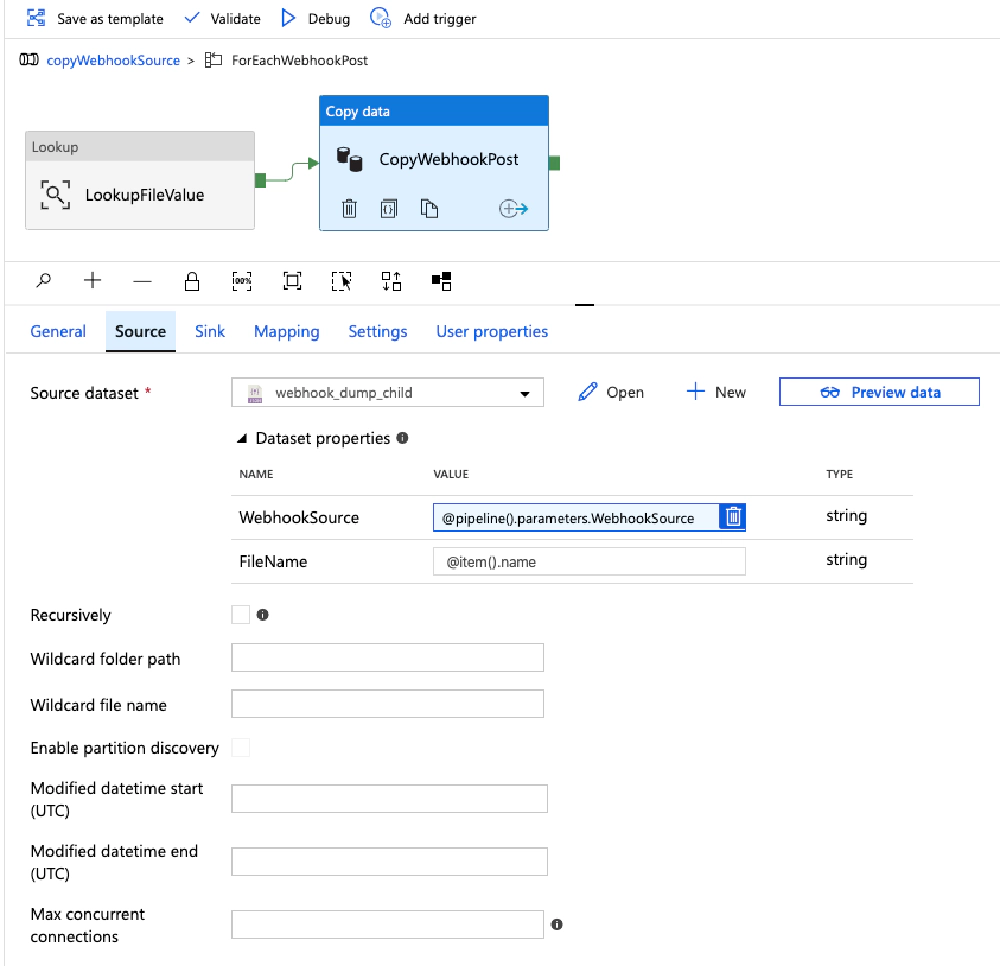
Copying files with the CopyData activity
On the Sink tab, create another dataset, webhook_target, that will point to the location where to copy the file:
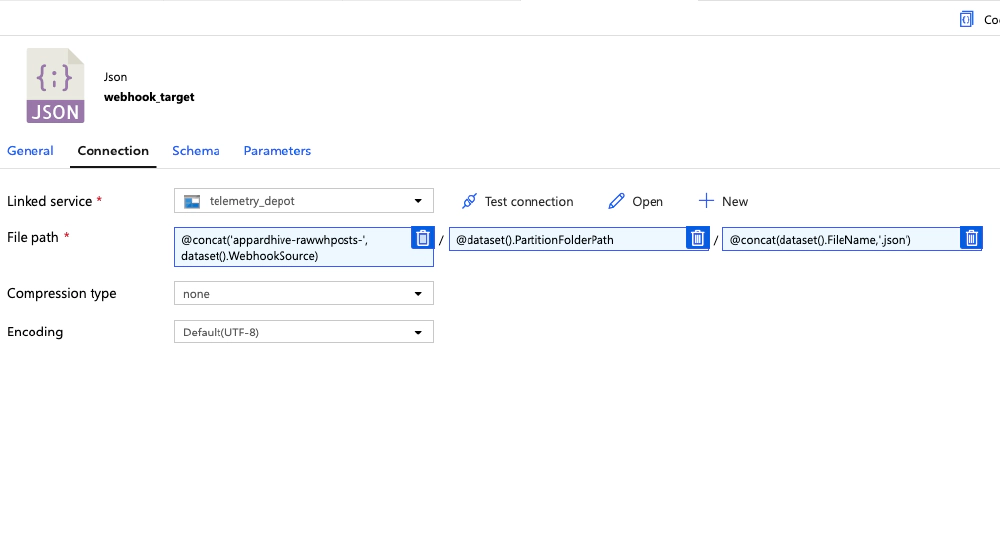
Copying files with the CopyData activity
This dataset has three parameters:
- WebhookSource: used to determine the name of the new container
- PartitionFolderPath: used to determine the folder path (eg:
YYYY-MM-DD/HH) in the container - FileName: the name of the file to create
I used these values on the Connection tab of the dataset to set the values. With the dataset configured, go back to the Copy data activity and set the input parameters.
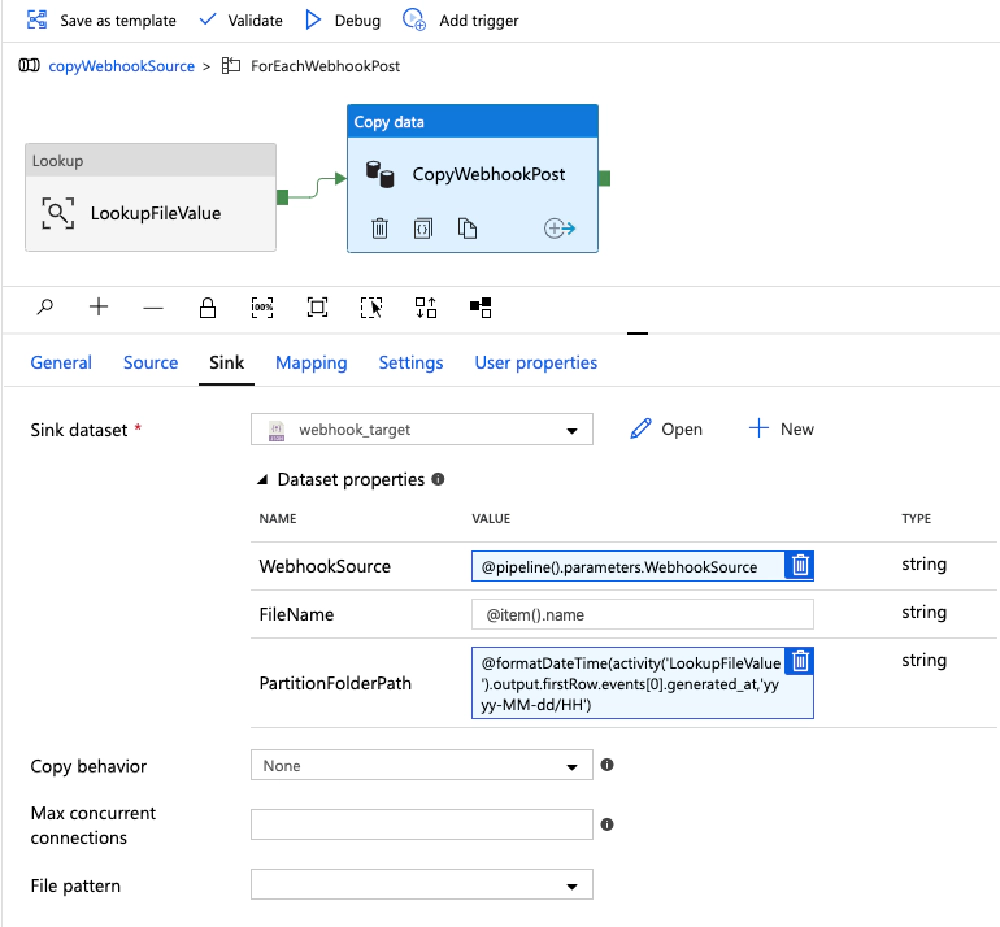
Specifying the target location, 'Sink', for the CopyData activity
Notice the expression I used for the PartitionFolderPath input parameter. This was somewhat complicated as I found functions available within expressions in the documentation aren’t universal: you can use some in a pipeline while others can be used only in data flows. Uh… ooookkkaaaaayyyy… that’s not intuitive…
That’s it! The last thing to do was to create the outer pipeline that executed this pipeline for each file prefix.
Creating the outer loop “runAllFilePrefixes” pipeline
Create a new pipeline runAllFilePrefixes and give it two parameters. I set the FilePrefixes parameter to a simple JSON array.
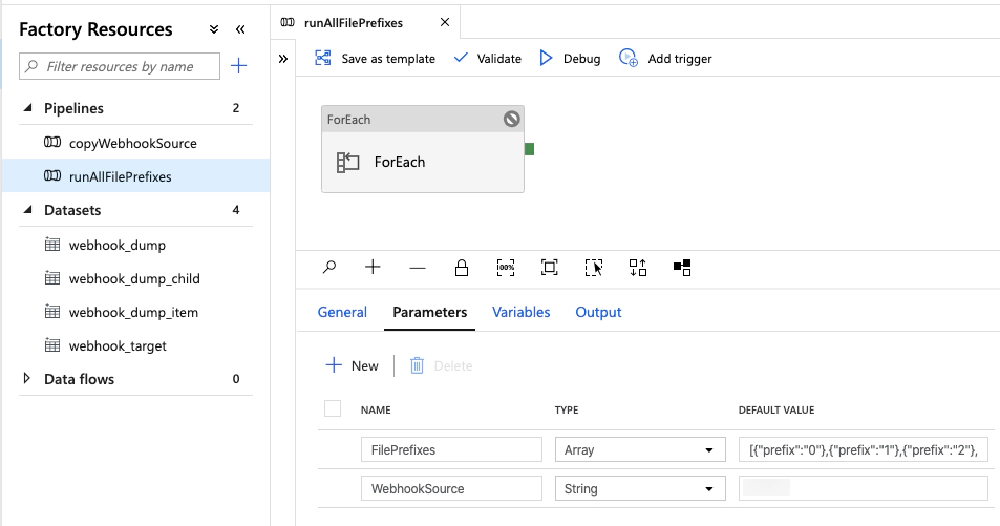
Overview of the 'runAllFilePrefixes' pipeline
Add a single ForEach activity to the pipeline and set the Items property to the array of prefixes defined in the pipeline’s input parameter FilePrefixes:
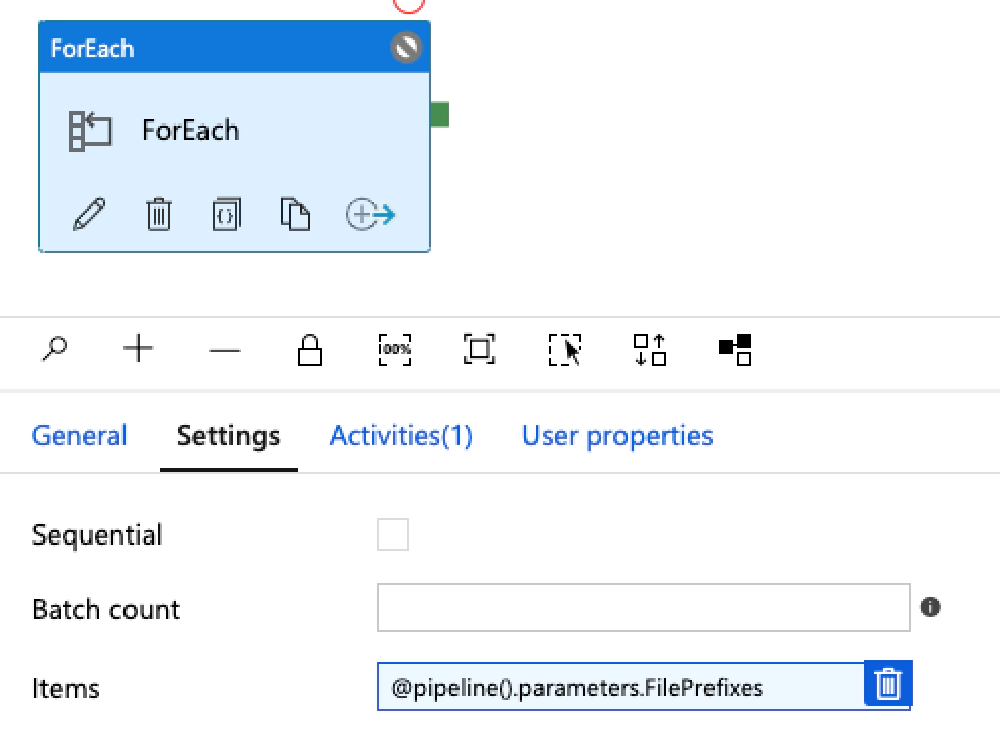
Looping over all prefixes with the ForEach activity
Within the ForEach, add a single activity: Execute Pipeline.
Enter the name of the pipeline previously created above & set the two input parameters of the pipeline to set the FilePrefix to the current item in the array & the WebhookSource we’re enumerating over.
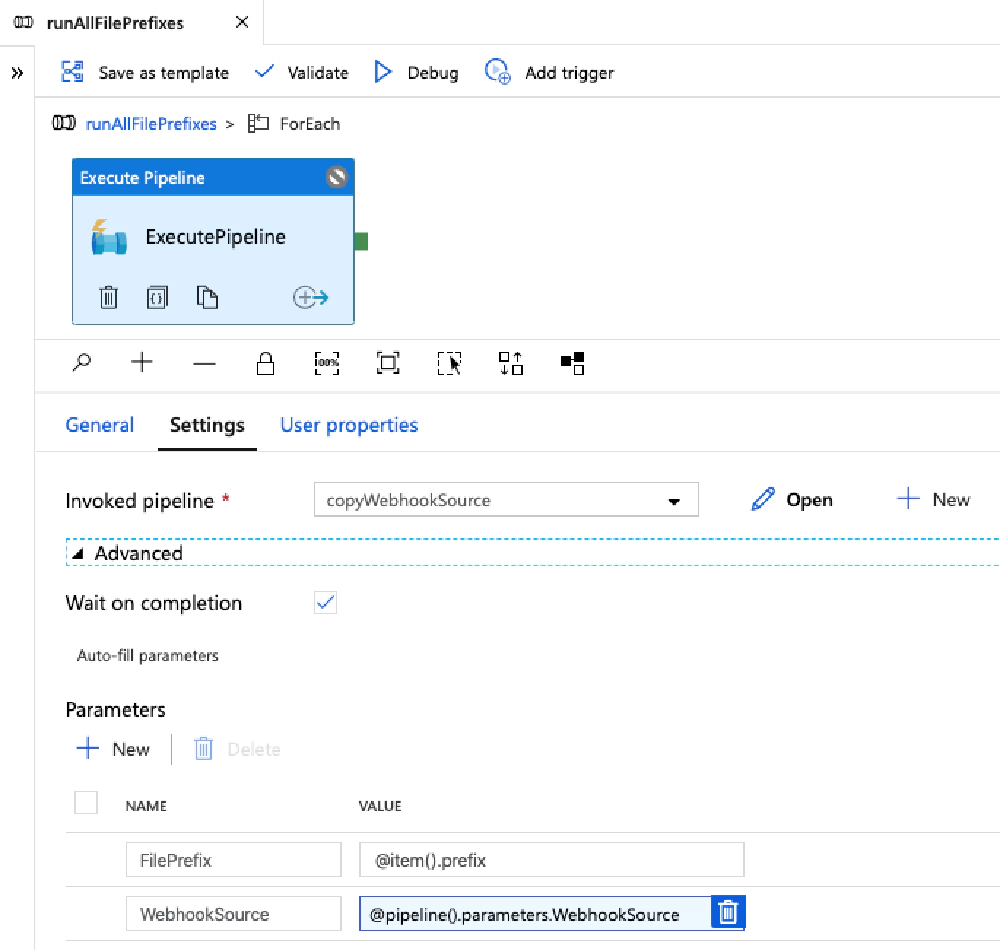
ExecutePipeline activity
Conclusion
Before diving into ADF and firing off your pipelines, if you have lots of data like I did, make sure you run a debug test to not only ensure everything works, but to get an idea on how much it is going to cost. Cost is beyond the scope of what I want to dive into within this post, but suffice to say I was a bit surprised at how expensive this was.
I spent considerably more than I anticipated I would, but I’d do it again when I factor in how much time it would have token for me to write something to do this same work, handle timeouts, and babysit the process. I saved a lot of my time and complexity by using ADF. When there were failures, the monitoring capability made it very easy to find those exception files and manually move them. Out of the millions of files I moved over the course of ~36 hours, there were only 11 failures I had to manually address.

Microsoft MVP, Full-Stack Developer & Chief Course Artisan - Voitanos LLC.
Andrew Connell is a full stack developer who focuses on Microsoft Azure & Microsoft 365. He’s a 21-year recipient of Microsoft’s MVP award and has helped thousands of developers through the various courses he’s authored & taught. Whether it’s an introduction to the entire ecosystem, or a deep dive into a specific software, his resources, tools, and support help web developers become experts in the Microsoft 365 ecosystem, so they can become irreplaceable in their organization.
