Forward
A very common question that pops up in the SharePoint newsgroups, list servers, and blogs surrounds the issue that the SharePoint Links Web Part doesn’t provide the option to open new links in new windows.
Many people have come up with their own work-around solutions. Todd Bleeker had a good solution that involves using the Content Editor Web Part (CEWP) in his Dashboard Web Part series, but you have to add the CEWP to every single page.1
Wouldn’t it be nice if it was part of the solution OOTB on every new site you created? Of course! How would you do this? One way is to modify the Links list template in the site definitions.
In this article, I’ll show you how you can make a few modifications to add a new field to each link that allows contributors to specify if links should open in a new window or not.
All files created/modified of any importance are available for download at the end of this article.
Tangent: List Templates and Site Definitions
For a super fast overview, when a new SharePoint site is created, one of the first steps you take is to select a template to build out the site. These templates are defined in the file system: C:\Program Files\Common Files\Microsoft Shared\web server extensions\60\TEMPLATE\1033. After selecting a template, SharePoint uses the ONET.XML & SCHEMA.XML file to build out the default lists and adds the default Web Parts to the homepage. The ONET.XML file also contains information about what types of lists can be created once the site has been created. It is within these site definitions and templates where you can create your own OOTB lists for sites and really make some powerful solutions.
Overview
So how are we going to implement this OpenInNewWindow feature? We’re going to do it the Microsoft recommended way:
- Part 1: Copy an existing site definition
- Part 2: Modify the SCHEMA.XML file in our new site definition using CAML
Let’s get started! All my site definitions that I modify from the originals have my in the prefix which is the convention I’ll use in this article.
Part 1: Copy an Existing Site definition
This section is a very fast tutorial on how to create a new site definition from an existing site definition. For more information and a much more detailed walk-through step-by-step with screenshots along the way, check out Heather’s Add a Custom List to SharePoint - a foray into CAML article in the footnotes.
Let’s take the most straightforward and common site definition: Team Site. Create a copy of the the Team Site site definition (C:\Program Files\Common Files\Microsoft Shared\web server extensions\60\TEMPLATE\1033\STS) and name the new folder MYSTS.
Give New Site Definition A Unique Name
Now, we need to alter the ONET.XML file for our new MYSTS site definition so that it has a unique name in the Template Picking screen - how else do you plan to distinguish it from the existing Team Site? Open the ONET.XML file for MYSTS (C:\Program Files\Common Files\Microsoft Shared\web server extensions\60\TEMPLATE\1033\MYSTS\XML\ONET.XML), find the <Project> element (should be line #4), and change it’s Title attribute from “Team Web Site” to “myTeam Web Site”, as shown in Figure 1:

Figure 1: ONET.XML
Complete file linked in the Downloads section at end of the article
Register the New Site Definition
Now we need to tell SharePoint there’s a new site definition available to users when they create a site. This info is found in WEBTEMP.XML* files, located here: C:\Program Files\Common Files\Microsoft Shared\web server extensions\60\TEMPLATE\1033\XML. SharePoint looks at all the WEBTEMP.XML* files in the afore mentioned directory for the list of available site definitions. To tell SharePoint about our new site definition, let’s copy the one used for the “Team Web Site” (STS) site definition and modify it for our purposes. Create a copy WEBTEMP.XML and name it WEBTEMPMYSTS.XML.
Open our new WEBTEMPMYSTS.XML. You’ll see two <Template> elements as well as a handful of <Configuration> elements. Since we’re only going to use this new file to define only our new site definition, we can get rid of a lot the XML in this file to define one template with one configuration as follows (again, for more information on the structure of this file, refer to Heather’s article as mentioned above):

Figure 2: WEBTEMPMYSTS.XML
Complete file linked in the Downloads section at end of the article
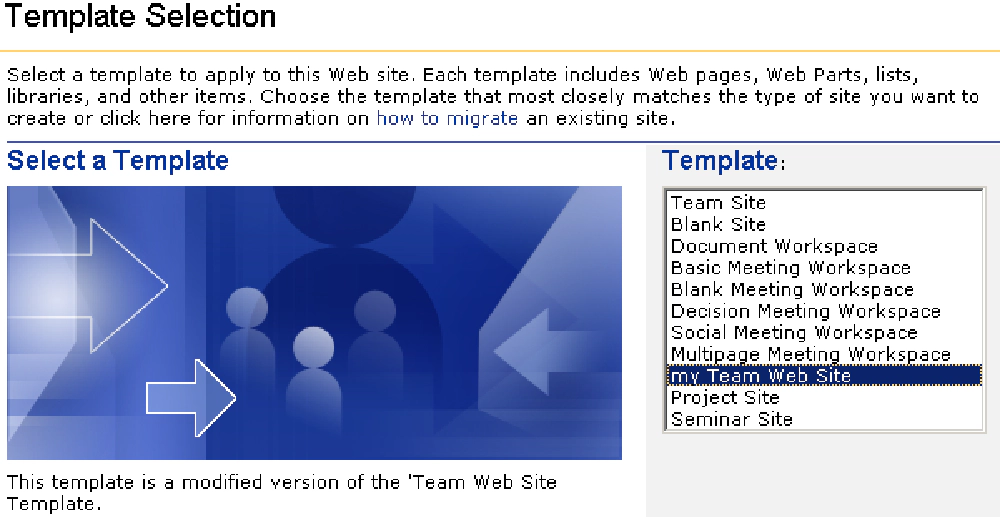
That’s it, we now have our new site definition created and told SharePoint to offer it in the available site definitions to pick from when creating new WSS sites. For this to take effect, run IISRESET.EXE from a command line and provision/extend a new WSS site (that’s the fun part… you have to reset IIS every time you make changes to a site definition or the WEBTEMP.XML* files). When you reach the Template Selection page, you should see our site definition listed in the available options as the following image does (notice the selected template):

Figure 3: WSS Template Selection Page
Part 2: Modify the SCHEMA.XML File in Our New Site definition Using CAML
At this point we have our own site definition which we can customize to our heart’s content. We’re just interested in a specific list template our new site definition: the one containing the Links list. The Links list template is found in the following folder: C:\Program Files\Common Files\Microsoft Shared\web server extensions\60\TEMPLATE\1033\MYSTS\LISTS\FAVORITE.
The FAVORITE folder contains 5 files. The ASPX files are all used for the various pages used in this template. We’ll ignore these for now as they are outside the scope of this article. What we’re really interested in is the SCHEMA.XML file. This is where the real work begins.
Add New Field “Open In New Window”
The first thing we need is a new boolean field that we’ll use to hole the flag if the link should be opened in a new window. We do this by adding a new <Field> element in the <Fields> section of the SCHEMA.XML file. Look for the line that defines the URL field (on or about line #11) that looks like this (take note the type is URL… we’ll revisit this in a second):
<Field Type="URL"
       Name="URL"
       DisplayName="URL"
       Required="TRUE"
       FromBaseType="TRUE"></Field>
Let’s add a new field just after this line:
<Field Type="Boolean"
       Name="OpenInNewWindow"
       DisplayName="Open in New Window"
       Required="TRUE"></Field>
The attributes say that this field is of type boolean (the user will be presented with a checkbox), the unique ID of the Field (Name), the friendly display name, and if the field is required on this list. If a field is required, the field can’t be removed from the list.
View the New Item Form With The New Field
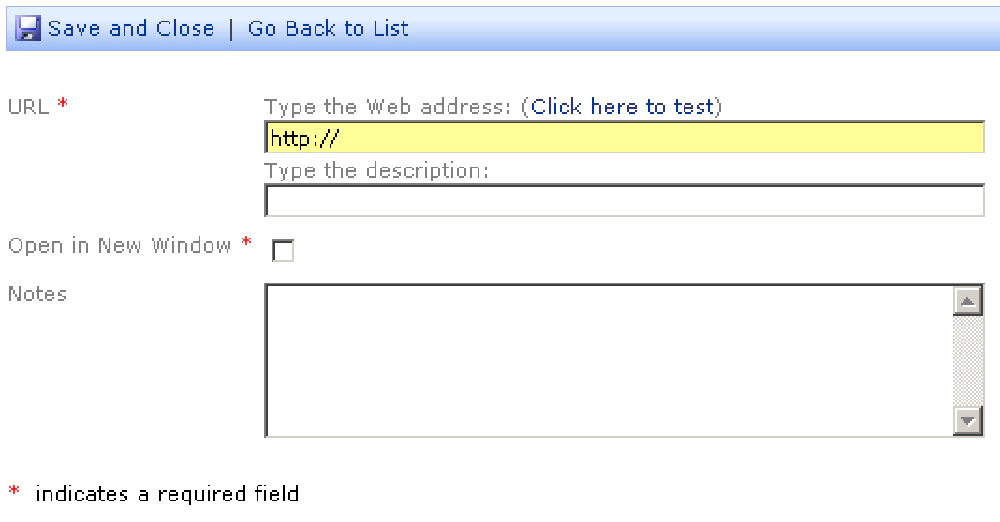
Save your changes, reset IIS, and open the WSS site you created using our site definition. Go into the Links list and click New Item. The form should look like this:

Figure 4: New Item form with New 'Open In New Window' Field
Go ahead and add two new records, one opening in a new window, one opening in the same window.
Add New Field to Existing Views (optional)
Now we need to add this field to existing views. Personally I wouldn’t add this field to any of the views, but if you wanted to, it’s very simple. Find the “All Links” view by searching for the opening <View> element that defines that view. For example, search for “All Links”, this should take you down to line #156:
<View BaseViewID="1"
      Type="HTML"
      OrderedView="TRUE"
      WebPartZoneID="Main"
      DisplayName="All Links"
      DefaultView="TRUE"
      Url="AllItems.aspx">
Within this view, there’s a element called <ViewFields> (around line #702). It currently contains three fields. To add your new field, you’d just add a new <FieldRef> tag and assign the Name attribute the name of your new field. Again, I’m not going to do this here.
Anytime you make changes to this file you’ll need to reset IIS to see your changes take effect.
The Problem with the URL Field Rendering
As you saw above, the URL field is of type URL. When a field of type URL is displayed, SharePoint checks to see if a description was entered for the link. If it was, it renders the URL field as <a href="URL">description</a>… otherwise it renders it as <a href="URL">URL</a>. While this is all fine and good, this poses a problem for our new field. We won’t be able to use the URL property because to open in a new window, we’d need to add in a target="_blank" to open the link in a new window. Because the whole anchor tag is rendered by the URL type, we’ll need to roll our own implementation via a computed field (this is how those fields that provide the roll-over drop-down edit menus in certain lists).
Add A New Computed Field
To add a new field, jump back to the top of the file, where we added the OpenInNewWindow field. Add a new <Field> element after the existing “Note” field (the Note field should be on or about line #13):
<Field Type="Computed"
       Name="URLNewWinLink"
       DisplayName="URL"
       ReadOnly="TRUE"
       Filterable="FALSE"
       DisplayNameSrcField="URL"
       AuthoringInfo="(with new window feature)"></Field>
Attributes to take note of:
| Attribute | Description |
|---|---|
| Type | Computed implies that this field is calculated from existing fields. |
| ReadOnly | This marks the field as not editable by a contributor. |
| AuthoringInfo | Friendly name when a list of fields is displayed (like in the order of the fields presented when editing a view). |
Next you need to specify what fields you’re going to use within this computed value. To do this add a <FieldRefs> element with the necessary <FieldRef> elements for each field inside the:
<FieldRefs>
  <FieldRef Name="URL" />
  <FieldRef Name="OpenInNewWindow" />
</FieldRefs>
Adding the Rendering Instructions
Now for the big piece: the rendering instructions. Add a <DesignPatters> element just after the <FieldRefs> element. I’ll step through this in chuncks as it’s complicated for those not familiar with CAML. What you’re doing is using CAML tags to specify the resulting output.
The first part of the output will be <a href="URL". This is accomplished by this code:
<HTML><![CDATA[<A HREF="]]></HTML>
  <Column Name="URL" HTMLEncode="TRUE">
<HTML><![CDATA["]]></HTML>
Next we need to determine if the link should be opened in a new window or not. If it is, we need to add target="_blank" to the anchor tag. Here’s how you do a conditional with CAML (should be fairly straightforward):
<Switch>
  <Expr><Column Name="OpenInNewWindow"/></Expr>
  <Case Value="1">
    <HTML><![CDATA[ target="_blank"]]></HTML>
  </Case>
</Switch>
Now, close the opening anchor tag:
<HTML><![CDATA[<]]></HTML>
To add the text for the link, we need to check one of two properties: <Column> and <Column2>. The WSS SDK explains the two better than I could:
The Column element is used to return the raw data value for a particular field (as opposed to the formatted version provided by the Field element).
The Column2 element is used in rendering a hyperlink. In Microsoft Windows SharePoint Services, hyperlinks are stored as two separate values. The actual URL value is stored in one part, and the descriptive text is stored in another. In a Link field, <Column> returns the value of the URL, and <Column2/> returns the descriptive text of the hyperlink.
Reference: Microsoft WSS SDK
So… we need to check and see if the <Column2> element has anything in it. If so, we want to use that to show the link to the user. Otherwise, we’ll just use the URL itself:
<Switch>
  <Expr><Column2 Name="URL"></Expr>
  <Case Value=""><Column Name="URL" HTMLEncode="TRUE"/></Case>
  <Default><Column2 Name="URL" HTMLEncode="TRUE"/></Default>
</Switch>
All that’s left is t he closing anchor tag:
<HTML><![CDATA[</A>]]></HTML>
That completes our computed field… it should now look like this:
<Field Type="Computed" Name="URLNewWinLink" DisplayName="URL"
       ReadOnly="TRUE" Filterable="FALSE"
       DisplayNameSrcField="URL"
       AuthoringInfo="(with new window feature)">
  <FieldRefs>
    <FieldRef Name="URL" />
    <FieldRef Name="OpenInNewWindow" />
  </FieldRefs>
  <DisplayPattern>
    <HTML><![CDATA[<A HREF="]]></HTML>
    <Column Name="URL" HTMLEncode="TRUE" />
    <HTML><![CDATA["]]></HTML>
    <Switch>
      <Expr><Column Name="OpenInNewWindow" /></Expr>
      <Case Value="1">
        <HTML><![CDATA[ target="_blank"]]></HTML>
      </Case>
    </Switch>
    <HTML><![CDATA[>]]></HTML>
    <Switch>
      <Expr><Column2 Name="URL" /></Expr>
      <Case Value="">
        <Column Name="URL" HTMLEncode="TRUE" />
      </Case>
      <Default>
        <Column2 Name="URL" HTMLEncode="TRUE" />
      </Default>
    </Switch>
    <HTML><![CDATA[</A>]]></HTML>
  </DisplayPattern>
</Field>
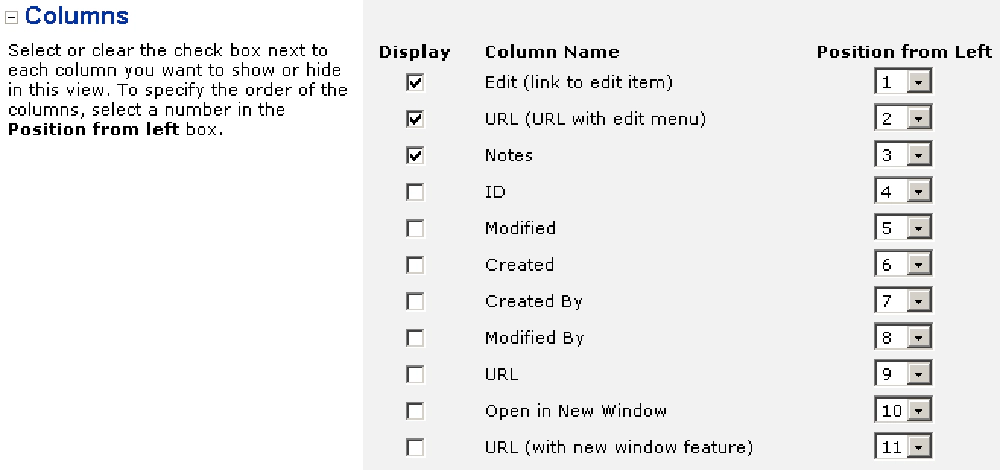
This computed field can now be used in existing or new views as you can see it’s now one of those special options in the field chooser within a view settings page (it’s the last one listed in the view below: All Links):

Figure 5: Computed Field in View Settings Page
Modify Existing Views to Use The New Computed Column
Now that we have this computed column, we need to make sure the existing views use it when displaying the links. Right now we’re concerned about two different views: the All Links view and the Summary view when the Web Part is placed in a Web Part Zone on a Web Part Page. Let’s first concentrate on the Summary view as the All Links view is a different animal. Look for the Summary view by searching for this <View> element (should be on or about line #86): <View BaseViewID="0" Type="HTML" OrderedView="TRUE">
At the end of the <View> element, you’ll see a <ViewFields> element (on or about line #177). You will also notice that it contains a single <FieldRef> element referring to the URL. Change this to our new computed field: URLNewWinLink. It should look like this:
<View>
  <!-- .. -->
  <Query>
    <OrderBy>
      <FieldRef Name="Order" Ascending="TRUE"></FieldRef>
    </OrderBy>
  </Query>
  <ViewFields>
    <FieldRef Name="URLNewWinLink"></FieldRef>
  </ViewFields>
  <RowLimit>20</RowLimit>
</View>
Now, save your changes, reset IIS, and refresh the homepage of the WSS site you created. Click on the link list item you added that should open in a new window and watch it work! Do the same for the one that should load in the same window. Cool huh?
One Last Finishing Touch
There’s one last finishing touch that I think should be implemented. The All Links summary view displays a special computed column that displays the drop-down edit menu when the mouse hovers over it. Right now, all links open in the same window. This computed field should be modified to open in a new window if so specified. Fortunately, we’ve already done the hard part!
Jump back to the top of the SCHEMA.XML file and find the URLwMenu <Field> element (on or about line #40). Add the OpenInNewWindow <FieldRef> element to the <FieldRefs> element just like we did for the URLNewWinLink computed field. If you don’t do this, we won’t be able to access it within the <DesignPattern> element. Scroll down to the <Switch> element where it’s starting to build the anchor tag for the link (on or about line #70). The code currently looks like this:
<Default>
  <HTML><![CDATA[<A onfocus="OnLink(this)" HREF="]]></HTML>
  <Column Name="URL" HTMLEncode="TRUE"/>
  <HTML><![CDATA[">]]></HTML>
  <Switch>
    <Expr><Column2 Name="URL"/></Expr>
    <Case Value=""><Column Name="URL" HTMLEncode="TRUE"/></Case>
    <Default><Column2 Name="URL" HTMLEncode="TRUE"/></Default>
  </Switch>
  <HTML><![CDATA[</A>]]></HTML>
</Default>
We need to modify it to look like the following (the highlighted portion shows the new code… take note some code was removed as it was prematurely closing the opening anchor tag:
<Default>
  <HTML><![CDATA[<A onfocus="OnLink(this)" HREF="]]></HTML>
  <Column Name="URL" HTMLEncode="TRUE"/>
  <HTML><![CDATA["]]></HTML>
  <Switch>
    <Expr><Column Name="OpenInNewWindow"/></Expr>
    <Case Value="1">
    <HTML><![CDATA[ target="_blank"]]></HTML>
    </Case>
  </Switch>
  <HTML><![CDATA[>]]></HTML>
  <Switch>
    <Expr><Column2 Name="URL"/></Expr>
    <Case Value=""><Column Name="URL" HTMLEncode="TRUE"/></Case>
    <Default><Column2 Name="URL" HTMLEncode="TRUE"/></Default>
  </Switch>
  <HTML><![CDATA[</A>]]></HTML>
</Default>
Save, reset IIS, and refresh your WSS site. Everything works!
Closing Thoughts - Some Things To Consider
The first thing a customer is going to say/ask when you tell them you can do this “what about all my existing sites & lists?” I’m going to assume that most of your existing sites use the OOTB templates. Well, according to Microsoft, you shouldn’t modify the existing templates for reasons I’ve already outlined & referenced. This leaves the people who want to add this functionality to their existing sites hanging out there. With that being said…
I’m of the mindset that you shouldn’t modify existing public interfaces (in this case, the templates provided by Microsoft OOTB). However, if you add to the public interface, the existing code should still work. It may break when the vendor updates the original stuff, so you are going it on your own if you do it.
I have implemented this on a few of my existing sites and it worked just fine. However, I did notice that some lists blew up as their Links lists had been customized from their original state. More research is definitely in order (I’ll post the results here), so if you implement on existing sites (using either the Microsoft provided templates or your own templates), I’d highly recommend extensive testing.
Footnotes
As it’s been discussed many many times, Microsoft recommends you not modify existing site definitions and rather, copy existing ones and make your modifications to the copy. See Mike Fitzmaurice’s Supportable Customizations: Don’t Panic post for why you should work with copies and not the originals. Also refer to the MSDN article Best Practices for Ensuring Application Reusability and Upgrade in Windows SharePoint Services ↩︎
Download Article Resources
Want the resources for this article? Enter your email and we'll send you the download link.
Microsoft MVP, Full-Stack Developer & Chief Course Artisan - Voitanos LLC.
Andrew Connell is a full stack developer who focuses on Microsoft Azure & Microsoft 365. He’s a 22-year recipient of Microsoft’s MVP award and has helped thousands of developers through the various courses he’s authored & taught. Whether it’s an introduction to the entire ecosystem, or a deep dive into a specific software, his resources, tools, and support help web developers become experts in the Microsoft 365 ecosystem, so they can become irreplaceable in their organization.


